Microsoft Office
Overview
The following is a high-level overview of the required steps for deploying the components of the Teams Adapter. For detailed deployment instructions, see the Deployment Guide section.
- Register the Service App and Web Service components as Azure OAuth apps with access to the Microsoft Graph API (or register io.Connect Desktop as such).
In order to access the Microsoft Graph API resources and perform various operations, the components of the Teams Adapter must be registered in your Azure administration portal and given the appropriate permissions. The exact set of permissions depends on the functionality you wish to use. You have the option to register the Teams Adapter separately, or to register io.Connect Desktop and use its SSO functionality to obtain the token for using the Microsoft Graph API.
- Register the Platform App component as an Azure OAuth app with access to the Web Service component.
If you wish to use the Platform App component of the Teams Adapter to add custom actions to the Teams UI, you must register it as an app in your Azure administration portal. This will secure the communication between the Platform App and the Web Service components.
- Host the Web Service component.
The Web Service component has to be deployed in your environment in order to provide services to the Teams Adapter running on the user machines.
If you plan on using the event subscription features of the Teams Adapter or the custom UI features provided by the Platform App component, the Web Service must be deployed on a host visible from the Microsoft Graph API in order to receive event notifications.
The Web Service component is delivered as a ZIP file containing the Node.js app and its configuration, which you can deploy to your servers or cloud environment.
- Install the Service App component and io.Connect Desktop on the user machine.
The Service App is a regular io.Connect web app which can be deployed alongside any of your other io.Connect apps, so that it will be launched automatically when your user starts io.Connect Desktop.
If you want your Teams Adapter installation to be able to work with sensitive message data (i.e. the actual message text and other information), you will need to generate an encryption certificate to enable end-to-end encryption for the user. This can be automated as part of the installation.
- Install the Platform App component in the Teams Management Portal.
If you want to use the Platform App to enable users to perform UI actions from Teams, you have to register it in your company Teams admin center so that it will show up in the Teams apps available to the users.
You also have the option to rebrand and modify the UI actions that will be added in Teams.
Deployment Guide
The following is a detailed deployment guide describing the necessary steps for registering, configuring, and deploying the Teams Adapter components (Service App, Web Service, and Platform App).
⚠️ Note that the Web Service and Platform App components are optional. It's possible to use the Teams Adapter without a Web Service component, but you will lose the features that depend on receiving events from Teams, as well as the UI functionalities provided by the Platform App component.
Service App
The Service App component can be delivered as part of the io.Connect Desktop installer or as a ZIP file. It's a web app that can be hosted in your cloud environment or on the user machines.
The following steps describe the process of registering the Service App component of the Teams Adapter in Azure and configuring it.
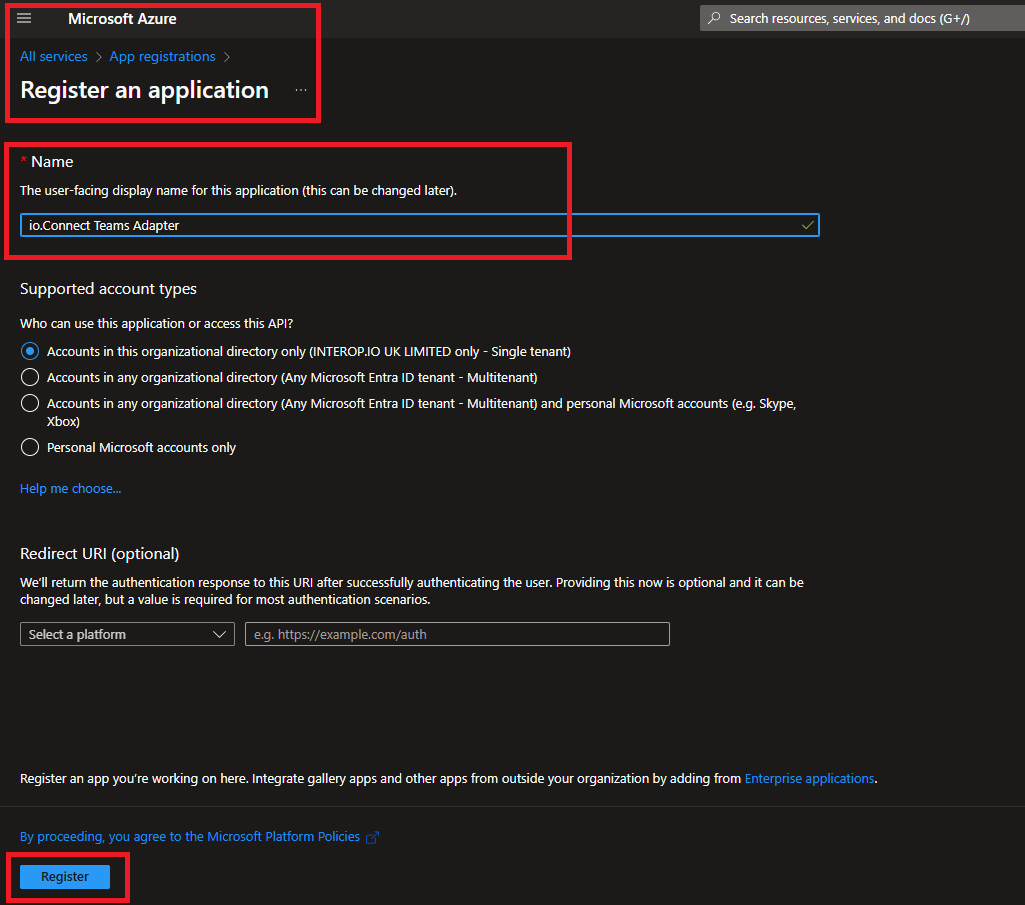
- Go to the Microsoft Azure portal and start a new app registration process. Provide a public name for the Service App component and register it:
- Copy the app (client) ID of the new registration:
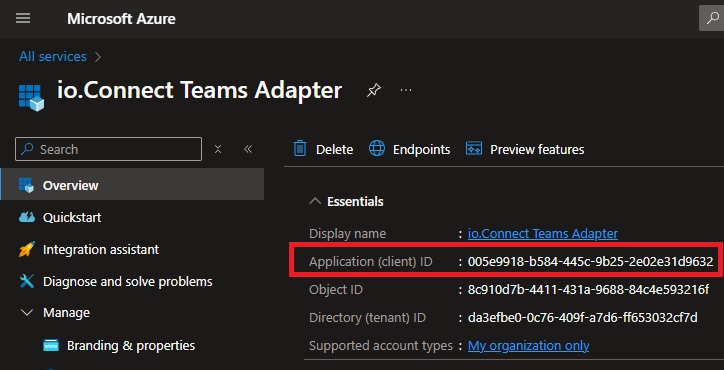
Set this as a value of the "appId" property of the "oAuth" object under the "customProperties" top-level key in the Service App app definition:
{
    "customProperties": {
        "oAuth": {
            "appId": "my-app-id"
        }
    }
}- Decide on the appropriate Microsoft Graph API permissions for the Service App component based on which functionalities of the Teams Adapter you want to use. Define the desired permissions in the
"scopes"array of the"oAuth"object under the"customProperties"top-level key in the Service App app definition:
{
    "customProperties": {
        "oAuth": {
            "scopes": [
                "Chat.Read",
                "Chat.ReadBasic",
                "Chat.ReadWrite",
                "ChatMessage.Read.All",
                "ChatMessage.Send",
                "User.Read",
                "User.ReadBasic.All"
            ]
        }
    }
}
Permissions can always be added or removed later - you only have to make sure that the users will receive the updated app definition for the Service App component.
ℹ️ For details on the required permissions for each functionality provided by the Teams Adapter, see the Functionalities section.
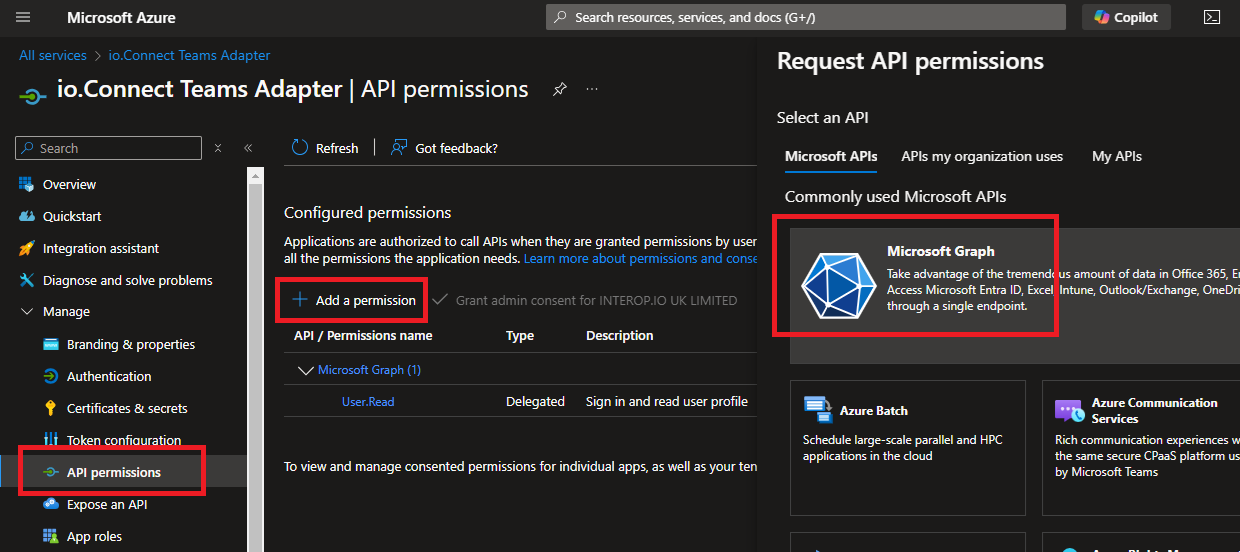
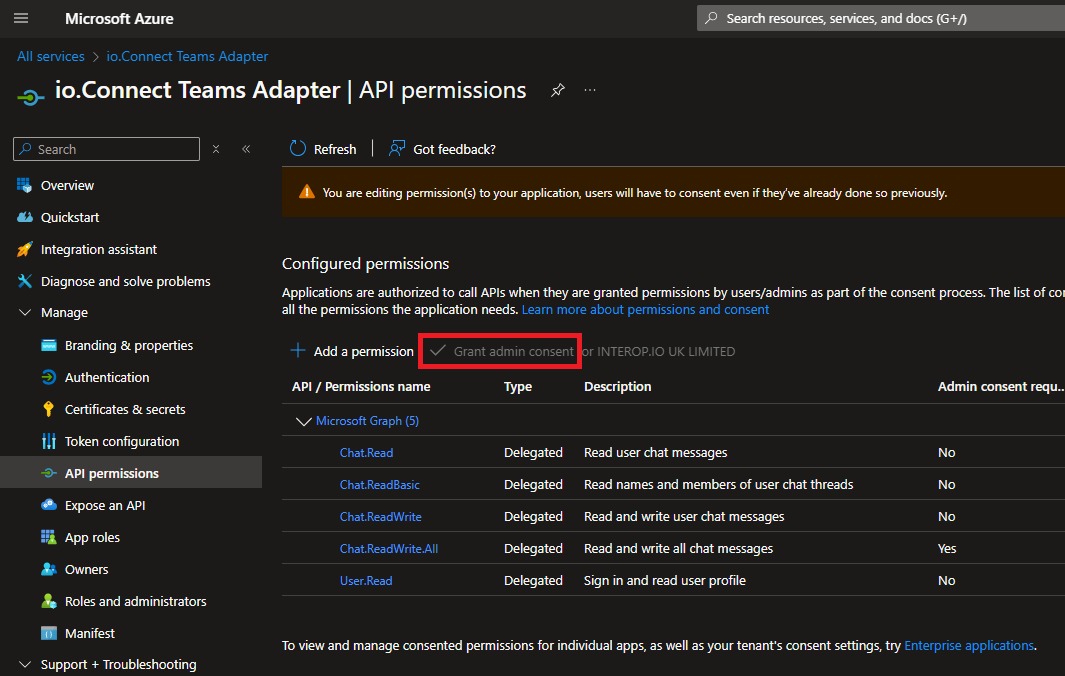
- On the app registration page for the Service App component in the Microsoft Azure portal, start the process of adding a permission and select the Microsoft Graph API:
Click on "Delegated permissions" and add the selected permissions:
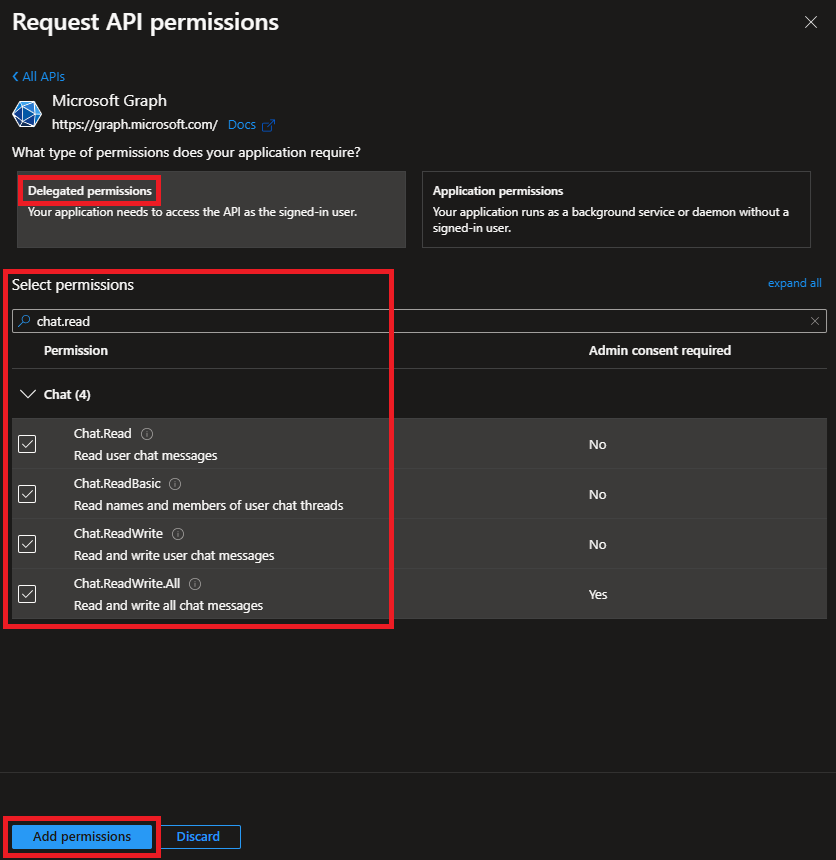
Click on "Grant admin consent" to finish the process:
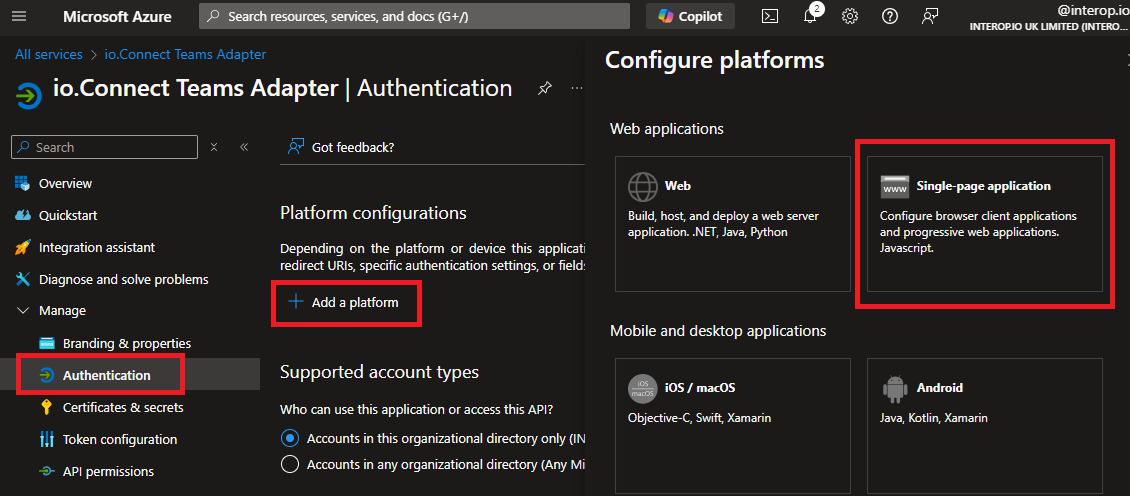
- Go to "Authentication", start the process of adding a platform, and select "Single-page application":
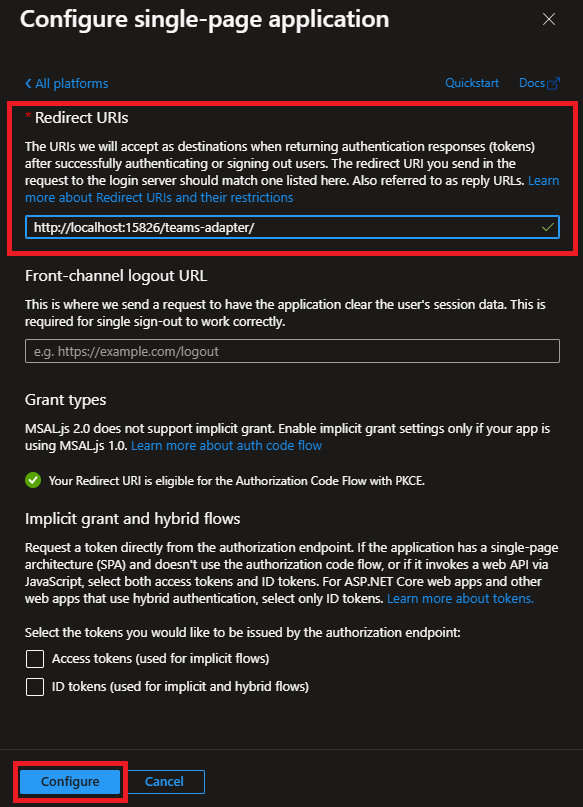
In the "Redirect URIs" field, enter the URL at which you will host the Service App component. Any number of URLs can be added, including localhost ones:
- Use the
"url"property of the"details"top-level key in the app definition of the Service App component to specify the URL at which it will be hosted:
{
    "details": {
        "url": "https://example.com/teams-adapter/"
    }
}- Depending on your authentication strategy, set the
"type"property of the"authorization"object under the"customProperties"top-level key to"sso"or"login":
{
    "customProperties": {
        "authorization": "sso"
    }
}
ℹ️ For more details on the available authentication configuration settings for the Service App, see the Configuration section.
- If you plan on using the Web Service component as well, set the
"enabled"property of the"webService"object under the"customProperties"top-level key totrue. Provide the URL at which the Web service will be hosted, as well as any other relevant configuration settings:
{
    "customProperties": {
        "webService": {
            "enabled": true,
            "url": "https://my-teams-web-service.com",
            "pollIntervalMS": 3000
        }
    }
}- If you want to use the Web Service component for retrieving rich message information (e.g., the message content), you have to create an end-to-end encryption certificate. The certificate and its private key must be created in PEM format.
⚠️ Note that generating, securing, and distributing certificates is outside the scope of this guide. This should be handled by your existing organization processes and infrastructure.
To instruct the Service App component to retrieve rich message information, set to true the "requestContents" property of the "messages" object under the "customProperties" top-level key in the Service App app definition. The certificate serial number, data (without the "BEGIN" and "END" lines), and private key of the generated certificate must be provided in the "encryptionCertificates" array:
{
    "customProperties": {
        "messages": {
            "requestContents": true,
            "encryptionCertificates": [
                {
                    "encryptionCertificateId": "certificate-id",
                    "data": "certificate-data",
                    "privateKey": "private-key-data"
                }
            ]
        }
    }
}
ℹ️ For more details on the available encryption certificate configuration settings, see the Configuration section.
Web Service
The Web Service component is a Node.js app that is delivered as a ZIP file. It has to be deployed in your environment in order to provide services to the Teams Adapter running on the user machines.
If you plan on using the event subscription features of the Teams Adapter or the custom UI actions provided by the Platform App component, the Web Service must be deployed on a host visible from the Microsoft Graph API in order to receive event notifications.
⚠️ Note that the Web Service component is optional. It's possible to use the Teams Adapter without a Web Service component, but you will lose the features that depend on receiving events from Teams, as well as the UI actions provided by the Platform App component.
The following steps describe the process of registering the Web Service component of the Teams Adapter in Azure and configuring it.
- Similarly to deploying the Service App, go to the Microsoft Azure portal and register the Web Service component:
- Copy the app (client) ID and the directory (tenant) ID of the new registration:
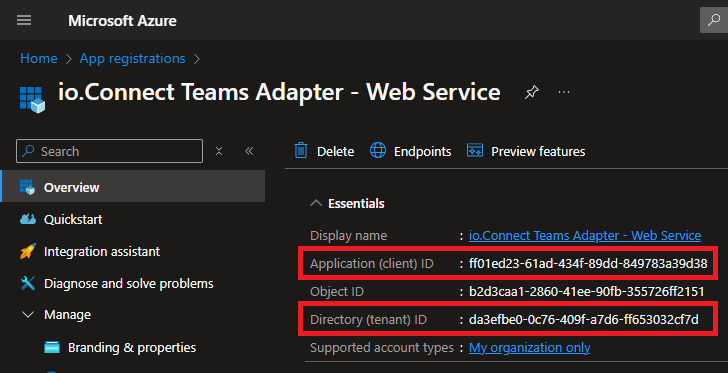
Set these as a values of the "appId" and "tenantIdAllowList" properties in the Web Service app definition:
{
    "appId": "my-app-id",
    "tenantIdAllowList": ["my-tenant-id"]
}- It's recommended to set a regular expression filter for your organization user IDs by using the
"userAllowList"property:
{
    "userAllowList": "^.*@interop[.]io$"
}- Optionally, if the Teams Adapter will use the
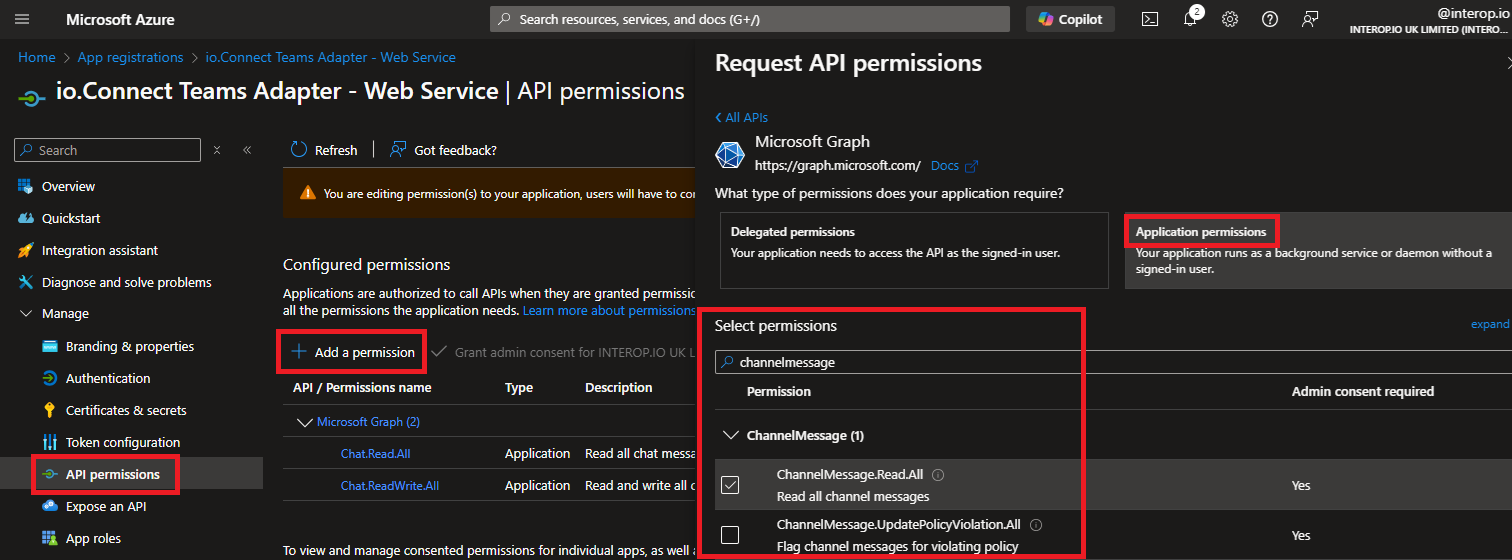
"io.Teams.SearchChannelMessages"andio.Teams.SearchChatMessagesfunctionalities, you must add the following Microsoft Graph API permissions:
"ChannelMessage.Read.All""Chat.Read.All""Chat.ReadWrite.All"
Similarly to adding permissions for the Service App, on the app registration page for the Web Service component in the Microsoft Azure portal, start the process of adding a permission. Select the Microsoft Graph API, click on "Application permissions" and add the required permissions:
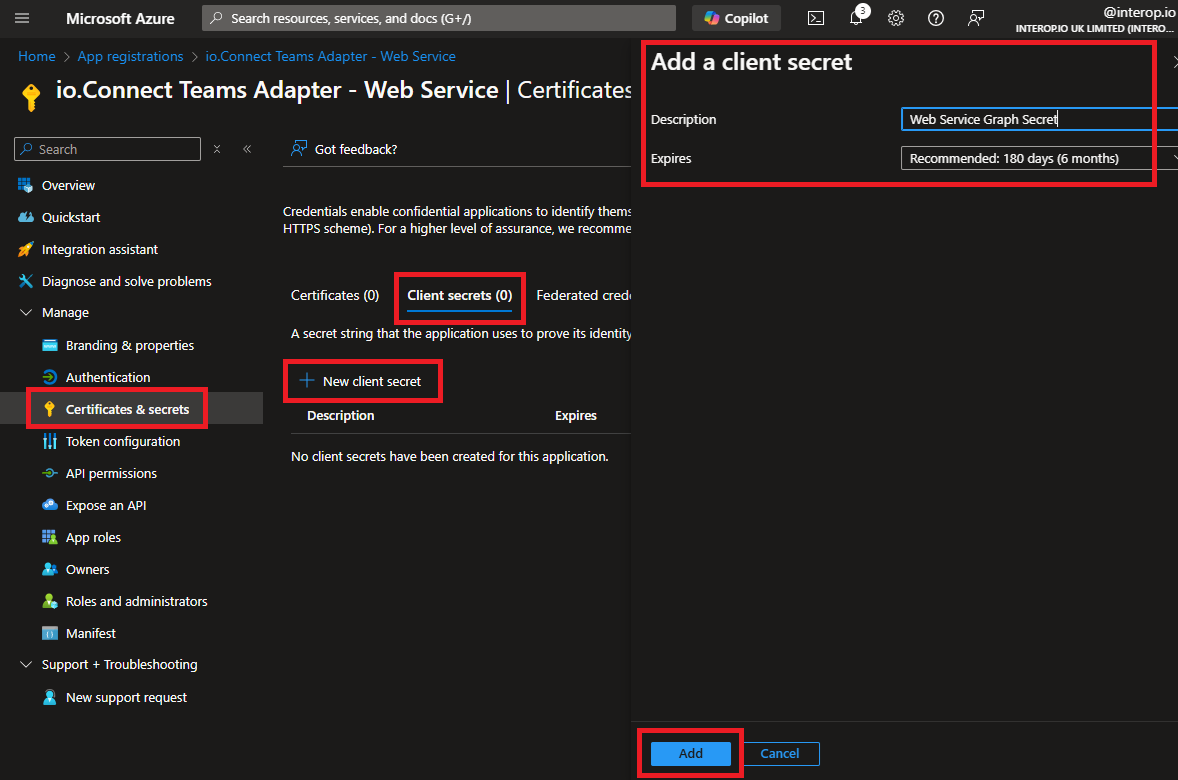
- Create a client secret in the app registration page for the Web Service component and copy its value:
- Deploy the Web Service component as a Node.js app in your cloud environment. Set the
GRAPH_SECRETenvironment variable to the value of the copied Web Service client secret.
⚠️ Note that when the client secret created in Azure expires, you will have to create a new one and redeploy the Web Service component.
- If you plan on using the
"io.Teams.SearchChannelMessages"andio.Teams.SearchChatMessagesfunctionalities which use metered APIs and subscriptions internally, enable billing on the subscription that is running the Web Service.
ℹ️ For details on billing for metered APIs and subscriptions, see the official Microsoft Graph API documentation.
- If you want to load balance the Web Service, keep in mind that requests related to a particular user will always have the same value for the
userIdquery parameter. This means that you will have to always route requests to the same instance of the Web Service based on this value.
Platform App
The Platform App component is a Teams app written with the Microsoft Teams Toolkit and delivered as a ZIP file.
⚠️ Note that the Platform App component is optional. The Platform App and the UI actions it provides can't be used without the Web Service component.
The following steps describe the process of deploying the Platform App component of the Teams Adapter and configuring it.
- Install the Teams Toolkit CLI:
npm install -g @microsoft/teamsapp-cliExtract the ZIP file containing the Platform App component, copy the
.env.blankfile to the/envdirectory and rename it with the name of your environment (e.g.,.env.test). This file will provide environment settings for your Platform App deployment. The following examples assume that the file is named.env.test.Edit the
.env.testfile and provide values for all of the following environment variables:
| Environment Variable | Description |
|---|---|
AAD_APP_OAUTH_AUTHORITY |
Authority URL ending with your Azure Active Directory tenant ID (e.g., https://login.microsoftonline.com/my-aad-tenant-id). |
AAD_APP_TENANT_ID |
Your Azure Active Directory tenant ID. |
TEAMS_APP_ENV |
Environment value for the Platform App (e.g., test). |
TEAMS_APP_CONTEXT_ACTION_SUFFIX |
Suffix for the names of the custom actions displayed in the Teams UI by the Platform App (e.g., (TEST)). |
TEAMS_APP_LONG_NAME |
Long name for the Platform App (e.g., io.Connect Teams Adapter (TEST)). |
TEAMS_APP_PACKAGE_NAME |
Name for the Platform App package (e.g., io.connect.teams.adapter.test). |
TEAMS_APP_SHORT_NAME |
Short name for the Platform App (e.g., io.Connect (TEST)). |
TEAMS_APP_TENANT_ID |
Your Azure Active Directory tenant ID. |
TEAMSFX_ENV |
Set this to the same value as the TEAMS_APP_ENV environment variable. |
WEBSERVICE_URL |
URL pointing to the location of the Web Service component. |
WEBSERVICE_SCOPE |
API scope for the Web Service component in the format api://<my-web-service-app-id>/.default where <my-web-service-app-id> must be replaced with the app (client) ID of the Web Service component. |
Example configuration:
AAD_APP_OAUTH_AUTHORITY=https://login.microsoftonline.com/my-aad-tenant-id
AAD_APP_TENANT_ID=my-tenant-id
TEAMS_APP_ENV=test
TEAMS_APP_CONTEXT_ACTION_SUFFIX=(TEST)
TEAMS_APP_LONG_NAME=io.Connect Teams Adapter (TEST)
TEAMS_APP_PACKAGE_NAME=io.interop.teams.adapter.test
TEAMS_APP_SHORT_NAME=io.Connect (TEST)
TEAMS_APP_TENANT_ID=my-tenant-id
TEAMSFX_ENV=test
WEBSERVICE_URL=https://my-web-service.com/
WEBSERVICE_SCOPE=api://my-web-service-app-id/.default
If you want to rebrand or customize the UI actions displayed by the Platform App, use the resources and the
manifest.jsonconfiguration file in the/appPackagedirectory.Open a command prompt in the root directory and use the Teams Toolkit CLI to push the Platform App to your environment:
teamsapp provision --env test & yes | teamsapp deploy --env test⚠️ Note that the Teams Toolkit CLI will populate your environment file with additional information, so you may want to save it before pushing the Platform App to your environment.
Go to the Teams Development portal and publish the Platform App to your organization.
Go to the Teams Administration portal and deploy the Platform App to your users. Use the "Setup policies" page of the Teams Administration portal to create or edit a policy that will install the Platform App for some or all of your users.
