
Salesforce
Overview
⚠️ Note that the following sections are relevant only for the latest versions of the Salesforce Adapter (6.0 and later).
ℹ️ For details on migrating from 5.0 to 6.0, see the Implementation & Migration Guides > Migrating from 5.0 to 6.0 section.
ℹ️ For details on the legacy versions (3.0 and 4.0), see the Legacy Adapter section.
After installing the Salesforce Adapter in your organization, you can start interop-enabling your Lightning Web Components. If you intend on using Salesforce within the io.Connect platform (io.Connect Desktop or io.Connect Browser), it's recommended to use one of the platform components (prefixed with workspace) distributed with the Salesforce Adapter package, as they provide the best possible interoperability performance for this case. These components can be used both in your Lightning Out apps, or from within the Salesforce platform (with certain limitations).
It's recommended to keep your interop-enabled components in the Utility Bar of your Lightning app. A Utility Bar component is loaded once per app and stays connected to the io.Connect framework while the user navigates between records, objects, and tabs.
⚠️ Note that using Salesforce within the io.Connect platform doesn't require providing connection settings after installation. These settings are required when using Salesforce in a web browser.
⚠️ Note that using the platform components to achieve interoperability between Salesforce and io.Connect Browser projects is still an experimental feature. This means that enabling some of the io.Connect Browser functionalities may require additional development.
Requirements
To be able to use the platform components, Lightning Web Security must be enabled:
Log in to your Salesforce organization as an administrator.
Go to
Setup > Security > Session Settings.Make sure that Lightning Web Security is enabled in the "Lightning Web Security" section.
⚠️ Note that the platform components aren't available in organizations that use Lightning Locker instead of Lightning Web Security. Use the Lightning Message Service bridge instead, which supports only registering and invoking Interop methods.
⚠️ Note that you must first implement your Utility Bar component and then attach it to your Lightning app.
Limitations
Due to the security restrictions imposed by Salesforce, it's impossible to embed the Salesforce platform in an
<iframe>in io.Connect Browser. To avoid this limitation, the Salesforce app must be opened in a new browser window or tab.If using more than one instance of a platform component in the same app, all interop-enabled LWCs will have the same app name. This means that you won't be able to register more than one event listener for the same type of event. To avoid this limitation, keep your interoperability logic in a single Utility Bar component, or use the platform components in different Lightning Out apps.
Examples
Full working examples demonstrating interoperability between Salesforce and interop-enabled apps are provided via the interop.io Salesforce Adapter [demos] Salesforce package.
To retrieve the package into your project, execute the following command using the Salesforce CLI:
sf project retrieve start --package-name "interop.io Salesforce Adapter [demos]"Salesforce App Definition
The following sections describe how to create app definitions for the Salesforce platform depending on whether you are using the Salesforce Adapter with io.Connect Desktop or with io.Connect Browser.
io.Connect Desktop
To be able to open Salesforce in io.Connect Windows or Workspaces in io.Connect Desktop, you must provide a valid app definition for it. Besides the standard required definition properties ("name", "type", and "url"), it's also required to enable auto injection of the @interopio/desktop library and to configure a preload script.
Enabling auto injection is necessary because the @interopio/desktop library provides the interoperability capabilities of the platform components. The preload script is necessary because it passes the io.Connect factory function to them.
The preload script is distributed with the Salesforce Adapter package. To retrieve its URL, follow the Preload Script guide.
The following is an example configuration for defining the Salesforce platform as an io.Connect app:
{
    "name": "salesforce",
    "type": "window",
    "title": "Salesforce",
    "details": {
        // URL pointing to your Salesforce organization.
        "url": "https://your-salesforce-url.salesforce.com/",
        // This is required to enable usage of preload scripts.
        "security": {
            "webSecurity": false,
            "allowRunningInsecureContent": true,
            "allowedExternalURISchemes": ["data", "https", "http"]
        },
        // This is required to enable interoperability and library usage in production.
        "preloadScripts": {
            // URL of the preload script retrieved from your Salesforce organization.
            "scripts": ["<preload-script-url>"],
            "useBase64PreloadScripts": false
        },
        // Enable auto injection of the `@interopio/desktop` library.
        "autoInjectAPI": {
            "enabled": true,
            // If set to `false` (default), will enable you to provide initialization settings from your component.
            // If `true`, the library will be auto initialized with the default settings (e.g., you won't be able
            // to use features that are disabled by default such as the Workspaces API and the Search API).
            "autoInit": false
        }
    },
    "customProperties": {
        // Use this if you want to add Salesforce to the "Add App" menu in a Workspace.
        // This will enable users to open Salesforce in Workspaces.
        "includeInWorkspaces": true
    }
}
Preload Script
The preload script is distributed with the Salesforce Adapter package, so you must retrieve its URL from your Salesforce organization:
Open the App Launcher of your Salesforce organization.
Find and open the "io.SFA in io.CD preloadScript generator" app.
Click the "Copy URL" button.
Provide the copied URL in the
"scripts"array of the"preloadScripts"object in your app definition.If the Salesforce app has already been started in the current session of io.Connect Desktop, use the "Clear Preload Scripts Cache" option in the "Diagnostics > Cache" section of the io.Connect Desktop tray menu to clear the preload scripts cache.
Restart the Salesforce app for the changes to take effect.
ℹ️ For more details on preload scripts, see the io.Connect Desktop > Capabilities > More > Features section.
io.Connect Browser
To be able to open Salesforce in io.Connect Windows or Workspaces in io.Connect Browser, you must provide a valid app definition for it when initializing your Main app.
The following is an example configuration for defining the Salesforce platform as an io.Connect app:
import IOBrowserPlatform from "@interopio/browser-platform";

const config = {
    licenseKey: "my-license-key",
    applications: {
        local: [
            {
                name: "salesforce",
                type: "window",
                title: "Salesforce",
                details: {
                    // URL pointing to your Salesforce organization.
                    url: "https://your-salesforce-url.salesforce.com/"
                },
                customProperties: {
                    // Use this if you want to add Salesforce to the "Add App" menu in a Workspace.
                    // This will enable users to open Salesforce in Workspaces.
                    includeInWorkspaces: true
                }
            }
        ]
    }
};

const { io } = await IOBrowserPlatform(config);
⚠️ Note that the Salesforce app must be opened in a new browser window or tab, as it's impossible to embed the Salesforce platform in an
<iframe>.
Usage
The following sections describe the platform components, their APIs, and provide examples on how to implement an interop-enabled LWC.
Available Components
The Salesforce Adapter package provides three platform components:
| Component | Description |
|---|---|
workspaceBaseComponent |
Provides everything workspaceLightComponent provides, plus support for plugins and for mapping Interop methods to DOM events. Use it for components on record, app, and home pages. |
workspaceLightComponent |
The lightest component. Provides direct access to the io.Connect APIs via the this.io object, but supports neither plugins, nor mapping Interop methods to DOM events. |
workspaceUtilityBar |
The recommended component. Provides everything workspaceBaseComponent provides, plus methods for managing the Utility Bar. Must be used in the Utility Bar of your Lightning app. |
All three components are used by extending them in your own LWC. The following sections describe workspaceBaseComponent. The same properties, methods, and hooks are available in workspaceUtilityBar, which adds the methods for managing the Utility Bar, and in workspaceLightComponent, which supports neither plugins, nor the connected-methods property.
Component API
The workspaceBaseComponent component provides a set of properties and methods that you can use to interop-enable your LWC.
The component has the following properties that can be used in its HTML file:
| Property | Type | Description |
|---|---|---|
application-name |
string |
Name for the component that will be used by the io.Connect framework when interacting with other interop-enabled apps. |
connected-methods |
object |
Key/value pairs of Interop method names and the names of the DOM events that they will handle (e.g., { "My.Method": "my_event" }). If you specify this property, you must also specify the events that will be handled. |
factory-config |
object |
Config object passed to the IODesktop() factory function for initializing the @interopio/desktop library, or a Config object passed to the IOBrowser() factory function for initializing the @interopio/browser library, depending on the io.Connect platform you are using. Defaults to {}. |
oninterop_<event-name> |
function |
Defines a DOM event to be handled by one of the Interop methods specified in the connected-methods property. The property name must always be prefixed with oninterop_ (e.g., oninterop_my_event). Accepts as a value the component hook that is defined as the handler for the respective Interop method. You can define as many DOM events as necessary. |
The component has the following methods that can be accessed via the this object upon successful connection to the io.Connect framework:
| Method | Accepts | Description |
|---|---|---|
executePlatformMessageCallback() |
(string, boolean, object) |
Sends a response to the workspaceBaseComponent component about the result from the Interop method invocation. The component will relay the response to the calling app. Accepts three required arguments - the ID of the invocation (which can be extracted from the event details), a Boolean value denoting whether the invocation Promise should be resolved (true) or rejected (false), and the actual result from the method invocation to be passed to the calling app. |
getInteropInstanceObjects() |
- |
Retrieves the initialized io.Connect API object and makes it available in your LWC. Returns a Promise. |
isListeningToMethod() |
(string) |
Returns the name of the DOM event handled by a specific Interop method, or undefined if the component isn't listening for invocations of that method. Accepts as a required argument the name of the Interop method to verify. |
registerMethod() |
(string, string) |
Can be used instead of the connected-methods property to register Interop methods for handling DOM events. Accepts as required arguments the name of the Interop method and the name of the DOM event. |
triggerOutbound() |
(object) |
Invokes an Interop method registered by other interop-enabled apps. Accepts as a required argument an object with method and payload properties specifying the name of the Interop method to invoke and arguments for the invocation. Returns a Promise. |
unregisterMethod() |
(string) |
Unregisters an Interop method. Accepts as a required argument the name of the Interop method to unregister. |
verifyExistingExternalRegisteredMethod() |
(string) |
Verifies whether an Interop method is registered by another app within the io.Connect framework. Use this method before invoking an Interop method registered by another interop-enabled app. Accepts as a required argument the name of the Interop method to verify. |
The component has the following hooks that you can override in your LWC:
| Hook | Description |
|---|---|
onConnected() |
Invoked on successful connection to the io.Connect framework. Use it for all your outbound interoperability logic. |
onError() |
Invoked when the connection to the io.Connect framework fails. |
⚠️ Note that if you override
connectedCallback(),renderedCallback(), ordisconnectedCallback()in your LWC, you must call the respective method of the base component, otherwise the connection to the io.Connect framework won't be established or cleaned up properly.
The workspaceUtilityBar component provides the following additional methods for managing the Utility Bar:
| Method | Accepts | Description |
|---|---|---|
enableModal() |
(boolean) |
Enables or disables the modal mode of the Utility Bar panel. |
enablePopout() |
(boolean, string) |
Enables or disables popping out the Utility Bar panel. Accepts as a second argument the text to display when popping out is disabled. |
getAllUtilityInfo() |
- |
Retrieves information about all utility items in the Utility Bar. |
getInfo() |
- |
Retrieves information about the utility item of the component. |
minimize() |
- |
Minimizes the Utility Bar panel. |
onUtilityClick() |
(function) |
Registers a handler that will be invoked when the user clicks the utility item of the component. |
open() |
(object) |
Opens the Utility Bar panel. |
updatePanel() |
(object) |
Updates the properties of the Utility Bar panel (e.g., its label or icon). |
updateUtility() |
(object) |
Updates the properties of the utility item (e.g., its label or icon). |
⚠️ Note that these methods are available only when the component is placed in the Utility Bar of your Lightning app.
Using io.Connect APIs
⚠️ Note that using the io.Connect APIs in your interop-enabled component must always be executed via the
onConnected()hook to ensure connectivity to the io.Connect framework.
The io.Connect APIs provided by the initialized @interopio/desktop or @interopio/browser libraries can be accessed directly in your interop-enabled component via the this.io object. This enables you to use all functionalities they provide in addition to the APIs provided by the workspaceBaseComponent component.
The io.Connect APIs can be accessed only after a successful connection to the io.Connect framework has been established. To ensure this is the case, always route the usage of io.Connect APIs via the onConnected() hook of your component.
⚠️ Note that to be able to use the
@interopio/workspaces-apiand the@interopio/search-apilibraries, you must explicitly enable them via thefactory-configproperty of theworkspaceBaseComponentcomponent. If Salesforce is running in io.Connect Desktop, you must also make sure that the@interopio/desktoplibrary won't be auto initialized via the Salesforce app definition.
Plugins
Instead of implementing all your interoperability logic directly in your LWC, you can distribute it across plugin classes. Each plugin is a separate class holding the logic for a single functionality, which enables you to develop and test each functionality independently.
To use plugins, assign an array of plugin classes to the plugins property of your LWC. The Salesforce Adapter will instantiate each class on successful connection to the io.Connect framework and will invoke its onConnected() hook.
A plugin class must extend StandalonePlugin (exported by the workspaceBaseComponent module) or UtilityPlugin (exported by the workspaceUtilityBar module). Both base classes provide the following properties to the plugin instance:
| Property | Type | Description |
|---|---|---|
io |
object |
The initialized io.Connect API object. |
parent |
object |
The LWC that holds the plugin. Use it to access the properties and methods of your component. |
⚠️ Note that the
workspaceLightComponentcomponent doesn't support plugins.
The optional CRM module provides the available CrmPlugin plugin (exported by the crmPlugin module), which registers the T42.CRM.* Interop methods. Add it to the plugins property of your component, or use one of the available Utility Bar components of the module, which already do so. To implement your own CRM plugin instead, apply the ApexExportsMixin mixin (exported by the crmMixins module) to a plugin class.
Example Implementation
To interop-enable a Utility Bar, you must:
- create a standard LWC with XML, HTML, and JavaScript files targeting
lightning__UtilityBar; - extend the
workspaceUtilityBarcomponent in the JavaScript file; - use the
workspaceUtilityBarcomponent in the HTML file to wrap your LWC; - define the required component properties (
application-nameandfactory-config) in the HTML file; - use the
workspaceUtilityBarcomponent API and the io.Connect APIs to implement the component functionality;
The following examples demonstrate how to create an interop-enabled Utility Bar that will be used in an io.Connect Desktop platform. The component registers an Interop method that can be invoked by other interop-enabled apps, and also invokes an Interop method already registered by other interop-enabled apps.
Example XML configuration for a LWC:
<?xml version="1.0" encoding="UTF-8"?>
<LightningComponentBundle xmlns="http://soap.sforce.com/2006/04/metadata">
    <apiVersion>65.0</apiVersion>
    <isExposed>true</isExposed>
    <description>This component demonstrates inbound and outbound interoperability between Salesforce and io.Connect apps.</description>
    <masterLabel>My Interop-Enabled Utility Bar</masterLabel>
    <targets>
        <target>lightning__UtilityBar</target>
    </targets>
</LightningComponentBundle>
Example HTML structure of an interop-enabled Utility Bar that uses the workspaceUtilityBar component:
<template>
    <!-- Using the `workspaceUtilityBar` component to interop-enable your LWC. -->
    <!-- The `slds-is-relative` class positions the connection spinner of the component. -->
    <interopio-workspace-utility-bar
        class="slds-is-relative"
        application-name="my-interop-enabled-utility-bar"
        factory-config={myCustomIODesktopConfig}

        connected-methods={connectedMethods}
        oninterop_inbound_event={onInbound}
    >
        <!-- The `slds-card__body_inner` class applies the standard SLDS padding to the card. -->
        <lightning-card class="slds-card__body_inner" title="My Interop-Enabled Utility Bar">
            <!-- Your component structure. -->
        </lightning-card>
    </interopio-workspace-utility-bar>
</template>
Example implementation of an interop-enabled Utility Bar:
// Import the `workspaceUtilityBar` component and the plugin holding your interoperability logic.
import { NavigationMixin } from "lightning/navigation";
import WorkspaceUtilityBar from "interopio/workspaceUtilityBar";
import { SyncPlugin } from "./plugins/syncPlugin.js";

const TEST_INBOUND_METHOD = "My.Test.Inbound.Method";
const TEST_OUTBOUND_METHOD = "My.Test.Outbound.Method";
const DOM_EVENT_TO_LISTEN = "inbound_event";

export default class MyInteropEnabledUtilityBar extends NavigationMixin(WorkspaceUtilityBar) {
    // Plugins holding the logic of your component.
    plugins = [SyncPlugin];

    // Custom configuration for initializing the `@interopio/desktop` library.
    myCustomIODesktopConfig = {
        // Enabling the Workspaces API and the Search API.
        workspaces: true,
        search: true
    };

    // Defines the Interop method mappings. Each key is an Interop method name
    // and each value is the name of the DOM event that the method will handle.
    // These mappings are forwarded to the `connected-methods` property
    // of the `workspaceUtilityBar` component.
    connectedMethods = {
        // "My.Test.Inbound.Method": "inbound_event"
        [TEST_INBOUND_METHOD]: DOM_EVENT_TO_LISTEN
    };

    // If you don't need to customize this hook, you can skip its declaration.
    disconnectedCallback() {
        super.disconnectedCallback();

        console.log("Disconnected callback invoked.");
    };

    // If you don't need to customize this hook, you can skip its declaration.
    renderedCallback() {
        super.renderedCallback();

        console.log("Rendered callback invoked.");
    };

    // This will be called by the `workspaceUtilityBar` component
    // on successful connection to the io.Connect framework.
    // Once connected, you will have access to all io.Connect APIs via the `this.io` object.
    // You must execute all your outbound Interop logic in the `onConnected()` hook.
    onConnected() {
        super.onConnected();

        // Invoke an outbound Interop method.
        this.triggerOutbound();
    };

    // Implementation of the handler for the `TEST_INBOUND_METHOD` method
    // that will be invoked for the `inbound_event` DOM event.
    onInbound(event) {
        // Extract the invocation ID and the arguments for the Interop method
        // invocation provided by the calling app.
        const { callbackID, payload: { value } } = event.detail;
        // If `true`, the `workspaceUtilityBar` component will resolve the invocation `Promise`.
        // If `false`, the `workspaceUtilityBar` component will reject the invocation `Promise`.
        const isSuccessful = value ? true : false;
        // Result that will be returned from invoking the Interop method.
        const invocationResult = { "OK": value ? true : false };

        // Send a response to the `workspaceUtilityBar` component.
        // The `workspaceUtilityBar` component will relay the response to the calling app.
        super.executePlatformMessageCallback(callbackID, isSuccessful, invocationResult);

        console.log(`Inbound data received: ${value}.`);
    };

    triggerOutbound() {
        // Checking whether the desired Interop method has been registered by any io.Connect app.
        const isRegistered = super.verifyExistingExternalRegisteredMethod(TEST_OUTBOUND_METHOD);

        // Skip the invocation if the Interop method hasn't been registered.
        if (!isRegistered) {
            return;
        };

        // Providing the name of the Interop method to invoke and arguments for the invocation.
        const args = {
            method: TEST_OUTBOUND_METHOD,
            payload: { value: "value" }
        };

        // Invoke an outbound Interop method. Alternatively, you can use the io.Connect API
        // directly: this.io.interop.invoke(args.method, args.payload);
        super.triggerOutbound(args);
    };

    // Helper method that navigates to a record in your Salesforce organization.
    // The plugins of the component can access it via their `parent` property.
    navigateToRecord(recordId) {
        this[NavigationMixin.Navigate]({
            type: "standard__recordPage",
            attributes: { recordId, actionName: "view" }
        });
    };

    onError() {
        console.error("Something went wrong, check the latest error logs.");
    };
};
Example implementation of the plugins/syncPlugin.js plugin:
import { UtilityPlugin } from "interopio/workspaceUtilityBar";

const OPEN_RECORD_METHOD = "My.OpenRecord";

export class SyncPlugin extends UtilityPlugin {
    onConnected() {
        super.onConnected();

        // Register an Interop method directly via the io.Connect API.
        this.io.interop.registerAsync({ name: OPEN_RECORD_METHOD }, (payload, caller, success, error) => {
            // Skip the invocation if it originates from this same Salesforce instance.
            if (caller.peerId !== this.io.connection.peerId) {
                this.syncRecord(payload, success, error);
            };
        });
    };

    // Extracts the Salesforce record ID from the arguments of the Interop method invocation.
    getSalesforceId(record) {
        const salesforceId = record?.ids?.find((id) => id.systemName.startsWith("Salesforce"));

        return salesforceId ? salesforceId.nativeId : null;
    };

    syncRecord(recordData, success, error) {
        const recordId = this.getSalesforceId(recordData);

        try {
            // The `parent` property holds the Utility Bar component.
            this.parent.navigateToRecord(recordId);
            success({ synced: true });
        } catch (e) {
            error({ synced: false, error: `Invalid record data: ${recordData}.` });
        };
    };
};
Attaching the Utility Bar Component
After deploying your Utility Bar component, attach it to the Lightning app in which you want to use it. If your package build includes the CRM module, you can attach the available "interop.io Salesforce Adapter with CRM" component instead of creating your own.
- Go to
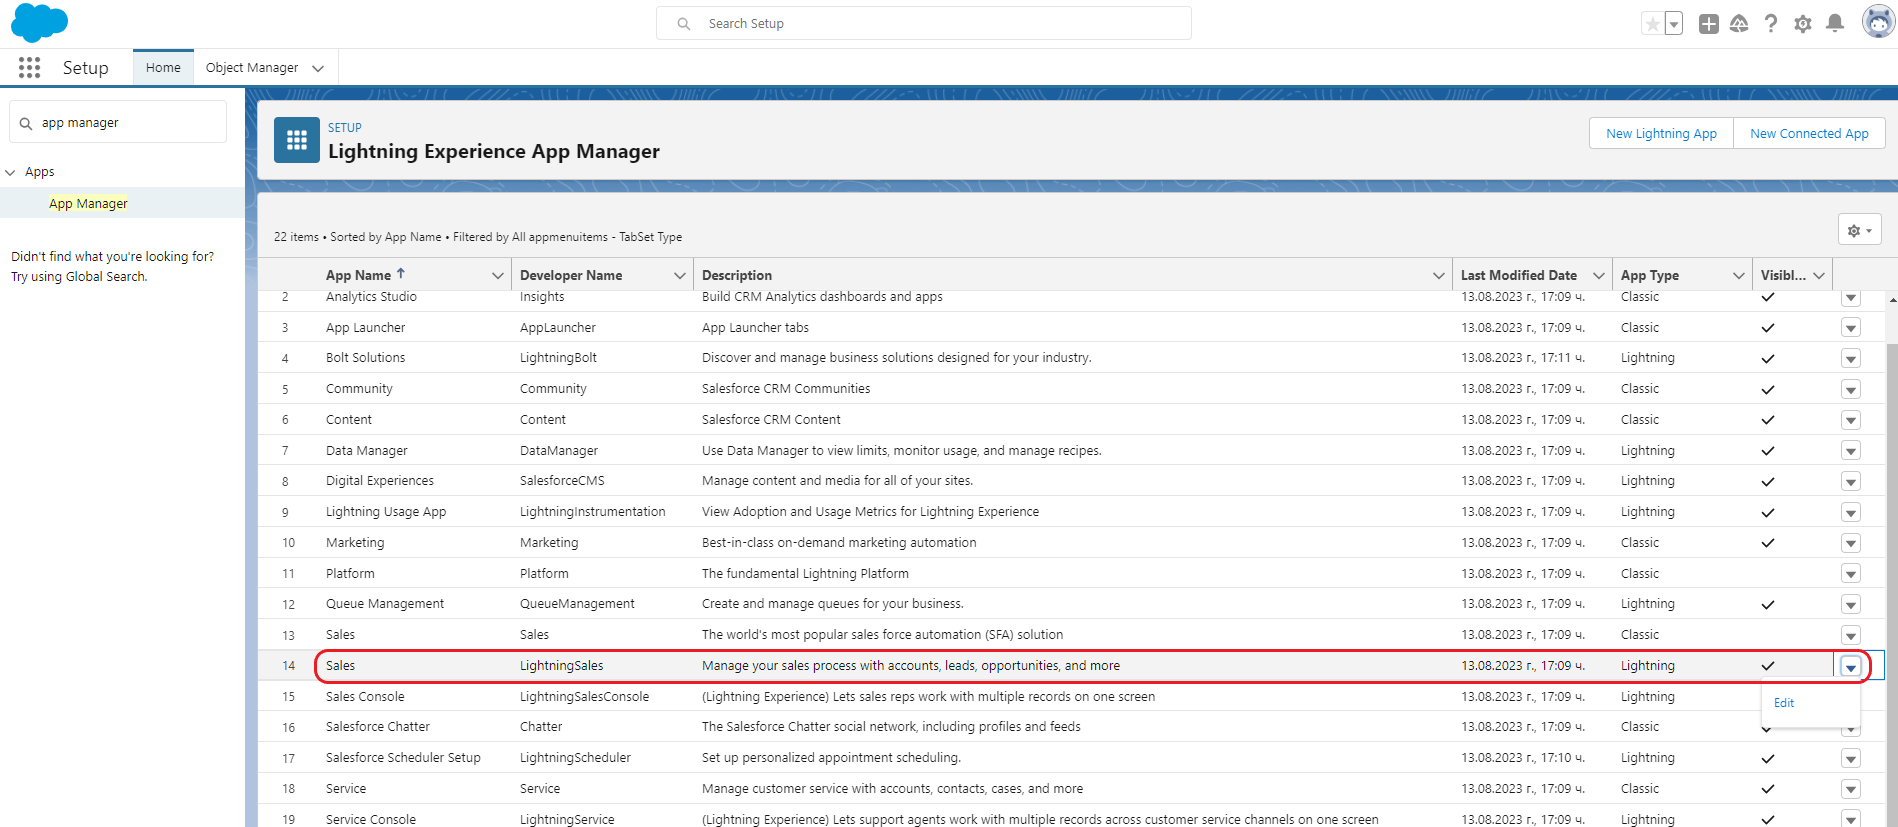
PLATFORM TOOLS > Apps > App Manager(or search for "App Manager" in the Quick Find bar) and choose an app. For instance, use the "Sales" Lightning app and click on the arrow at the end of its row. Click the "Edit" button from the dropdown menu:
- In the newly opened page, go to
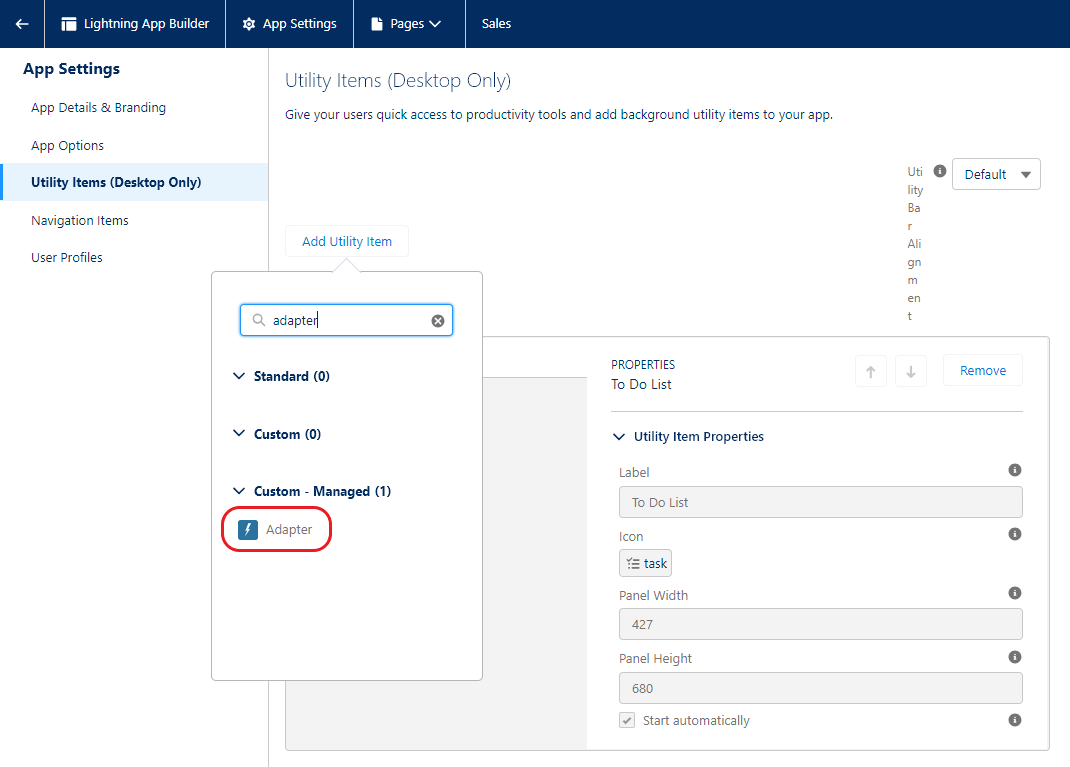
App Settings > Utility Itemsand click the "Add Utility Item" button. Search for the label of your Utility Bar component and click on it in the item list:
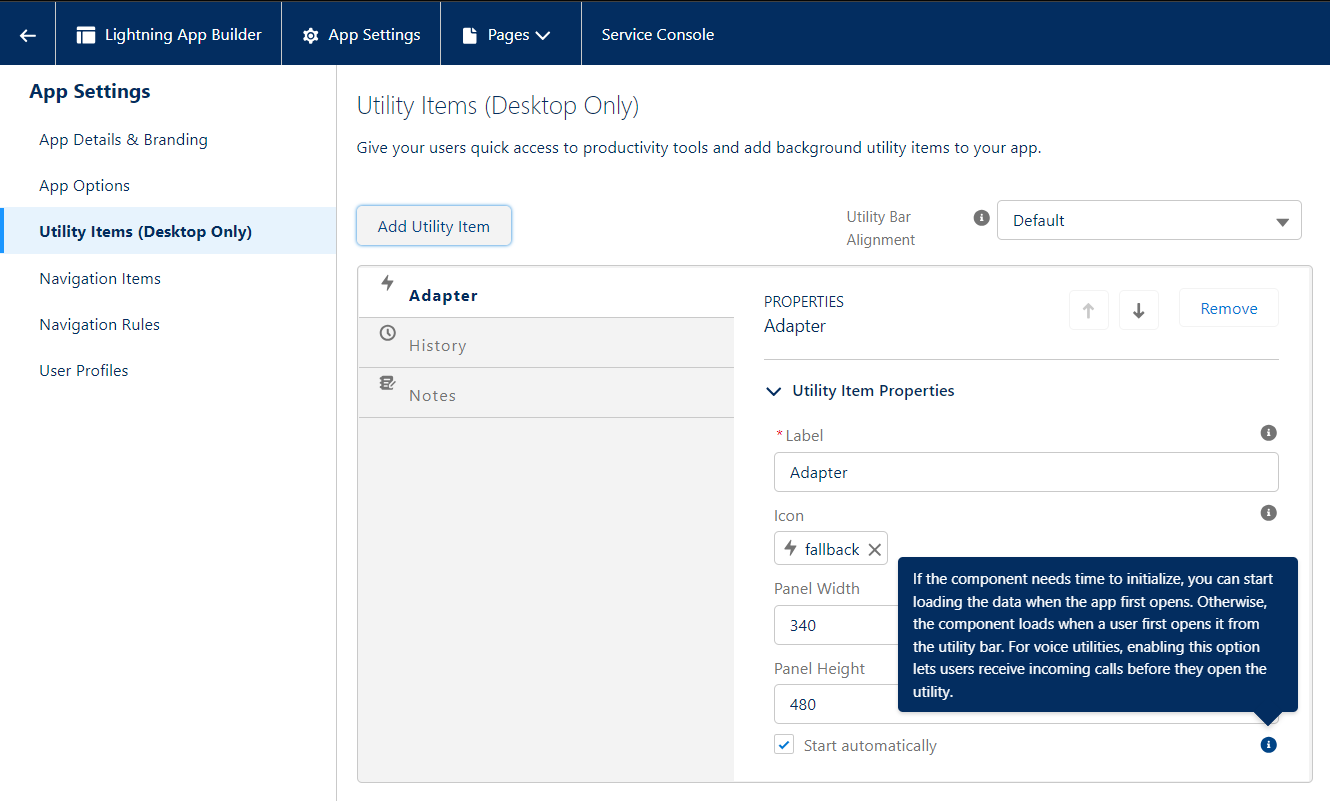
- Select the "Start automatically" checkbox, so that your component connects to the io.Connect framework when the app is loaded:
- Click the "Save" button to save your changes.
⚠️ Note that if the utility item isn't started automatically, your component will connect to the io.Connect framework and will register its Interop methods only after the user clicks the utility item.
If you have done everything correctly, your component will be available as a utility item in the Utility Bar of the Lightning app.
Lightning Page Implementation
Use the workspaceBaseComponent component when you need an interop-enabled component on a record, app, or home page - for instance, when the component must display data about the currently open record.
The implementation is identical to the Example Implementation above, except for the following:
- the XML configuration targets Salesforce pages instead of the Utility Bar;
- the HTML file uses the
workspaceBaseComponentcomponent; - the JavaScript file extends
workspaceBaseComponent, and the plugins of the component extendStandalonePlugin;
Example XML configuration for a LWC:
<?xml version="1.0" encoding="UTF-8"?>
<LightningComponentBundle xmlns="http://soap.sforce.com/2006/04/metadata">
    <apiVersion>65.0</apiVersion>
    <isExposed>true</isExposed>
    <description>This component demonstrates inbound and outbound interoperability between Salesforce and io.Connect apps.</description>
    <masterLabel>My Interop-Enabled Component</masterLabel>
    <targets>
        <!-- Salesforce pages targeted by the component. -->
        <target>lightning__RecordPage</target>
        <target>lightning__AppPage</target>
        <target>lightning__HomePage</target>
    </targets>
</LightningComponentBundle>
Example HTML structure of an interop-enabled LWC that uses the workspaceBaseComponent component:
<template>
    <!-- Using the `workspaceBaseComponent` component to interop-enable your LWC. -->
    <interopio-workspace-base-component
        application-name="my-interop-enabled-component"
        factory-config={myCustomIODesktopConfig}

        connected-methods={connectedMethods}
        oninterop_inbound_event={onInbound}
    >
        <lightning-card title="My Interop-Enabled Component">
            <!-- Your component structure. -->
        </lightning-card>
    </interopio-workspace-base-component>
</template>
Example class declaration of an interop-enabled LWC:
import WorkspaceBaseComponent, { StandalonePlugin } from "interopio/workspaceBaseComponent";

export default class MyInteropEnabledComponent extends WorkspaceBaseComponent {
    // The rest of the implementation is the same as in the Utility Bar example above.
};