
Salesforce
Overview
⚠️ Note that the following sections are relevant only for the latest versions of the Salesforce Adapter (5.0 and later). For details on the legacy versions (3.0 and 4.0), see the Legacy Adapter section.
After installing the Salesforce Adapter in your organization, you can start interop-enabling your Lightning Web Components. If you intend on using Salesforce in a web browser, it's recommended to use the <Tick42-interop-connected-component-base> component that is distributed with the Salesforce Adapter package as it provides the best possible interoperability performance for this case. This component can be used both in your Lightning Out apps, or from within the Salesforce platform.
⚠️ Note that using Salesforce in a web browser has the disadvantage of having to attach an io.Connect Utility Bar component to your Lightning App and provide additional package configuration after installation in order to enable interoperability. These steps aren't required when using Salesforce within the io.Connect Platform.
⚠️ Note that using the
<Tick42-interop-connected-component-base>component to achieve interoperability between Salesforce and io.Connect Browser projects is still an experimental feature. This means that enabling some of the io.Connect Browser functionalities may require additional development.
Requirements
To be able to use the <Tick42-interop-connected-component-base> component, you must provide additional package configuration after installation and attach one of the io.Connect Utility Bar components to your Lightning App. The Utility Bar components are distributed with the Salesforce Adapter package. For instructions on how to configure your package and on how to attach a Utility Bar component to your Lightning app, see the Configuration section.
Examples
Full working examples demonstrating interoperability between Salesforce and interop-enabled apps are provided via the interop.io Salesforce Adapter [demos] Salesforce package.
To retrieve the package into your project, execute the following command using the Salesforce CLI:
sf project retrieve start --package-name "interop.io Salesforce Adapter [demos]"Configuration
To enable interoperability between Salesforce and other io.Connect apps when using Salesforce in a web browser, you must provide additional package configuration and attach a Utility Bar component to your Lighting App. There are two Utility Bar components provided with the Salesforce Adapter package:
interop.io Salesforce Adapter (LWC)- a LWC-based Utility Bar component;interopio_Salesforce_Adapter- an Aura-based Utility Bar component;
Attaching the Utility Bar Component
The following steps describe the process of attaching the io.Connect Utility Bar component:
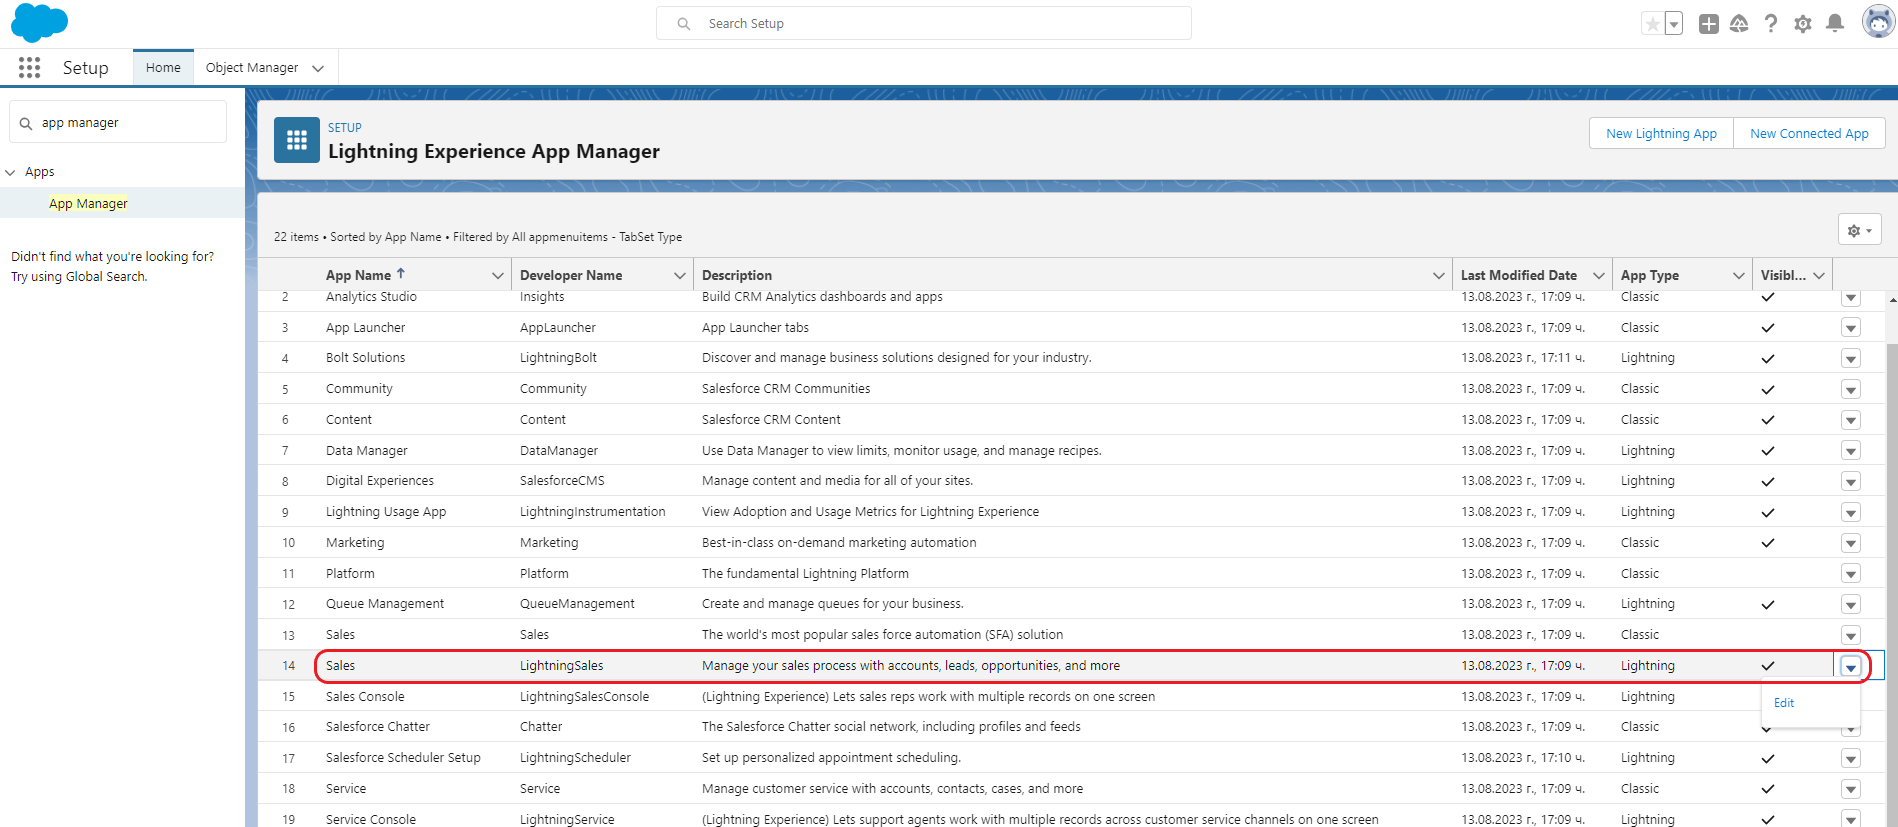
- To begin using the Salesforce Adapter, you must attach it to a Lightning App. Go to
PLATFORM TOOLS > Apps > App Manager(or search for "App Manager" in the Quick Find bar) and choose an app. For instance, use the "Sales" Lightning app and click on the arrow at the end of its row. Click the "Edit" button from the dropdown menu:
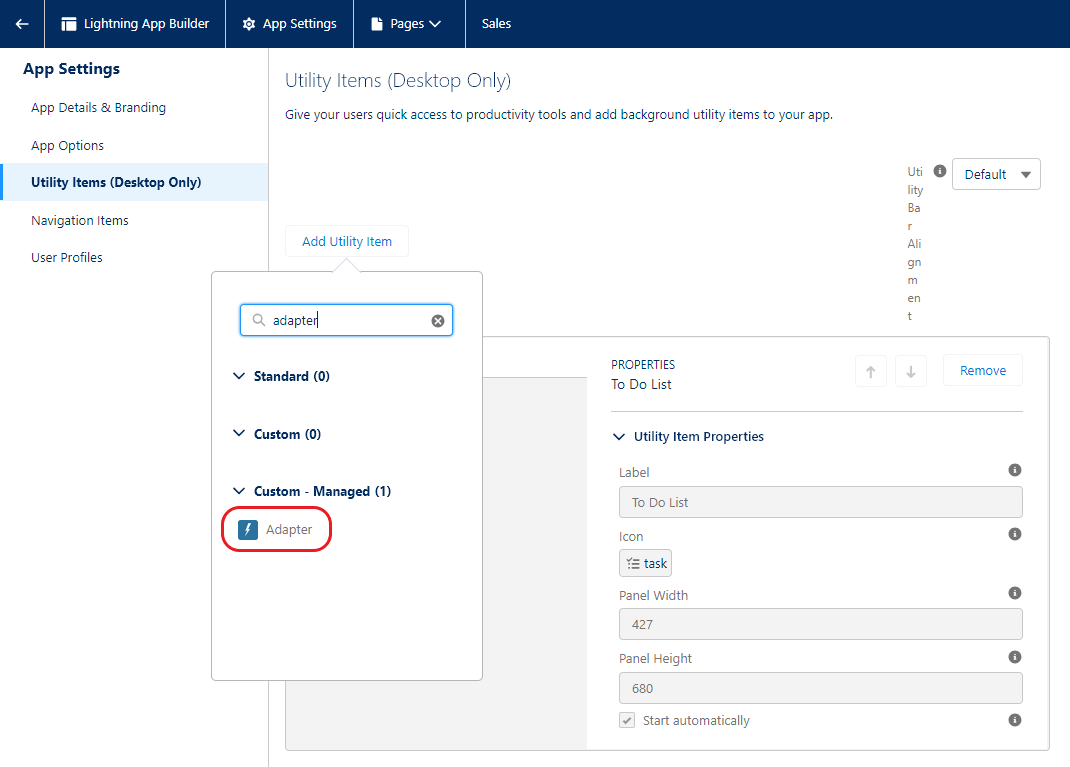
- In the newly opened page, go to
App Settings > Utility Itemsand click the "Add Utility Item" button. Search for "Adapter" and click on the "Adapter" item from the item list:
- It's recommended to use the default settings for the Salesforce Adapter. You can select the "Start automatically" checkbox to enable the Adapter to load and establish a connection automatically. Otherwise, the user will have to click on it to activate it:
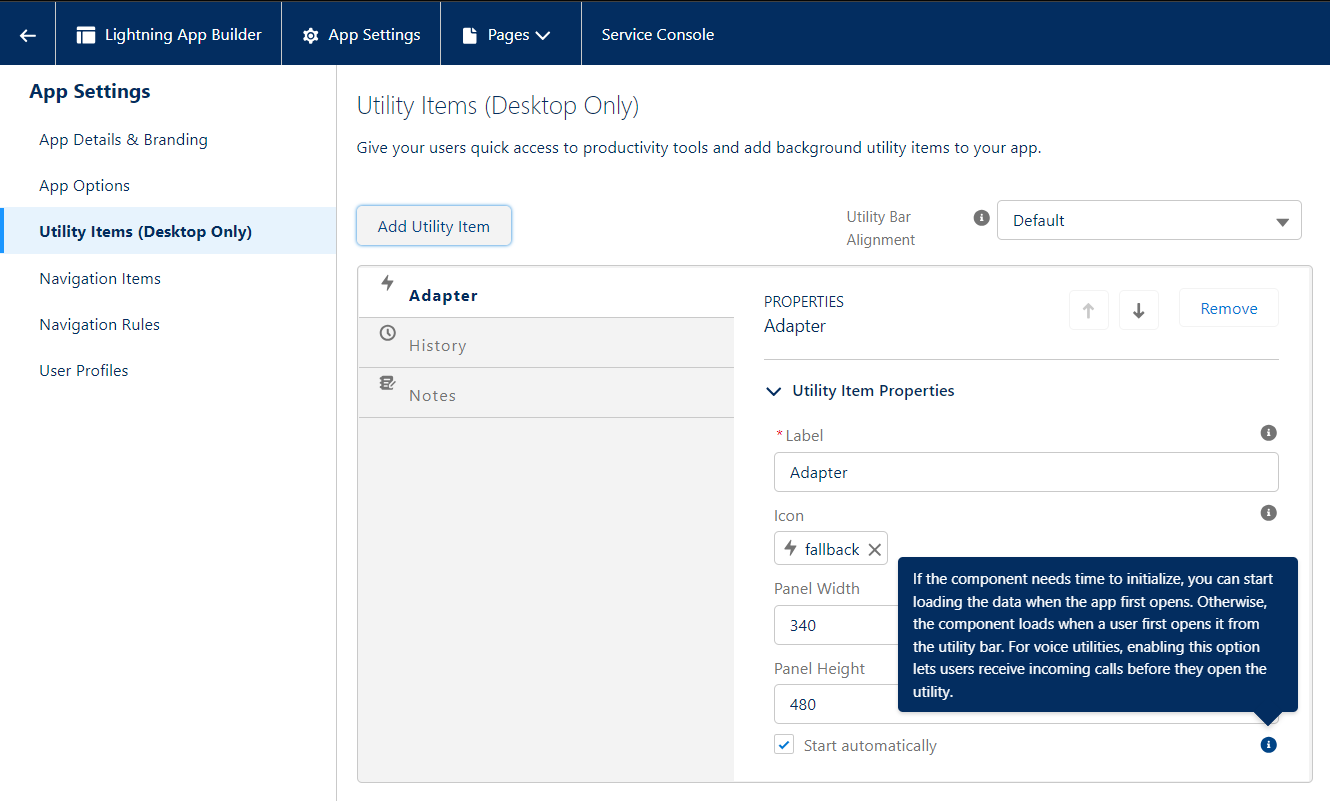
- Click the "Save" button to save your changes.
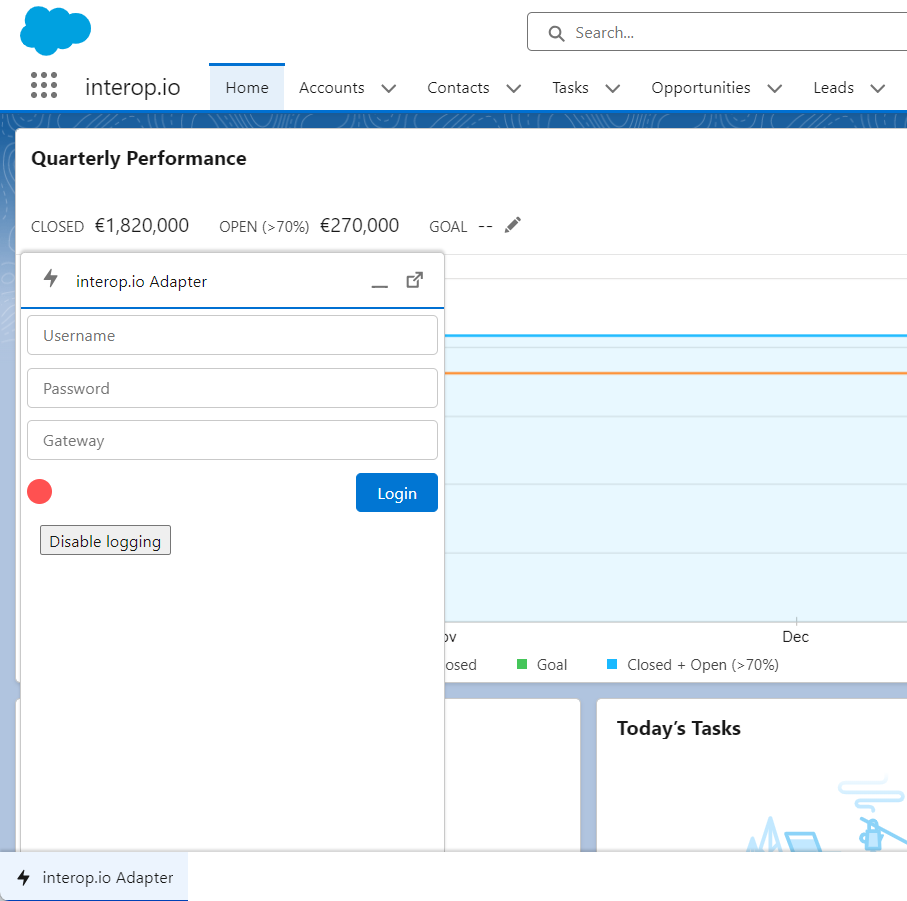
If you have done everything correctly, the Salesforce Adapter will be available as a utility item in the Utility Bar of the "Sales" Lightning app:
Establishing a Connection
Enter a username, password and an io.Connect Gateway address to establish a connection. The default Gateway address is ws://localhost:8385.
⚠️ Note that the username you supply to the Salesforce Adapter must be the same as the one used by the io.Connect platform, otherwise the Salesforce Adapter won't be able to find the Interop methods your apps have registered in the io.Connect framework under a different username. By default, the io.Connect platform uses the Windows username of the currently logged in user which you can see by running the
echo %USERNAME%command in a command prompt.
Default Settings
You can configure default settings that the Salesforce Adapter will use to establish a connection when the page is reloaded or if the user clicks the "Login" button without entering an io.Connect Gateway address, username or password. These settings can be set up on an organization level and also per user or user profile.
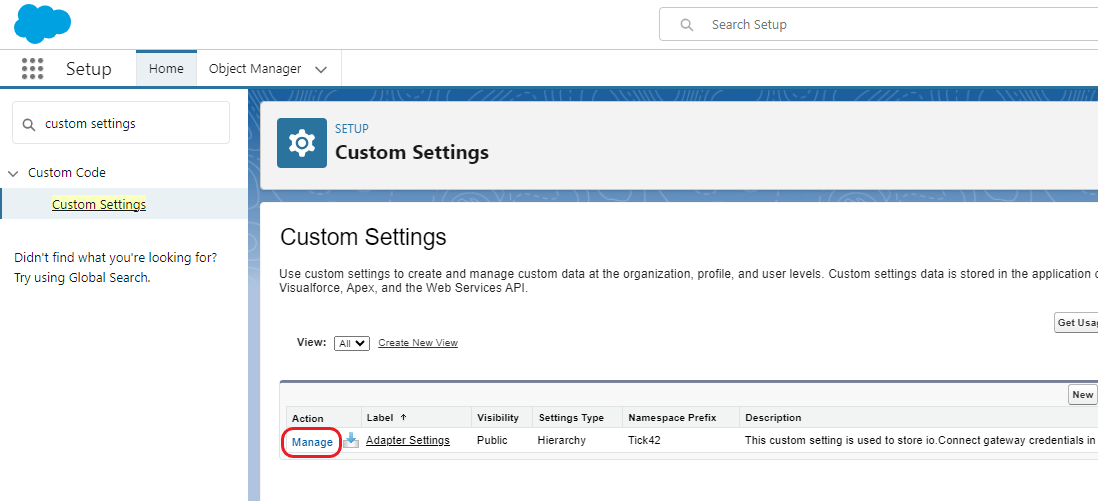
To open the page from where you can specify default connection settings, go to PLATFORM TOOLS > Custom Code > Custom Settings (or search for "Custom Settings" in the Quick Find bar) and click the "Manage" button of the "GW User Settings" list entry:
The following fields are available for configuration on an organization level and per user or user profile:
| Field | Description |
|---|---|
| Enable Auto Sync | Checkbox specifying whether to trigger automatic synchronization between all io.Connect apps when a record is changed in Salesforce. |
| Gateway URL | Address pointing to a running io.Connect Gateway. By default, this is ws://localhost:8385. |
| Gateway Username | Username that must be the same as the one used by the running instance of io.Connect Desktop to which a connection is established. By default, io.Connect Desktop uses the Windows username of the currently logged in user which you can see by right-clicking on the io.Connect Desktop tray icon or by running the echo %USERNAME% command in a command prompt. |
⚠️ Note that these settings will be used only if Salesforce is running in a browser and you want to connect to the io.Connect platform. If Salesforce is running within the io.Connect platform, these settings will be ignored.
Organization Level
To specify the organization level defaults, click on the "New" button above the "Default Organization Level Value" section and enter the desired settings:
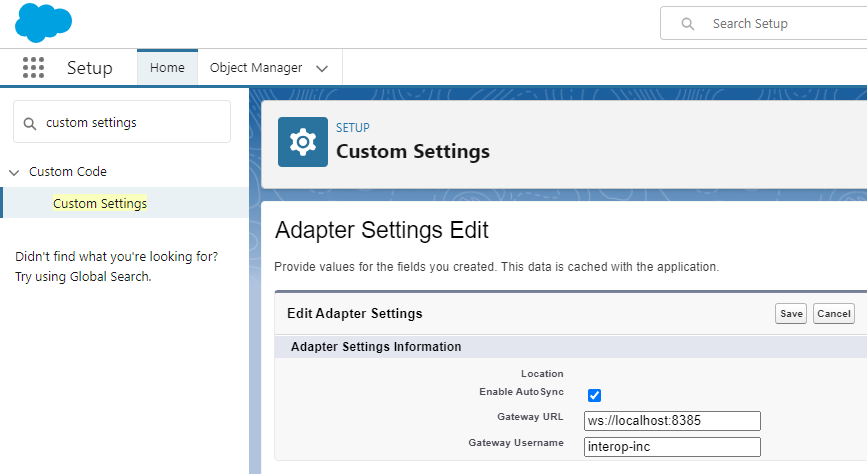
Click the "Save" button to save the changes.
⚠️ Note that any missing setting in "GW User Settings" are going to be replaced by the organization level defaults. This way you can specify the default Gateway for all users, and all user credentials can be specified later per user or user profile.
User & Profile Level
To specify user or profile level defaults, click on the "New" button under the "Default Organization Level Value" section and enter the desired settings. Select either "User" or "Profile" from the dropdown menu of the "Location" field and find the respective user or profile in the input field next to it:
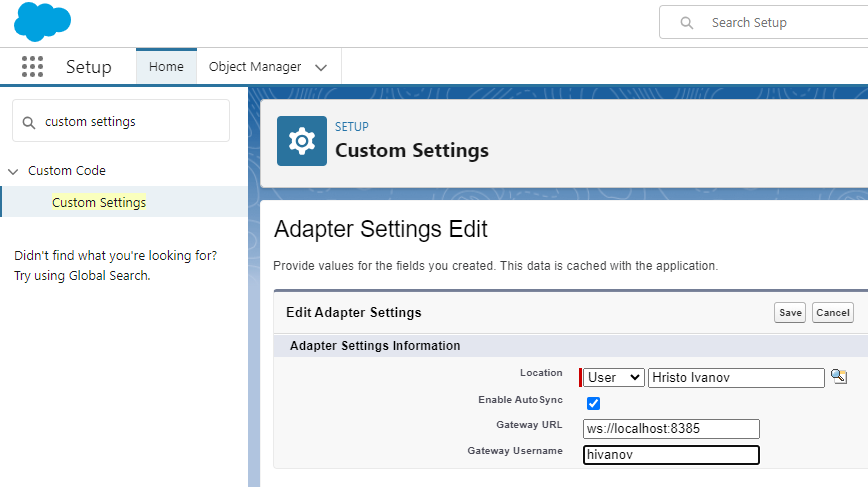
Click the "Save" button to save the changes.
Usage
The following sections describe the <Tick42-interop-connected-component-base> component API and provide examples on how to implement an interop-enabled LWC.
Component API
The <Tick42-interop-connected-component-base> component provides a set of properties and methods that you can use to interop-enable your LWC.
The component has the following properties that can be used in its HTML file:
| Property | Type | Description |
|---|---|---|
application-name |
string |
Name for the component that will be used by the io.Connect framework when interacting with other interop-enabled apps. |
factory-config |
object |
Config object passed to the IODesktop() factory function for initializing the @interopio/desktop library or a Config object passed to the IOBrowser() factory function for initializing the @interopio/browser library depending on the io.Connect platform your are using. Defaults to {}. |
connected-methods |
object |
Key/value pairs of Interop method names and the names of the DOM events that they will handle (e.g., { "My.Method": "my_event" }). If you specify this property, you must also specify the events that will be handled. |
oninterop_<event-name> |
function |
Defines a DOM event to be handled by one of the Interop methods specified in the connected-methods property. The property name must always be prefixed with oninterop_ (e.g., oninterop_my_event). Accepts as a value the component hook that is defined as the handler for the respective Interop method. You can define as many DOM events as necessary. |
The component has the following methods that can be accessed upon successful connection to the io.Connect framework and making available the <Tick42-interop-connected-component-base> component API in your LWC (e.g., via assigning it to this.connectedBase):
| Method | Accepts | Description |
|---|---|---|
executePlatformMessageCallback() |
(string, boolean, object) |
Use this method to send a response to the <Tick42-interop-connected-component-base> component about the result from the Interop method invocation. The component will relay the response to the calling app. Accepts three required arguments - the ID of the invocation (which can be extracted from event details), a Boolean value denoting whether the invocation Promise should be resolved (true) or rejected (false), and the actual result from the method invocation to be passed to the calling app. |
getInteropInstanceObjects() |
- |
Use this method to retrieve the initialized io.Connect API object and make it available in your LWC. |
registerMethod() |
(string, string) |
Can be used instead of the connected-methods property to register Interop methods for handling DOM events. Accepts as required arguments the name of the Interop method and the name of the DOM event. |
triggerOutbound() |
(object) |
Invokes an Interop method registered by other interop-enabled apps. Accepts as a required argument an object with method and payload properties specifying the name of the Interop method to invoke and arguments for the invocation. |
unregisterMethod() |
(string) |
Unregisters an Interop method. Accepts as a required argument the name of the Interop method to unregister. |
verifyExistingExternalRegisteredMethod() |
(string) |
Verifies whether an Interop method is registered within the io.Connect framework. Use this method before invoking an Interop method registered by another interop-enabled app. Accepts as a required argument the name of the Interop method to verify. |
Using io.Connect APIs
⚠️ Note that using the io.Connect APIs in your interop-enabled component must always be executed via the
onConnected()hook to ensure connectivity to the io.Connect framework.
The io.Connect APIs provided by the initialized @interopio/desktop or @interopio/browser libraries can be accessed directly in your interop-enabled component. This enables you to use all functionalities they provide in addition to the APIs provided by the <Tick42-interop-connected-component-base> component.
The io.Connect APIs can be accessed only after a successful connection to the io.Connect framework has been established. To ensure this is the case, always route the usage of io.Connect APIs via the onConnected() hook of your component.
Example Implementation
To interop-enable your LWC, you must:
- create a standard LWC with XML, HTML, and JavaScript files;
- use the
<Tick42-interop-connected-component-base>component in the HTML file to wrap your LWC; - define the required component properties (
application-nameandfactory-config) in the HTML file; - retrieve the
<Tick42-interop-connected-component-base>component in the JavaScript file in order to be able to access the component APIs; - retrieve the initialized io.Connect API object and make it available in your LWC;
- use the
<Tick42-interop-connected-component-base>component API and the io.Connect APIs to implement the component functionality;
The following examples demonstrate how to create an interop-enabled LWC that will be used in an io.Connect Desktop platform. The component registers an Interop method that can be invoked by other interop-enabled apps, and also invokes an Interop method already registered by other interop-enabled apps.
Example XML configuration for a LWC:
<?xml version="1.0" encoding="UTF-8"?>
<LightningComponentBundle xmlns="http://soap.sforce.com/2006/04/metadata">
    <apiVersion>60.0</apiVersion>
    <isExposed>true</isExposed>
    <description>This component demonstrates inbound and outbound interoperability between Salesforce and io.Connect apps.</description>
    <masterLabel>My Interop-Enabled Component</masterLabel>
    <targets>
        <!-- Salesforce pages targeted by the component. -->
        <target>lightning__RecordPage</target>
        <target>lightning__AppPage</target>
        <target>lightning__HomePage</target>
    </targets>
</LightningComponentBundle>
Example HTML structure of an interop-enabled LWC that uses the <Tick42-interop-connected-component-base> component:
<template>
    <!-- Using the `<Tick42-interop-connected-component-base>` component to interop-enable your LWC. -->
    <Tick42-interop-connected-component-base
        application-name="my-interop-enabled-component"
        factory-config={myCustomIODesktopConfig}

        connected-methods={interopMethods}
        oninterop_inbound_event={onInbound}
    >
        <lightning-card title="My Interop-Enabled Component">
            <!-- Your component structure. -->
        </lightning-card>
    </Tick42-interop-connected-component-base>
</template>
Example implementation of an interop-enabled LWC:
import { LightningElement } from "lwc";

export const TEST_INBOUND_METHOD = "My.Test.Inbound.Method";
export const TEST_OUTBOUND_METHOD = "My.Test.Outbound.Method";
export const INTEROP_METHODS = {};

// Interop method definitions.
// For each method, it's required to specify a method name and the DOM event that it will handle.
INTEROP_METHODS[TEST_INBOUND_METHOD] = {
    // Optional display name and description for the method. Can be used in the UI.
    displayName: "Inbound",
    description: "Inbound Interop method.",
    // Holds arguments for the method invocation.
    // Not used in the example, defined here only for demonstrative purposes
    // (invocation arguments are usually provided by the calling app).
    payload: { value: "value" },
    // Method name.
    method: TEST_INBOUND_METHOD,
    // Name of the event that the method will handle.
    domEvent: "inbound_event"
};

export default class MyInteropEnabledComponent extends LightningElement {
    _interopMethods = INTEROP_METHODS;
    // Custom configuration for initializing the `@interopio/desktop` library.
    myCustomIODesktopConfig = { windows: false, appManager: false };

    // This will pass the Interop methods and the respective DOM events
    // to the `connected-methods` property of the `<Tick42-interop-connected-component-base>` component.
    get interopMethods() {
        const result = {};

        // Extracting the method name and the name of the event that it will handle.
        // The specified methods will be invoked automatically when the respective events are fired.
        Object.values(this._interopMethods).forEach((m) => {
            result[m.method] = m.domEvent;
        });

        return result;
    };

    disconnectedCallback() {
        this.io?.done();
        this.connectedBase = null;
    };

    async renderedCallback() {
        if (!this.connectedBase) {
            // Retrieve the `<Tick42-interop-connected-component-base>` component to access the component APIs.
            this.connectedBase = this.template.querySelector("Tick42-interop-connected-component-base");

            try {
                // Retrieve the initialized io.Connect API instance.
                const { io } = await this.connectedBase?.getInteropInstanceObjects();

                if (io) {
                    // Make the io.Connect APIs available in your component.
                    this.io = io;
                    // Route all direct calls to the io.Connect APIs via the `onConnected()` hook
                    // to ensure that a connection to the io.Connect framework has been established.
                    this.onConnected();
                };
            } catch (error) {
                console.log(error);
            };
        };
    };

    // Once successfully connected to the io.Connect framework, you will have access to the component API
    // via the `this.connectedBase` object and to the io.Connect APIs via the `this.io` object.
    onConnected() {
        // Invoke an outbound Interop method.
        this.triggerOutbound();
    };

    // Implementation of the handler for the `TEST_OUTBOUND_METHOD` method that will be invoked for the `inbound_event`.
    onInbound(event) {
        // Extract the invocation ID and the arguments for the Interop method invocation provided by the calling app.
        const { callbackID, payload: { value } } = event.detail;
        // If `true`, the `<Tick42-interop-connected-component-base>` component will resolve the invocation `Promise`.
        // If `false`, the `<Tick42-interop-connected-component-base>` component will reject the invocation `Promise`.
        const isSuccessful = value ? true : false;
        // Result that will be returned from invoking the Interop method.
        const invocationResult = { "OK": value ? true : false };

        // Send a response to the `<Tick42-interop-connected-component-base>` component.
        // The `<Tick42-interop-connected-component-base>` component will relay the response to the calling app.
        this.connectedBase.executePlatformMessageCallback(callbackID, isSuccessful, invocationResult);

        console.log(`Inbound data received: ${value}.`);
    };

    triggerOutbound() {
        // Checking whether the desired Interop method has been registered by any io.Connect app.
        const isRegistered = this.connectedBase.verifyExistingExternalRegisteredMethod(TEST_OUTBOUND_METHOD);

        // Skip the invocation if the Interop method hasn't been registered.
        if (!isRegistered) {
            return;
        };

        // Providing the name of the Interop method to invoke and arguments for the invocation.
        const args = {
            method: TEST_OUTBOUND_METHOD,
            payload: { value: "value" }
        };

        // Invoke an outbound Interop method.
        // Alternatively, you can use the io.Connect API directly: this.io.interop.invoke(args.method, args.payload);
        this.connectedBase.triggerOutbound(args);
    };
};