More
Jump List
The jump list is a configurable categorized list of actions that can be shown in the context menu when the user right-clicks on a Windows taskbar icon of an interop-enabled app or a group of such icons:
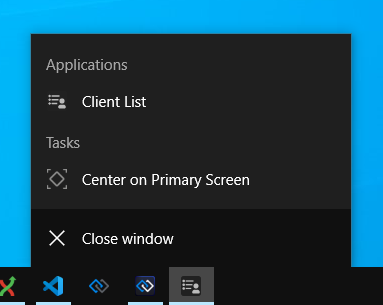
⚠️ Note that, currently, the jump list isn't available for web groups.
Configuration
The jump list can be enabled, disabled and configured globally and per app. The app definition will override the global system configuration.
⚠️ Note that the jump list configuration allows you to enable or disable the jump list and configure the predefined actions (e.g., change their names or icons), but in order to add custom jump list categories and actions for your apps, you must use the jump list API.
To configure the jump list system-wide, use the "jumpList" property of the "windows" top-level key in the system.json system configuration file of io.Connect Desktop. The following is the default system jump list configuration:
{
    "windows": {
        "jumpList": {
            "enabled": true,
            "categories": [
                {
                    "title": "Tasks",
                    "actions": [
                        {
                            "icon": "%IO_CD_ROOT_DIR%/assets/images/center.ico",
                            "type": "centerScreen",
                            "singleInstanceTitle": "Center on Primary Screen",
                            "multiInstanceTitle": "Center all on Primary Screen"
                        }
                    ]
                }
            ]
        }
    }
}
The "jumpList" object has the following properties:
| Property | Type | Description |
|---|---|---|
"categories" |
object[] |
Categorized lists with actions to execute when the user clicks on them. |
"enabled" |
boolean |
If true (default), will enable the jump list. |
Each object in the "categories" array has the following properties:
| Property | Type | Description |
|---|---|---|
"actions" |
object[] |
List of actions contained in the category. |
"title" |
string |
Title of the category to be displayed in the context menu. |
Each object in the "actions" array has the following properties:
| Property | Type | Description |
|---|---|---|
"icon" |
string |
Icon for the action to be displayed in the context menu. Must point to a local file. |
"multiInstanceTitle" |
string |
Title of the action to be displayed in the context menu when there are multiple instances with grouped Windows taskbar icons. |
"singleInstanceTitle" |
string |
Title of the action to be displayed in the context menu when there is a single instance with a single Windows taskbar icon. |
"type" |
string |
Type of the predefined action to execute. |
To override the system configuration per app, use the "jumpList" property of the "details" top-level key in the app definition file. The following example demonstrates how to disable the jump list for an app:
{
    "title": "My App",
    "type": "window",
    "name": "my-app",
    "details": {
        "url": "https://downloadtestfiles.com/",
        "jumpList": {
            "enabled": false
        }
    }
}
Predefined Actions
To use a predefined action, set the "type" property of the action object to the respective value (see Jump List > Configuration). The following are the currently supported predefined actions:
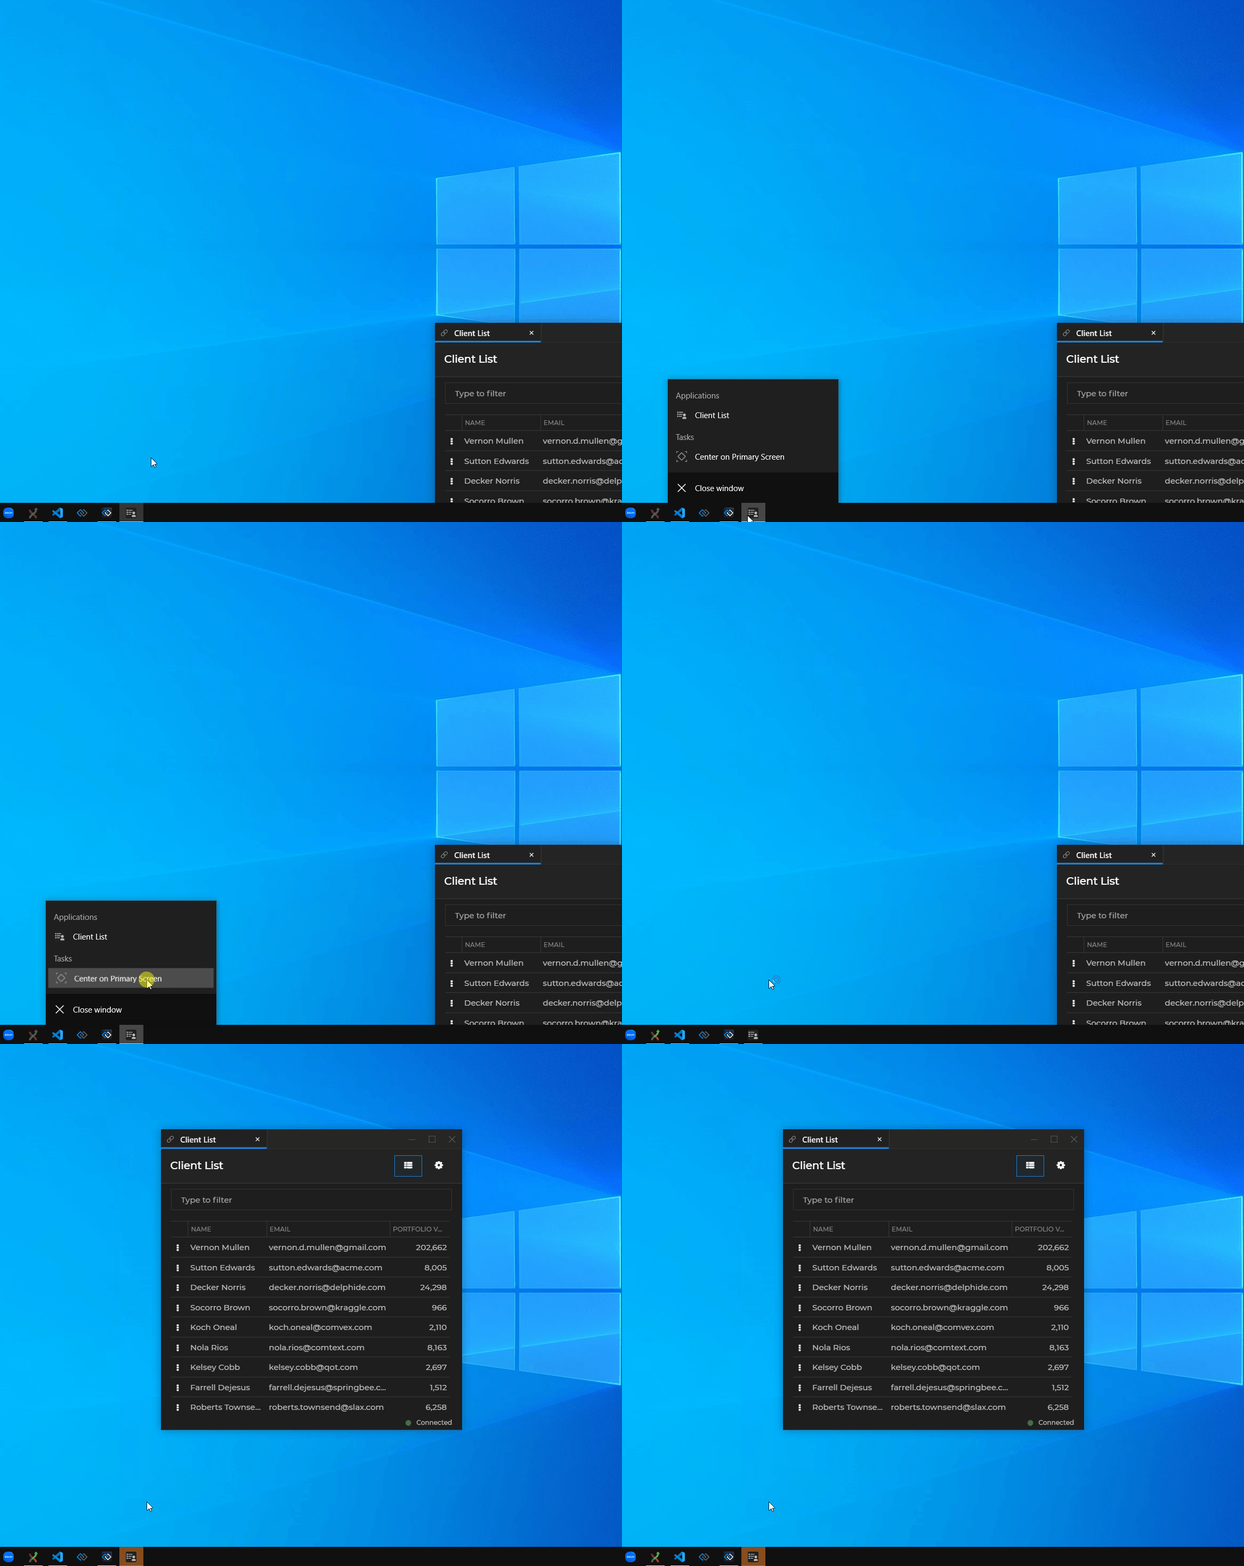
"centerScreen"- centers an app or a group of app instances on the primary screen. This action is extremely useful when you have many windows open on multiple displays and can't find the app you need. Use this action to find an app that: you may have moved to another screen or outside the screen bounds altogether; may be hidden behind other windows; may have been resized and become too small to notice; or may have simply blended visually with other apps:
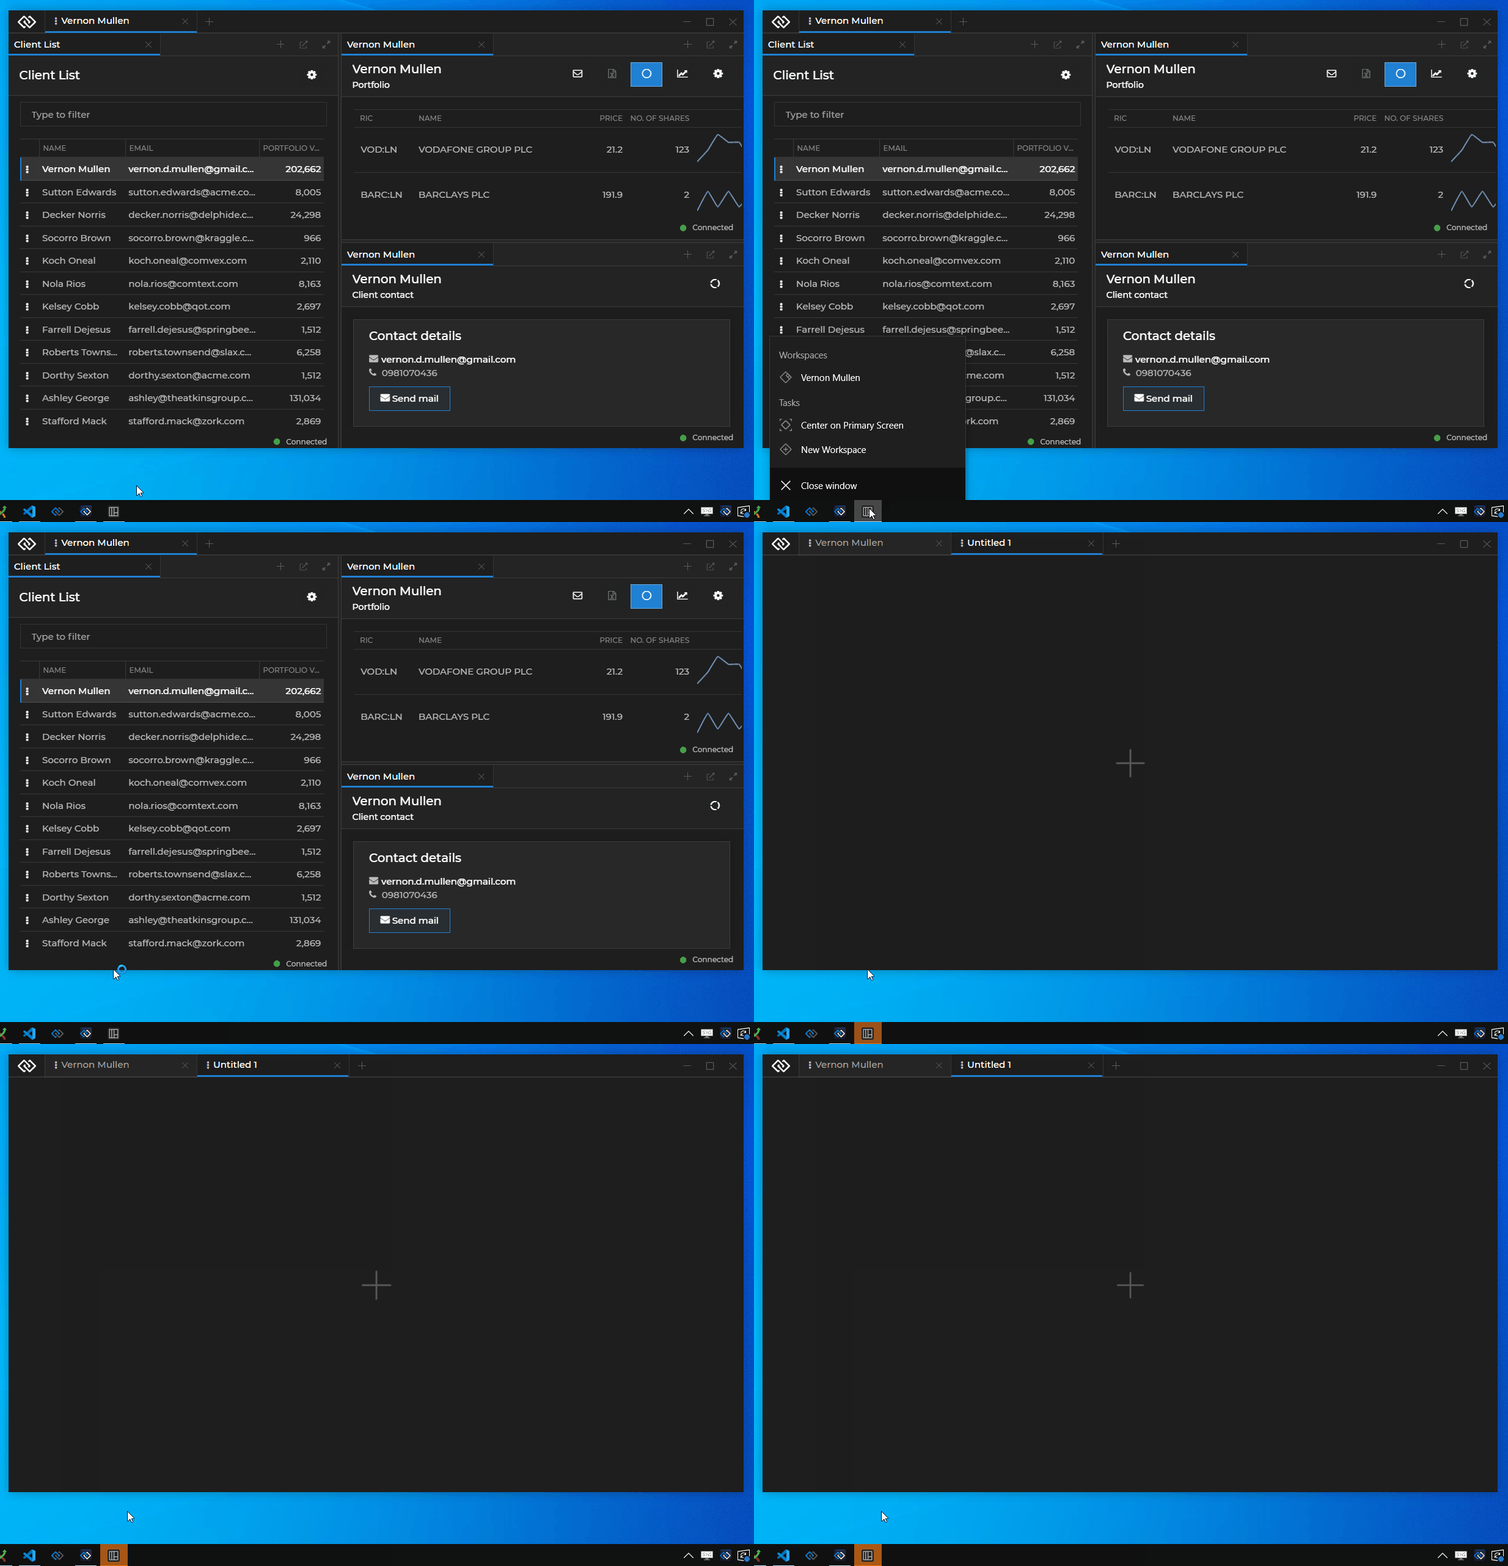
"newWorkspace"- opens a new Workspace. This action by default is part of the jump list for the Workspaces App. Clicking on the action opens a new empty Workspace in the last opened instance of the Workspaces App. If this action is part of the jump list for another app and the Workspaces App isn't currently open when the user clicks on the action, it will be started:
Jump List API
The jump list API is accessible via the IOConnectWindow object which describes an instance of an io.Connect Window:
const myWindow = io.windows.my();
// Check whether the jump list is enabled for the current window.
const isJumpListEnabled = await myWindow.jumpList.isEnabled();
Enable or Disable the Jump List
To enable or disable the jump list dynamically, use the setEnabled() method and pass a Boolean value as an argument:
const myWindow = io.windows.my();

// Checking whether the jump list is enabled for the current window.
const isJumpListEnabled = await myWindow.jumpList.isEnabled();

if (!isJumpListEnabled) {
    // Enabling the jump list.
    await myWindow.jumpList.setEnabled(true);
}
Categories
Jump list categories are used for grouping actions in a section under a common name. You can find a category by name, get a list of all available categories, create a new category or remove an existing one. The categories API is accessible via the jumpList.categories object.
To find a category by name, use the find() method:
const myCategory = await myWindow.jumpList.categories.find("My Category");To get a list of all available categories, use the list() method:
const categoryList = await myWindow.jumpList.categories.list();To create a category, use the create() method. Pass a title for the category and a list of JumpListActionSettings objects describing the actions in the category:
// Category settings.
const title = "My Category";
const actions = [
   {
        // Icon for the action. Must point to a local file.
        icon: "../images/action-one.ico",
        // Callback that will be executed when the user clicks on the action.
        callback: () => console.log("Action 1"),
        // Title of the action when there is a single instance with a single Windows taskbar icon.
        singleInstanceTitle: "Execute Action 1",
        // Title of the action when there are multiple instances with grouped Windows taskbar icons.
        multiInstanceTitle: "Execute Action 1 for All"
    },
    {
        icon: "../images/action-two.ico",
        callback: () => console.log("Action 2"),
        singleInstanceTitle: "Execute Action 2",
        multiInstanceTitle: "Execute Action 2 for All"
    }
];

// Creating a category.
await myWindow.jumpList.categories.create(title, actions);
To remove a category, use the remove() method and pass the category title as an argument:
await myWindow.jumpList.categories.remove("My Category");Actions
Each JumpListCategory object has an actions property through which you can access the actions API. You can create, remove or list all available actions in the current category.
To get a list of all available actions in a category, use the list() method:
const myCategory = await myWindow.jumpList.categories.find("My Category");

const actions = await myCategory.actions.list();
To create an action in a category, use the create() method. Pass a list of JumpListActionSettings objects describing the actions.
The following example demonstrates creating an action in the "Tasks" category that will toggle the io.Connect theme:
// Finding a category.
const category = await myWindow.jumpList.categories.find("Tasks");
// Action settings.
const actions = [
    {
        icon: "../images/toggle-theme.ico",
        // This action will toggle the io.Connect theme.
        callback: async () => {
            const currentTheme = await io.themes.getCurrent();
            if (currentTheme.name === "dark") {
                io.themes.select("light");
            } else {
                io.themes.select("dark");
            }
        },
        singleInstanceTitle: "Toggle Theme",
        multiInstanceTitle: "Toggle Theme"
    }
];

// Creating actions for an existing category.
await category.actions.create(actions);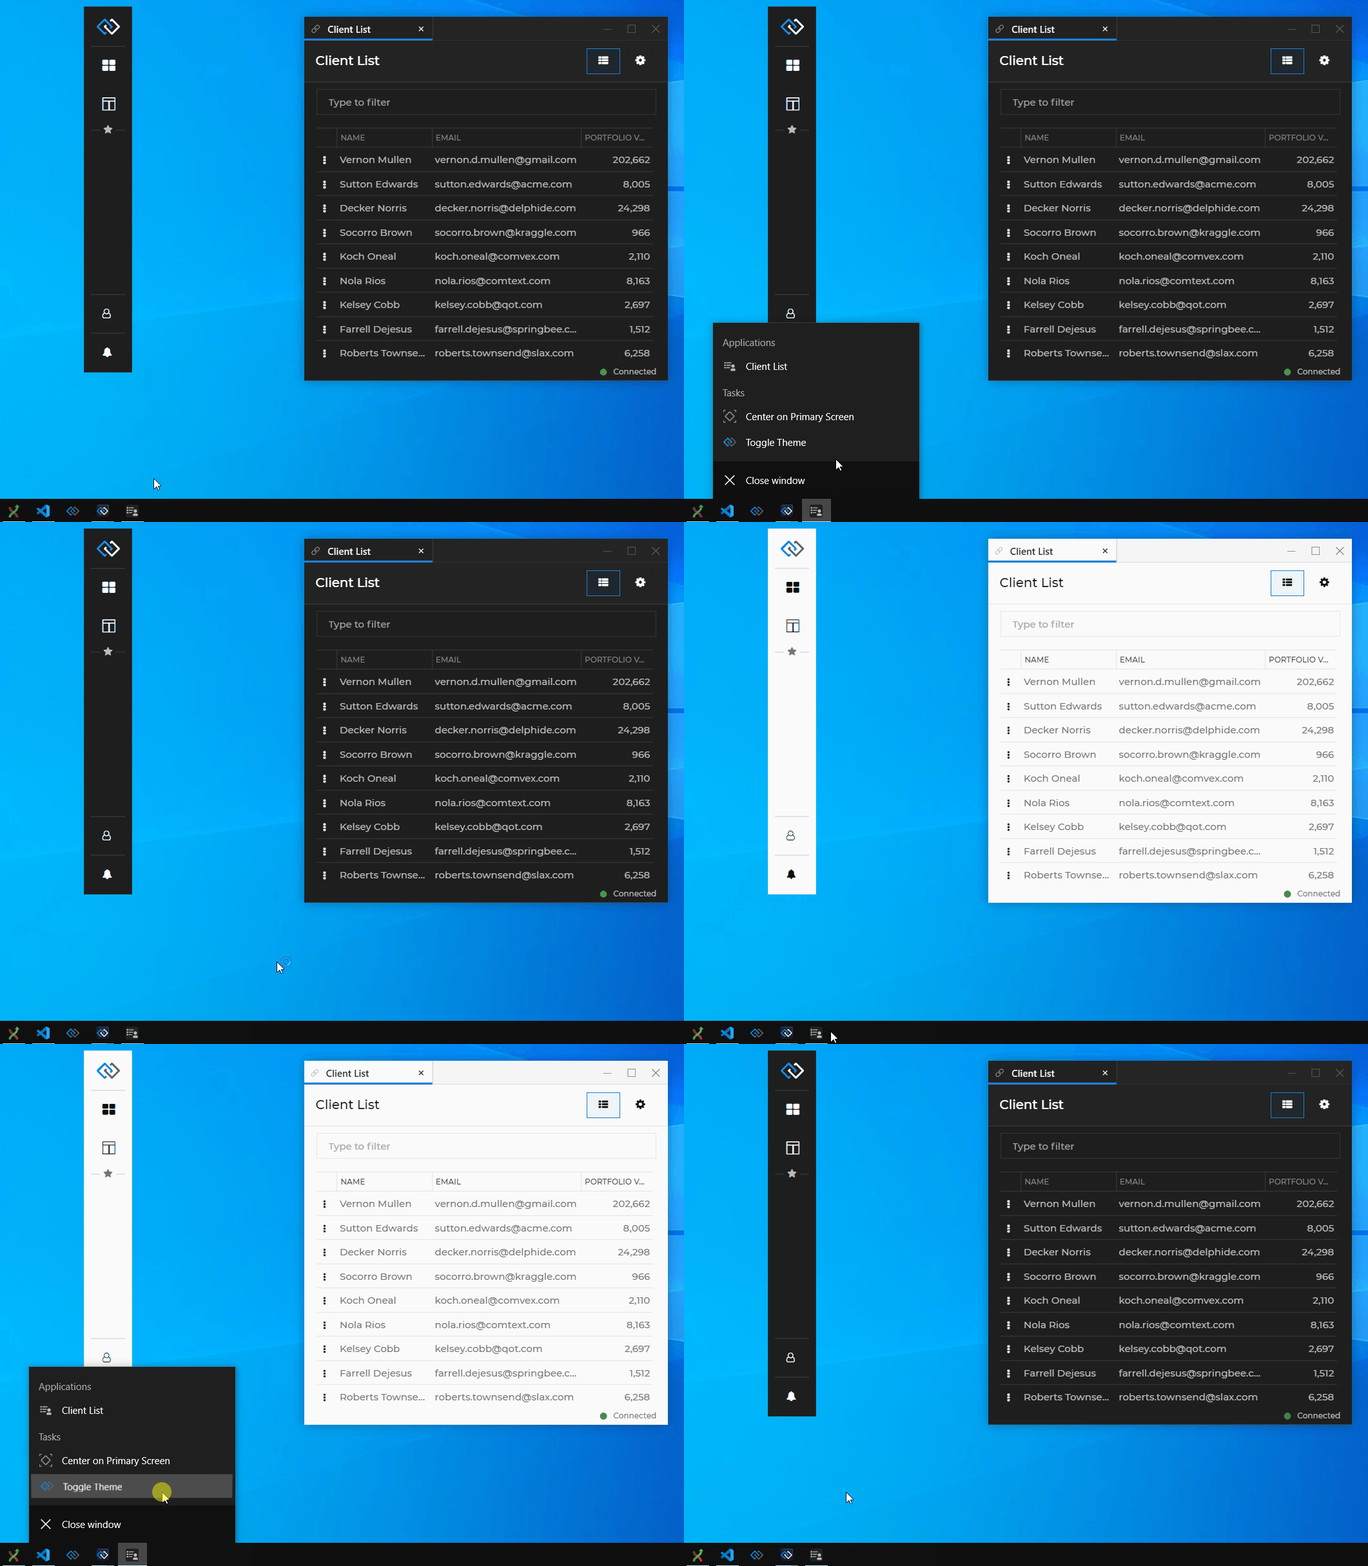
To remove one or more actions from a category, use the remove() method and pass a list of JumpListActionSettings objects to remove:
const actions = [
   {
        icon: "../images/action-one.ico",
        callback: () => console.log("Action 1"),
        singleInstanceTitle: "Execute Action 1",
        multiInstanceTitle: "Execute Action 1 for All"
    },
    {
        icon: "../images/action-two.ico",
        callback: () => console.log("Action 2"),
        singleInstanceTitle: "Execute Action 2",
        multiInstanceTitle: "Execute Action 2 for All"
    }
];

// Removing actions from a category.
await category.actions.remove(actions);
Hotkeys
The Hotkeys API allows apps to register key combinations and receive notifications when a key combination is pressed by the user irrespective of whether the app is on focus or not. Hotkeys are useful for web apps that don't have access to system resources and can't register global shortcuts.
Configuration
To control the hotkeys behavior, use the "hotkeys" top-level key in the system.json system configuration file of io.Connect Desktop.
Example configuration:
{
    "hotkeys": {
        "enabled": true,
        "blacklist": ["appManager"],
        "reservedHotkeys": ["ctrl+c", "ctrl+p", "ctrl+s"]
    }
}
The "hotkeys" object has the following properties:
| Property | Type | Description |
|---|---|---|
"enabled" |
boolean |
If true, hotkeys will be enabled. |
"blacklist" |
string[] |
List of names of apps that won't be able to register hotkeys. |
"reservedHotkeys" |
string[] |
List of reserved (system or other) hotkeys that app won't be able to override. |
"whitelist" |
string[] |
List of names of apps that will be able to register hotkeys. |
Hotkeys API
The Hotkeys API is accessible via the io.hotkeys object.
To register a hotkey, use the register() method:
// Define a hotkey.
const hotkeyDefinition = {
    hotkey: "shift+alt+c",
    description: "Open Client Details"
};

// This function will be invoked when the hotkey is pressed.
const hotkeyHandler = () => {
    io.appManager.application("Client Details").start();
};

// Register the hotkey.
await io.hotkeys.register(hotkeyDefinition, hotkeyHandler);
To remove a hotkey, use the unregister() and pass the value of the hotkey combination as an argument:
await io.hotkeys.unregister("shift+alt+c");To remove all hotkeys registered by your app, use the unregisterAll() method:
await io.hotkeys.unregisterAll();To check if your app has registered a specific hotkey, use the isRegistered() method:
// Returns a Boolean value.
const isRegistered = io.hotkeys.isRegistered("shift+alt+c");
Hotkeys View
There is a utility view that allows you to see all hotkeys registered by different apps. You can open it from the io.Connect Desktop tray icon menu - right-click on the tray icon to display the menu. When you click on the "Hotkeys" item you will see a list of the hotkeys registered by your app:
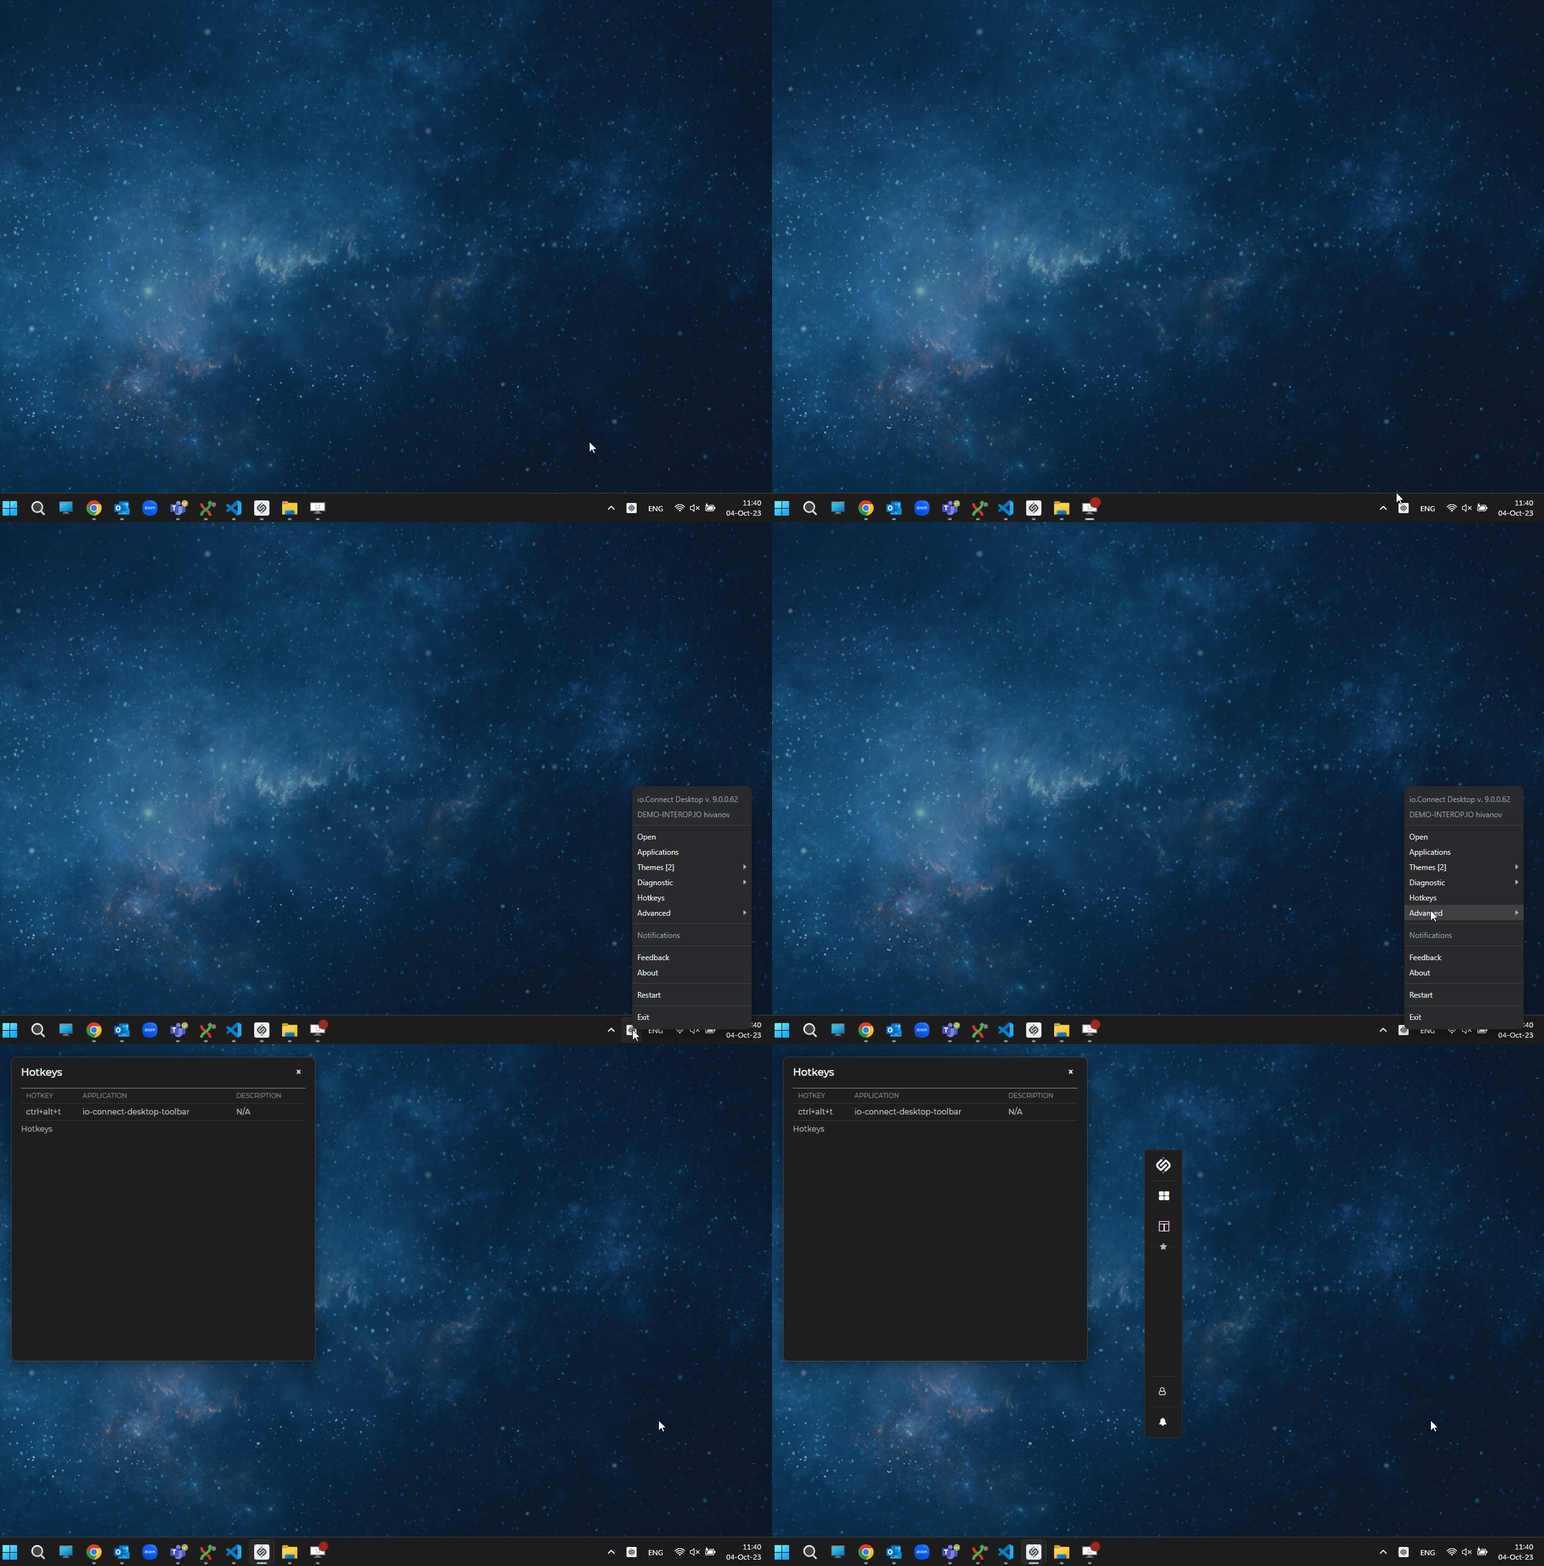
For a complete list of the available Hotkeys API methods and properties, see the Hotkeys API reference documentation.
Displays
io.Connect Desktop provides a way for apps to programmatically capture screenshots of the available monitors. Based on custom logic you can capture one or all monitors in order to save a snapshot of the visual state at a given moment.
Configuration
To enable display capturing you must add the "allowCapture" property to your app definition file and set it to true.
{
    "name": "MyApp",
    "type": "window",
    "allowCapture": true,
    "details": {
        "url": "http://localhost:3000"
    }
}
Displays API
The Displays API is accessible via the io.displays object.
All Displays
To get all displays, use the all() method. It returns an array of all available Display objects:
const allDsiplays = await io.displays.all();Primary Display
You can get the primary display with the getPrimary() method:
// Returns the primary display.
const primaryDisplay =  await io.displays.getPrimary();
Example of finding and capturing the primary display:
const display = await io.displays.getPrimary();
const screenshot = await display.capture({ scale:0.5 });
Specific Display
To get a specific display, use the get() method. It accepts a display ID as an argument and resolves with a Display object:
const displayID = 2528732444;

// returns a display by ID
const display = await io.displays.get(displayID);
Capturing All Displays
To capture all displays, use the captureAll() method. It accepts a CaptureAllOptions object and returns a Base64 encoded string or an array of Base64 encoded strings depending on the specified combined option.
The following example demonstrates how to capture all available displays and combine the screenshots into a single image with width set to 2000 pixels. The aspect ratio of the combined images will be preserved (the omitted keepAspectRatio property in the size object defaults to true) and the images will be arranged the way you have arranged your displays from your operating system settings:
const screenshot = await io.displays.captureAll({ combined: true, size: { width: 2000 } });The CaptureAllOptions object has the following properties:
| Property | Type | Description |
|---|---|---|
combined |
boolean |
Required. If true, will return a single image of all captured displays. If false, will return separate images for all captured displays. |
size |
object |
Accepts either a ScaleOptions or an AbsoluteSizeOptions object, specifying the size of the output image. |
Capturing Single Displays
To capture a single display, use the capture() method at top level of the API or on a Display instance.
When you use the capture() method at top level of the API, pass a CaptureOptions object. The following example demonstrates how to use the display ID to find and capture the desired display and also how to specify capturing options. The width and height of the output image will be half the width and height of the captured monitor. The captured image is returned as a Base64 encoded string:
const displayID = 2528732444;
const captureOptions = {
    id: displayID,
    size: { scale: 0.5 }
}

const screenshot = await io.displays.capture(captureOptions);
The CaptureOptions object has the following properties:
| Property | Type | Description |
|---|---|---|
id |
number |
Required. ID of the targeted display. |
size |
object |
Accepts either a ScaleOptions or an AbsoluteSizeOptions object, specifying the size of the output image. |
The ScaleOptions object has only one property - scale, which accepts a number. The value you pass to it specifies the size of the output image relative to the actual screen size. For instance, if you use scale: 0.5 the height and width of the output image will be half the height and width of the captured screen.
The AbsoluteSizeOptions object has the following properties:
| Property | Type | Description |
|---|---|---|
height |
number |
Specifies the height of the output image. Defaults to the captured display height. |
keepAspectRatio |
boolean |
Whether to keep the aspect ratio of the output image when you specify width and/or height of the output image. If true and both width and height are set, then the specified width will be used as a basis for the output image aspect ratio. |
width |
number |
Specifies the width of the output image. Defaults to the captured display width. |
When you use the capture() method of a Display instance, pass either a ScaleOptions or an AbsoluteSizeOptions object, specifying the size of the output image. The following example demonstrates how to find and capture all non-primary displays:
const screenshots = await Promise.all(
            // Get all displays.
            (await io.displays.all())
            // Filter out the primary display.
            .filter(display => !display.isPrimary)
            .map(display => display.capture({ scale: 0.5 })));
Capturing Windows & Window Groups
You can use the capture() method of an io.Connect Window instance or an io.Connect Window group to capture the respective window or window group. This method works also for minimized windows and window groups but doesn't work for hidden windows.
// Capture the current window.
const windowScreenshot = await io.windows.my().capture();

// Capture the current group.
const groupScreenshot = await io.windows.groups.my.capture();
Events
The onDisplayChanged() method allows you to handle the event that fires when a display has been modified - its resolution or position has changed, a display has been connected or disconnected, etc. Pass a handler that will be invoked each time a display changes and use the list of Display objects that it receives as an argument to react to the changes:
const handler = (displays) => {
    // React to DPI changes, display connected or disconnected, monitor position changed, etc.
    console.log(displays);
};

io.displays.onDisplayChanged(handler);
For a complete list of the available Displays API methods and properties, see the Displays API reference documentation.
Logging
io.Connect Desktop offers a Logger API which enables web apps to create a hierarchy of sub-loggers mapped to app components where you can control the level of logging for each component. You can also route the output of log messages (depending on the logging level) to a variety of targets - the developer console or an external output (usually a rolling file on the desktop, but actually any target the log4net library supports).
Adding logging to files to your web apps can be helpful in a variety of ways. Having a well-designed and meaningful logging structure in your apps and their components can save a lot of time when debugging an app during development or troubleshooting problems with an app in production.
ℹ️ For details on how to configure and customize the logging mechanisms of io.Connect Desktop, see the Developers > Configuration > System > Logging section.
ℹ️ For details on how to enable logging the
stdoutandstderrstream outputs of native apps, see the Developers > Configuration > System > Logging section.
Configuration
Logging for apps via the io.Connect APIs is disabled by default. To allow it, use the "allowLogging" top-level key in the app definition file:
{
    "allowLogging": true
}
Logger API
The Logger API is accessible via the io.logger object.
Logger instances have a subLogger() method that creates a new sub-logger of the current logger. The name of each logger instance is a dot delimited string containing all names of the loggers constituting an hierarchy line from the base logger (the app name) down to the current logger. This allows an effective and intuitive logging structure which can be easily adjusted to the component hierarchy in your app. For instance, a structure like app-name.main-component.sub-component gives you a clear idea from where the respective log entry originates and helps you find the necessary information much faster in a log file that may (and usually does) contain thousands of entries.
To use a logger in your interop-enabled apps, create a logger instance with the subLogger() method and assign the logger a name:
const logger = io.logger.subLogger("main-component");Next, set the logging level at which to publish log entries to the file. Use the publishLevel() method of the logger instance:
logger.publishLevel("info");Everything at and above the specified logging level will be logged, all else will be skipped. The available logging levels are "trace", "debug", "info", "warn" and "error".
To log messages, either use the log() method of the logger instance, or the respective logging level methods - error(), trace(), etc.
// The log() method accepts a message and logging level as arguments.
logger.log("Couldn't load component!", "error");

// or

// Each logging level method accepts only a message as an argument.
logger.error("Couldn't load component!");
For a complete list of the available Logger API methods and properties, see the Logger API reference documentation.
Location & Output
User apps will log in the respective <app-name>.log file where <app-name> represents the name of your app as specified in its app definition. A separate log file is created for each app that has logging enabled. All instances of an app log to the same file. The app log file will be located in the %LocalAppData%/interop.io/io.Connect Desktop/UserData/<ENV>-<REG>/logs/applications folder on Windows and in the ~Library/Application Support/interop.io/io.Connect Desktop/UserData/<ENV>-<REG>/logs/applications folder on macOS where <ENV>-<REG> represents the environment and region of io.Connect Desktop (e.g., DEMO-INTEROP.IO).
The log file entries are in the following format:
[<date>T<time>] [<logging_level>] [<instance_id>] [<logger_name>] - <log_message>The following example demonstrates an actual log entry:
[2020-03-11T14:27:58.087] [ERROR] [30760_11] [client-list.test-logger] - test-error
    at t.error (http://localhost:22080/client-list/desktop-4.8.0.js:1:39269)
    at <anonymous>:1:8
Available since io.Connect Desktop 9.9
Child windows of web apps opened via the browser native window.open() method can also use the Logger API to create log entries.
The log entries created by child windows are located in the parent app log file. Each log entry by a child app contains specific details about the child app (indication that the log entry was made by a child app, instance ID and URL of the child app) allowing you to easily find and extract the relevant information. The following example demonstrates the shape of an actual log entry by a child app:
[2025-06-16T10:12:12.476] [INFO] [15308_13] [child:15308_14|https://interop.io/] - Log entry by a child app.System Logs
Streaming & Consuming
You can configure io.Connect Desktop to stream the system logs so that they can be consumed by your apps. You can specify the log level and the interval at which the logs to be streamed. Use the "streaming" property of the "logging" top-level key in the system.json system configuration file of io.Connect Desktop to specify the log streaming configuration:
{
    "logging": {
        "streaming": {
            "enabled": true,
            "minLevel": "warn",
            "interval": 60
        }
    }
}
The "streaming" object has the following properties:
| Property | Type | Description |
|---|---|---|
"enabled" |
boolean |
If true, will enable streaming system log entries. Defaults to false. |
"interval" |
number |
Interval in seconds at which the log entries will be streamed. Defaults to 120. |
"minLevel" |
"error" | "warn" | "info" |
The minimum level of the log entries to be streamed. Defaults to "error". |
To consume the log entries in your apps, you must implement and register an Interop method named "T42.Logs.Listen". This method will be invoked whenever io.Connect Desktop streams the system logs. The method handler will receive an object with an entries property as an argument which holds an array of objects each describing the individual log entries:
const name = "T42.Logs.Listen";
const handler = logs => logs.entries.forEach(e => console.log(e.source, e.logEntry));

await io.interop.register(name, handler);
Each log entry has the following properties:
| Property | Type | Description |
|---|---|---|
logEntry |
object |
A LoggingEvent object as described in the log4js-node types. |
source |
"application" | "bridge" | "gw" |
Source of the system log entry. Log entries may come from the io.Connect Desktop app itself, from the internal window management app, or from the io.Connect Gateway. |
Log Files
Available since io.Connect Desktop 9.3
To specify settings for handling the system log files, use the "files" property of the "logging" top-level key in the system.json system configuration file of io.Connect Desktop:
{
    "logging": {
        "files": {
            "onStartup": "archive",
            "moveOldTo": "%LocalAppData%/my-org/logs"
        }
    }
}
The "files" object has the following properties:
| Property | Type | Description |
|---|---|---|
"moveOldTo" |
string |
Absolute path pointing to the location where the log files from the previous session (if any) will be moved on startup of io.Connect Desktop. You can use environment variables. Defaults to "%GLUE-USER-DATA%/logs/archive". |
"onStartup" |
string |
Specifies how to handle the log files on system startup. Set to "archive" to archive the existing log files. Set to "delete" to delete the existing log files. Set to "keep" (default) to leave the existing log files intact. |
Capturing Client App Errors
Available since io.Connect Desktop 9.9
To instruct io.Connect Desktop to capture console messages, network request errors, and any unhandled errors originating from your web app, use the "logging" property of the "details" top-level key in the app definition:
{
    "details": {
        "logging": {
            "consoleMessages": {
                "enabled": true,
                "level": "info"
            },
            "networkRequestErrors": {
                "enabled": true
            },
            "unhandledErrors": {
                "enabled": false
            }
        }
    }
}
The captured errors will be logged in the respective <app-name>.log file where <app-name> represents the name of your app as specified in its app definition. The app log file will be located in the %LocalAppData%/interop.io/io.Connect Desktop/UserData/<ENV>-<REG>/logs/applications folder on Windows and in the ~Library/Application Support/interop.io/io.Connect Desktop/UserData/<ENV>-<REG>/logs/applications folder on macOS where <ENV>-<REG> represents the environment and region of io.Connect Desktop (e.g., DEMO-INTEROP.IO).
Capturing these errors is disabled by default. The "logging" property accepts a Boolean or an object as a value. If set to true, all console messages, networks request errors, and unhandled errors will be logged. You can use an object as a value to provide settings for the types of errors you want to capture.
The "logging" object has the following properties:
| Property | Type | Description |
|---|---|---|
"consoleMessages" |
object |
Settings for capturing console messages. |
"networkRequestErrors" |
object |
Settings for capturing network request errors. |
"unhandledErrors" |
object |
Settings for capturing unhandled errors (e.g., unhandled Promise rejections, errors not logged in the console). |
The "consoleMessages" object has the following properties:
| Property | Type | Description |
|---|---|---|
"enabled" |
boolean |
If true, will allow capturing all console messages. Defaults to false. |
"level" |
"trace" | "debug" | "info" | "warn" | "error" |
Sets the level at which to capture console messages. The platform will capture all console messages at the specified level and above. Defaults to "trace". |
The "networkRequestErrors" object has the following properties:
| Property | Type | Description |
|---|---|---|
"enabled" |
boolean |
If true, will allow capturing all network request errors. Defaults to false. |
The "unhandledErrors" object has the following properties:
| Property | Type | Description |
|---|---|---|
"enabled" |
boolean |
If true, will allow capturing all unhandled errors. Defaults to false. |
Cookies
Web apps can retrieve, filter, set and remove cookies programmatically by using the io.Connect Cookies API.
Configuration
By default, interop-enabled web apps aren't allowed to manipulate cookies. To allow an app to manipulate cookies, use the "allowCookiesManipulation" property of the "details" top-level key in the app definition file:
{
    "details": {
        "allowCookiesManipulation": true
    }
}
Cookies API
The Cookies API is accessible via the io.cookies object.
Get
To retrieve all cookies, use the get() method:
const allCookies = await io.cookies.get();The get() method returns a list of Cookie objects.
To filter the cookies, pass a CookiesGetFilter object with the properties which you want to use as a filter.
The following example demonstrates filtering cookies by domain:
const filter = { domain: "interop.io" };

// Get a list of cookies for the same domain.
const filteredCookies = await io.cookies.get(filter);
The CookiesGetFilter object has the following optional properties, which you can use in any combination to filter the cookies:
| Property | Type | Description |
|---|---|---|
domain |
string |
Retrieves the cookies whose domains match or are subdomains of the specified domain. |
name |
string |
Filters the cookies by name. |
path |
string |
Retrieves the cookies whose path matches the specified path. |
secure |
boolean |
Filters cookies by their Secure attribute. |
session |
boolean |
If true, will return only the session cookies. If false, will return only the persistent cookies. |
url |
string |
Retrieves the cookies which are associated with the specified URL. If not specified, will retrieve the cookies for all URLs. |
Set
To create a cookie, use the set() method. It accepts as a required argument a CookiesSetDetails object with a required url property:
const cookie = {
    url: "https://example.com",
    name: "MyCookie",
    value: "42"
};

await io.cookies.set(cookie);
The CookiesSetDetails object has the following properties:
| Property | Type | Description |
|---|---|---|
domain |
string |
Domain for the cookie. Will be normalized with a preceding dot in order to be valid for subdomains too. |
expirationDate |
number |
The expiration date of the cookie as a number of seconds since the UNIX epoch. If not specified, the cookie will become a session cookie and won't be persisted between sessions. |
httpOnly |
boolean |
If true, the cookie will be marked with an HttpOnly attribute. Default is false. |
name |
string |
Name for the cookie. |
path |
string |
Path for the cookie. |
sameSite |
"unspecified" | "no_restriction" | "lax" | "strict" |
The value to be applied to the SameSite attribute. If set to "no_restriction", the secure property will be set automatically to true. Default is "lax". |
secure |
boolean |
If true, the cookie will be marked with a Secure attribute. Default is false, unless the SameSite attribute has been set to None. |
url |
string |
Required. URL to associate with the cookie. |
value |
string |
Value for the cookie. |
Remove
To remove a cookie, use the remove() method and pass the cookie URL and name:
const url = "https://example.com";
const name = "MyCookie";

await io.cookies.remove(url, name);
Dialogs
io.Connect Desktop offers default confirmation dialogs that will be shown on system shutdown or restart and when a window that prevents closing is about to be closed:
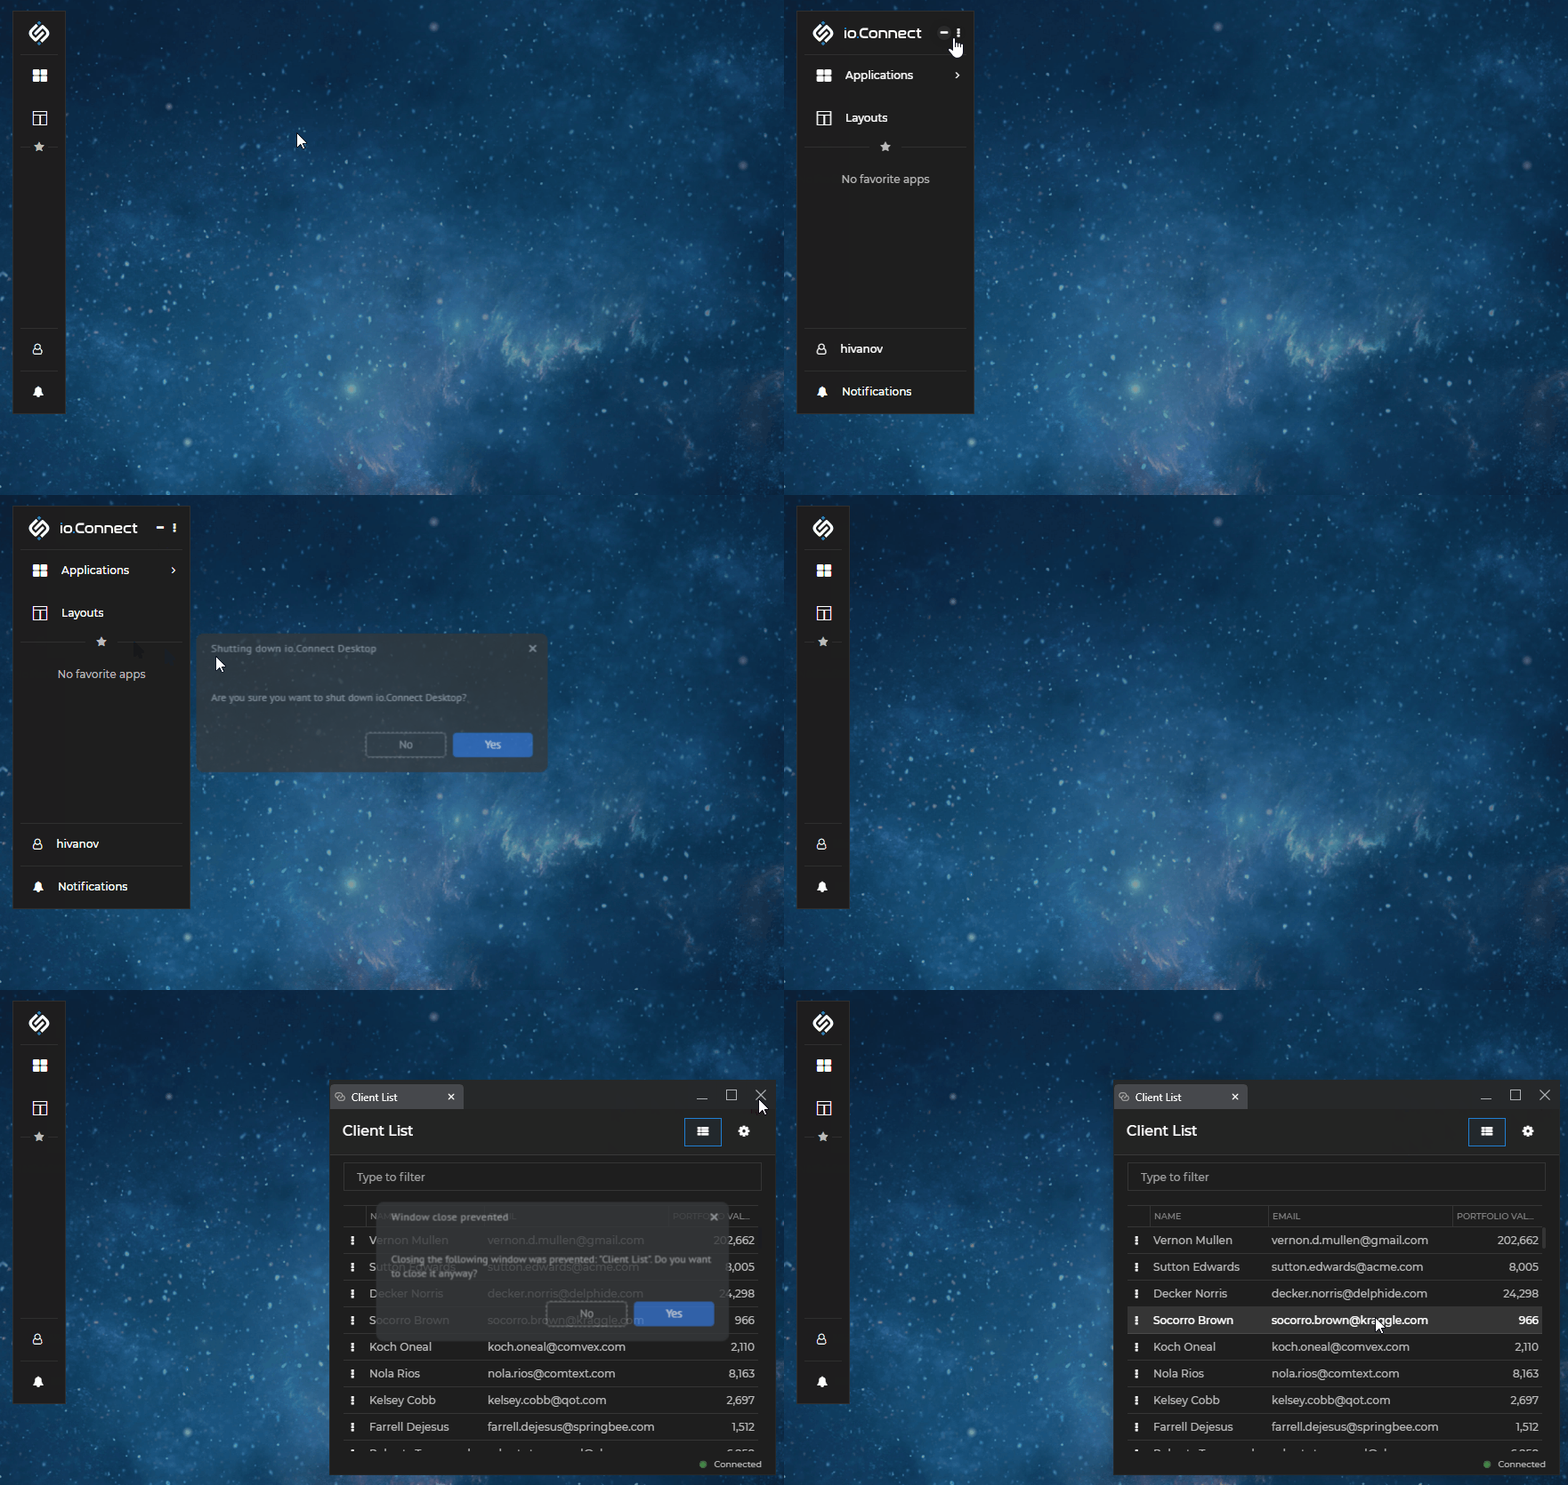
Configuration
The default dialogs are configurable via the "dialogs" top-level key in the system.json system configuration file of io.Connect Desktop. You can specify size for them, disable them, or provide a URL pointing to your own custom dialog app to be used by io.Connect Desktop:
{
    "dialogs": {
        "url": "https://my-custom-dialog.com",
        "width": 380,
        "height": 150,
        "enableDefaultDialogs": {
            "preventShutdown": false,
            "preventWindowClose": false
        }
    }
}
The "dialogs" object has the following properties:
| Property | Type | Description |
|---|---|---|
"enableDefaultDialogs" |
object |
Enable or disable the default io.Connect dialog messages. |
"height" |
number |
Height in pixels for the io.Connect dialogs. Defaults to 205. |
"transparent" |
boolean |
If true, the io.Connect Window containing the dialog will be transparent. |
"url" |
string |
URL pointing to the location of the io.Connect dialog app. |
"width" |
number |
Width in pixels for the io.Connect dialogs. Defaults to 400. |
The "enableDefaultDialogs" object has the following properties:
| Property | Type | Description |
|---|---|---|
"preventShutdown" |
boolean |
If true (default), will enable the dialog message that appears when io.Connect Desktop is about to shutdown. |
"preventWindowClose" |
boolean |
If true (default), will enable the dialog message that appears when the user tries to close an io.Connect Window that is programmatically prevented from closing. This dialog will appear also when such window participates in a Layout that is being closed. |
"unsavedLayoutChanges" |
boolean |
If true, will enable the dialog message that appears when the user modifies the current Global Layout and tries to restore another Global Layout. Defaults to false. Available since io.Connect Desktop 9.2. |
Using Dialogs Programmatically
The showDialog() method that is available on an IOConnectWindow instance and on a Workspaces Frame instance enables you to show dialogs dynamically.
The showDialog() method accepts a DialogOptions object as an argument in which you can specify dialog options - select a predefined io.Connect dialog type and fine-tune it, or create a completely customized one. The only required options are type and message for the dialog to show.
The following predefined dialog types are available:
| Dialog Type | Description |
|---|---|
"Ok" |
Contains an "OK" button. |
"OkCancel" |
Contains "OK" and "Cancel" buttons. |
"SingleInputDialog" |
Contains an input field, "Save" and "Don't Save" buttons. |
"YesNo" |
Contains "Yes" and "No" buttons. |
"YesNoCancel" |
Contains "Yes", "No" and "Cancel" buttons. |
The following example demonstrates displaying a predefined io.Connect dialog from an io.Connect Window instance:
const myDialog = {
    type: "SingleInputDialog",
    title: "Email Required",
    message: "Please, provide your email address:",
    inputPlaceholder: "john.doe@example.com",
    inputPattern: "[a-z0-9]@my-org.com",
    inputPatternErrorMessage: "Invalid email address!"
};

await myWindow.showDialog(myDialog);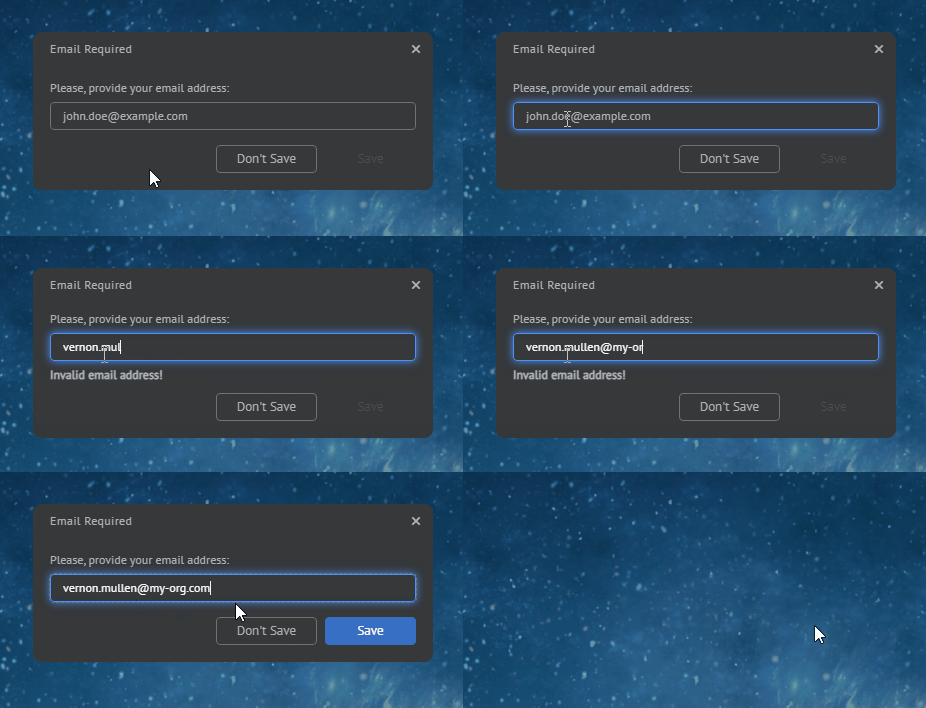
Custom Dialogs
The following example demonstrates creating a custom dialog using the options provided in the DialogOptions object:
const myDialog = {
    type: "MyCustomDialog",
    title: "Custom Title",
    message: "Custom Message",
    showTimer: true,
    timerDuration: 5,
    size: { height: 158 },
    showAffirmativeButton: true,
    affirmativeButtonName: "Confirm"
};

await myWindow.showDialog(myDialog);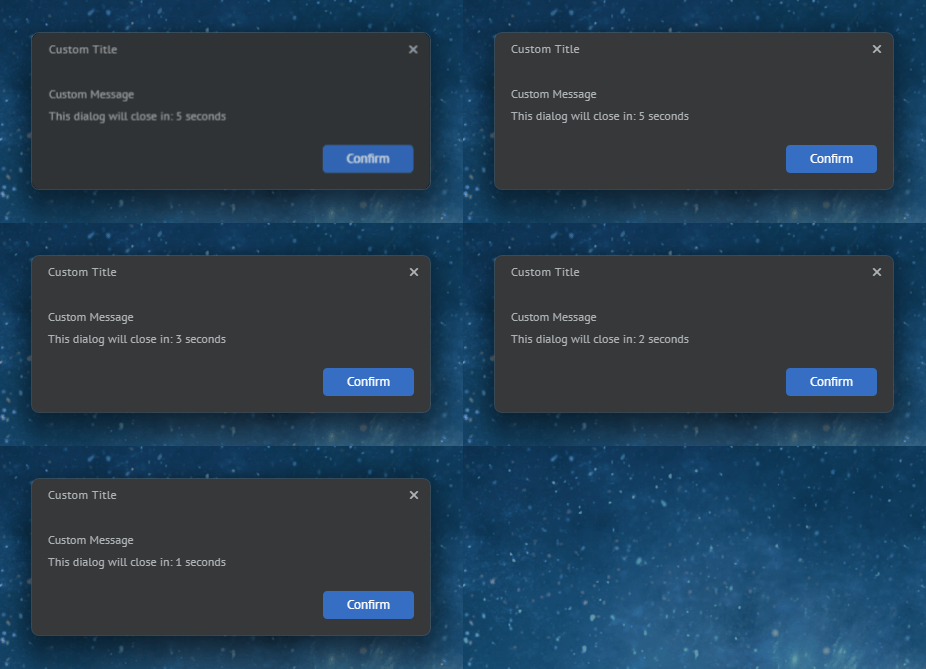
Dialog Mode
The DialogOptions object has an optional mode property which determines the blocking behavior of the dialog. The mode property is of type DialogMode which is an enumeration with two possible values:
| Value | Description |
|---|---|
"Global" |
All visible containers (including frameless io.Connect Windows) will be blocked for user interaction. |
"WindowContainer" |
Only the container (a Workspaces Frame, or an io.Connect Window group) of the window that is showing the dialog will be blocked for user interaction. All windows within a blocked container are blocked too. |
const myDialog = {
    type: "MyCustomDialog",
    title: "Custom Title",
    message: "Custom Message",
    // Will block all visible window containers for user interaction.
    mode: "Global"
};

await myWindow.showDialog(myDialog);
Functionality
To provide functionality to the dialog buttons or react when the user closes the dialog, use the DialogResult object returned from showing the dialog. The result is returned when the user clicks on a dialog button or closes the dialog.
The following example demonstrates showing a predefined io.Connect dialog with "OK" and "Cancel" buttons and responding to the user interaction:
const myDialog = {
    type: "OkCancel",
    title: "My Dialog Title",
    message: "My dialog message."
};

const handleDialogResult = (action, button) => {
    if (action === "closed") {
        // React to user closing the dialog.
        console.log("Dialog closed.");
        return;
    } else {
        if (button === "affirmative") {
            // React to user clicking the "OK" button.
            console.log("OK button clicked.");
        } else {
            // React to user clicking the "Cancel" button.
            console.log("Cancel button clicked.");
        }
    }
};

const { action, button } = await myWindow.showDialog(myDialog);

handleDialogResult(action, button);
Zooming
io.Connect Desktop supports zooming in and out of windows of web apps. Zooming can be controlled via configuration (system-wide or per app) or programmatically via the available methods/properties of a window instance.
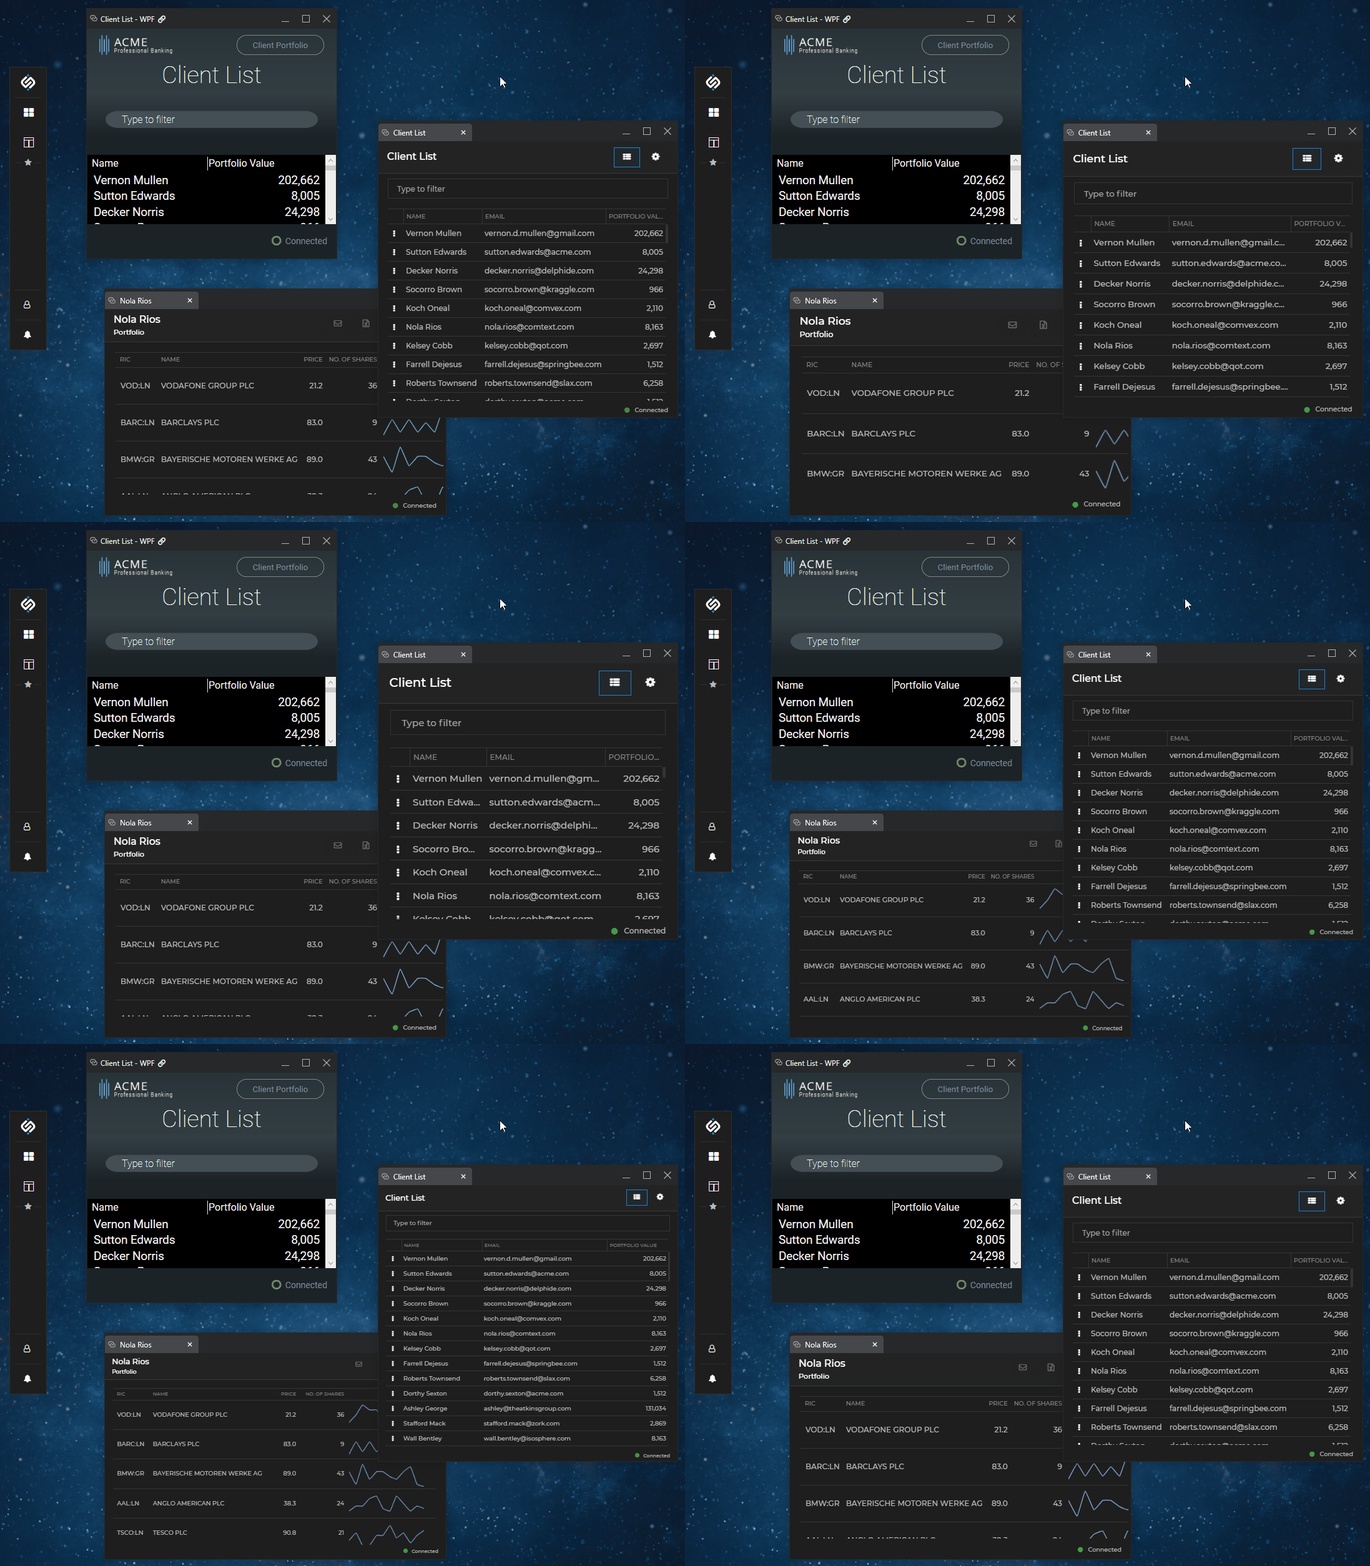
You can zoom in and out of windows in several ways:
CTRL + =(zoom in) andCTRL + -(zoom out);CTRL + MOUSE SCROLL;CTRL + 0- resets to the default zoom factor;- mouse pad gestures;
- using the right-click context menu (if enabled);
⚠️ Note that if your app logic includes both zooming a window and retrieving its size with the
window.innerHeightorwindow.innerWidthDOM properties, you have to consider the fact that the browser will report adjusted size values based on the zoom factor. In such cases, it's recommended to usewindow.outerHeightandwindow.outerWidth, or theboundsproperty of anIOConnectWindowinstance.
Configuration
You can configure window zooming globally via the system.json system configuration file of io.Connect Desktop. Use the "zoom" property of the "windows" top-level key:
{
    "windows": {
        "zoom": {
            "enabled": true,
            "mouseWheelZoom": true,
            "factors": [25, 33, 50, 67, 75, 80, 90, 100, 110, 125, 150, 175, 200, 250, 300, 400, 500],
            "defaultFactor": 100
        }
    }
}
The "zoom" object has the following properties:
| Property | Type | Description |
|---|---|---|
"defaultFactor" |
number |
Default zoom factor within the range of 25 to 500. Avoid negative values. Defaults to 100. |
"enabled" |
boolean |
If true (default), will enable zooming. |
"factors" |
number[] |
List of zoom factors to be used when the user zooms in or out of the window. The factors must be in ascending order and may have integer or floating point values. Zooming will only work with factor values within the range of 25 to 500. Avoid passing negative values when setting the zoom factor (via configuration or programmatically), as this will cause unexpected behavior. Defaults to [25, 33, 50, 67, 75, 80, 90, 100, 110, 125, 150, 175, 200, 250, 300, 400, 500]. |
"mode" |
"domain" | "window" |
Determines the default zoom behavior for web apps. If set to "domain" (default), changes in the zoom factor will be applied to the current window, as well as to all other windows within the same domain (default web browser behavior). If set to "window", changes in the zoom factor will be applied only to the current window and won't affect other windows within the domain. Available since io.Connect Desktop 9.10. |
"mouseWheelZoom" |
boolean |
If true, will enable zooming with CTRL + mouse scroll. Defaults to false. |
You can also enable zooming per app from the app definition, which will override the global zoom configuration. Use the "zoom" property of the "details" top-level key:
[
    {
        "title": "My App",
        "type": "window",
        "name": "myApp",
        "details": {
            "url": "http://localhost:22080/my-app/index.html",
            "zoom": {
                "enabled": true,
                "mouseWheelZoom": true,
                "factors": [25, 33, 50, 67, 75, 80, 90, 100, 110, 125, 150, 175, 200, 250, 300, 400, 500],
                "defaultFactor": 100
            }
        }
    }
]
Using Zoom Programmatically
There are several methods and properties exposed on the window instance, which you can use to control zoom behavior.
Get the current zoom factor:
const myWindow = io.windows.my();

console.log(myWindow.zoomFactor);
Zoom in:
// Will zoom in the window to the next factor defined in the `"factors"` array.
await myWindow.zoomIn();
Zoom out:
// Will zoom out the window to the previous factor defined in the `"factors"` array
await myWindow.zoomOut();
Set a desired zoom factor:
await myWindow.setZoomFactor(number);Carefully consider all cases if you intend to pass a zoom factor value based on a logic in your app. Negative values will cause unexpected behavior. Passing positive values lower than 25 will cause zoom out with a factor of 25, positive values higher than 500 will cause zoom in with a factor of 500 and passing zero as a factor will preserve the previous zoom factor.
Listening for zoom factor changes:
// Returns a function which you can use to unsubscribe from events for zoom factor changes.
const unsubscribe = myWindow.onZoomFactorChanged(w => {
    console.log(`Zoom factor changed to ${w.zoomFactor}`)
});

unsubscribe();
Downloads
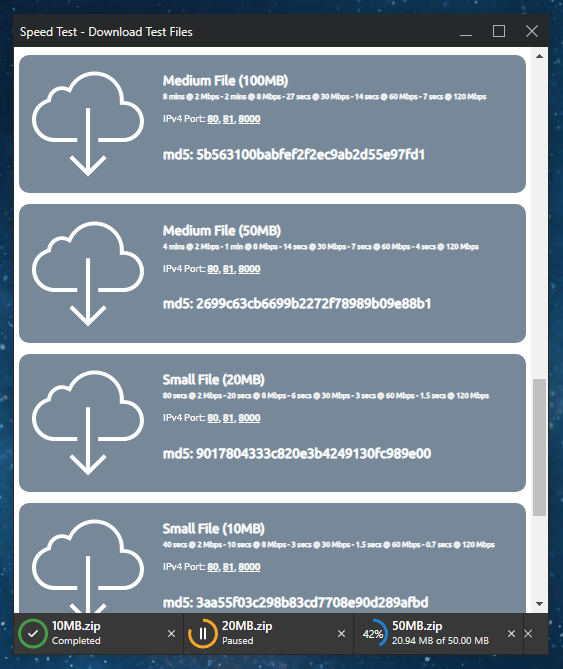
io.Connect Desktop allows for files to be downloaded in io.Connect Windows. Users can pause and cancel downloads, and open the location of completed downloads by clicking on them.
Available since io.Connect Desktop 9.2
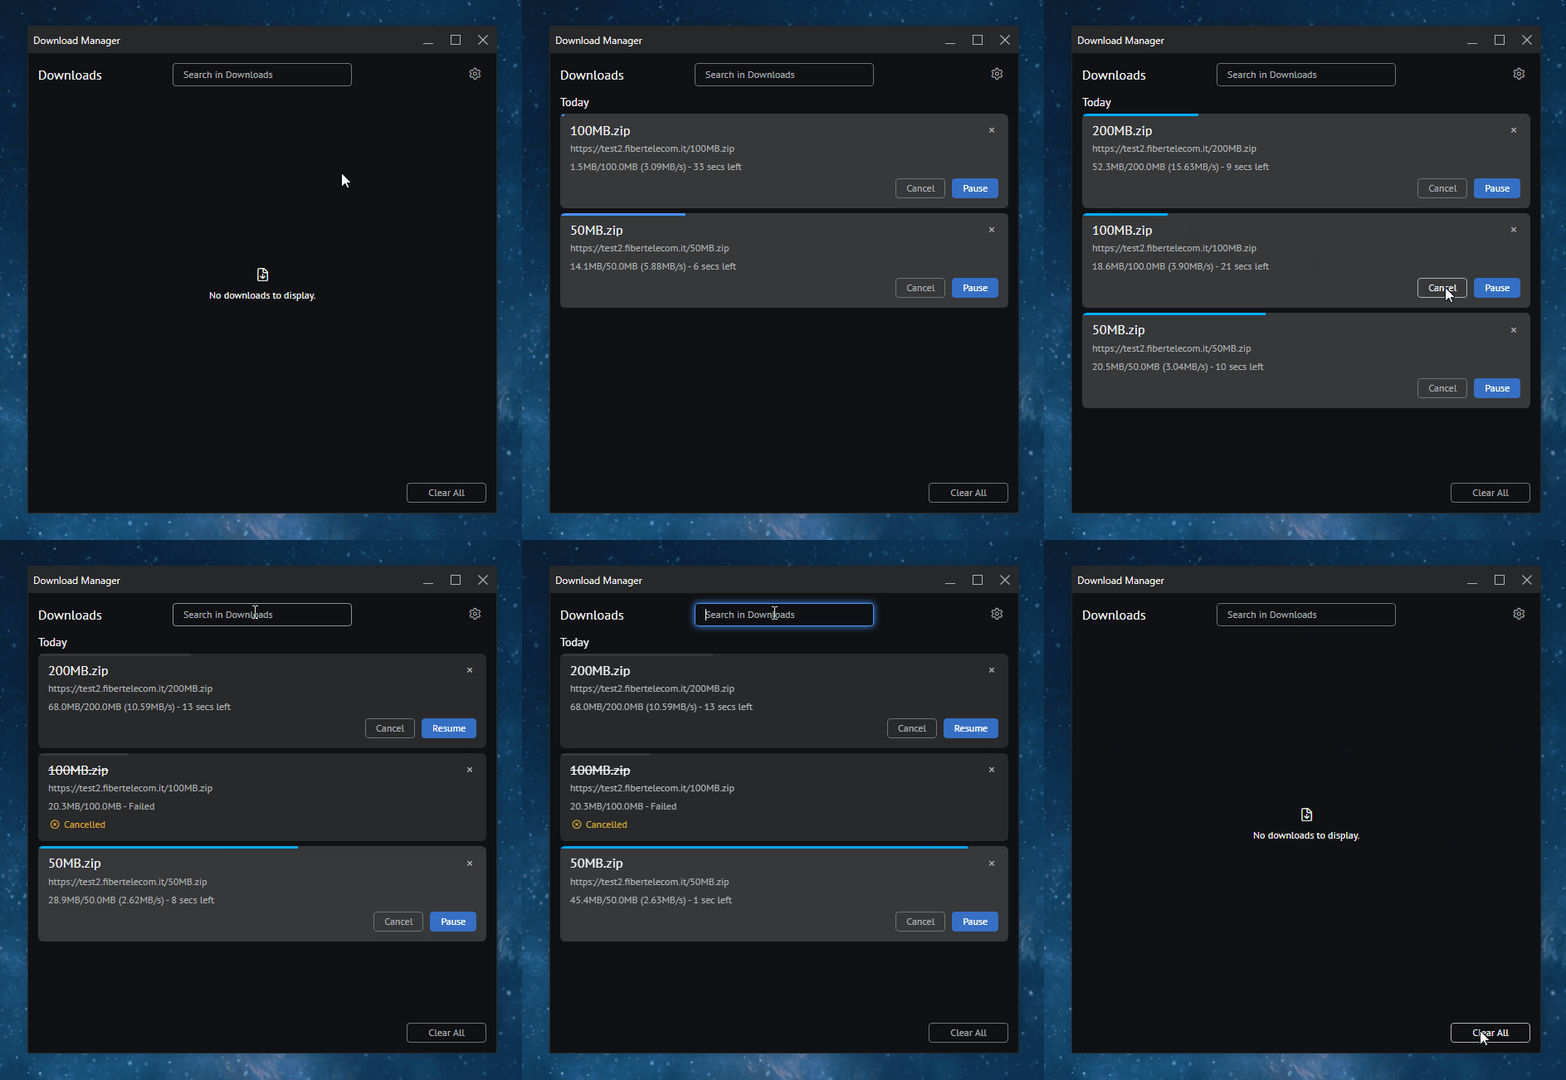
The io.Connect Download Manager is a central place for managing all downloads. It maintains and displays a list of ongoing, paused, completed, and canceled downloads (download items). Users can pause, resume or cancel downloads from it, open the location of a downloaded file, clear the list of downloads or remove individual download items from it, search for downloads, set the default location for downloading files. The Download Manager can be started via a configurable keyboard shortcut (CTRL + J by default), and can also be configured to open automatically when a download is initiated. Programmatic changes to download items are reflected in the Download Manager.
Configuration
Download configuration settings are available both for downloading files in io.Connect Windows and for the io.Connect Download Manager.
io.Connect Windows
The window download behavior is controlled globally via the system.json system configuration file of io.Connect Desktop. You can alternatively override the download behavior per app in the app definition.
To specify global download settings for all io.Connect Windows, use the "downloadSettings" property of the "windows" top-level key:
{
    "windows": {
        "downloadSettings": {
            "autoSave": true,
            "autoOpenPath": false,
            "autoOpenDownload": false,
            "enable": true,
            "enableDownloadBar": true,
            "path": "%DownloadsFolder%"
        }
    }
}
The "downloadSettings" object has the following properties:
| Property | Type | Description |
|---|---|---|
"autoOpenDownload" |
boolean |
If true, will open the download file after the download is completed. Defaults to false. |
"autoOpenPath" |
boolean |
If true, will open the folder that contains the downloaded file after the download is completed. Defaults to false. |
"autoSave" |
boolean |
If true (default), will auto save the file (without asking the user where to save it). If false, a system save dialog will appear. |
"enable" |
boolean |
If true (default), will enable the window to download files. |
"enableDownloadBar" |
boolean |
If true (default), a download bar tracking the download progress will appear at the bottom of the window. If false, the download process will be invisible. |
"path" |
string |
Location where the downloaded file will be saved. You can specify any sensible location within the OS, except system directories (i.e., it isn't possible to use locations such as the "Program Files" or "Windows" directories on Windows). Defaults to "%DownloadsFolder%". |
To override the default system download behavior per app in the app definition, use the "downloadSettings" property of the "details" top-level key:
{
    "details": {
        "downloadSettings": {
            "autoSave": false
        }
    }
}
Download Manager
Available since io.Connect Desktop 9.2
To configure the Download Manager of io.Connect Desktop, use the "downloadManager" top-level key in the system.json system configuration file:
{
    "downloadManager": {
        "autoStartOnDownload": true,
        "shortcut": "ctrl+alt+d"
    }
}
The "downloadManager" object has the following properties:
| Property | Type | Description |
|---|---|---|
"appName" |
string |
Name of an io.Connect app, as specified in its definition, to be used as a Download Manager. Defaults to "io-connect-download-manager". |
"autoStartOnDownload" |
boolean |
If true, the Download Manager app will be started automatically when a download is initiated. Defaults to false. |
"shortcut" |
string |
Shortcut for starting the Download Manager app. Defaults to "ctrl+j". |
Using Downloads Programmatically
To download a file programmatically from an io.Connect Window, use the download() method of an IOConnectWindow instance. Pass a URL to the file to download and an optional DownloadOptions object:
const myWindow = io.windows.my();
const downloadURL = "https://example.com/logo.png";
// Optional download settings.
const options = {
    autoOpenDownload: true,
    // The file extension is taken from the downloaded file.
    name: "my-logo"
};

const { path, size, url } = await myWindow.download(downloadURL, options);

console.log(`Download path: ${path}, File size: ${size}, URL: ${url}`);
The method returns a DownloadResult object containing the path to the downloaded file, the file size and the download URL.
Available since io.Connect Desktop 9.2
The downloads property of the iodesktop object injected in the global window object allows you to programmatically control the download items of the Download Manager and to retrieve and set the default location for downloads.
To retrieve or set the default download location, use the getSavePath() and the setSavePath() methods:
// Get the current location for downloaded files.
const currentPath = await iodesktop.downloads.getSavePath();

// Set the location for downloaded files.
await iodesktop.downloads.setSavePath("C:\\Users\\Me\\Desktop");
To get a list of all download items available in the Download Manager, use the list() method:
const downloads = await iodesktop.downloads.list();The list() method resolves with a list of DownloadItem objects, each with the following properties:
| Property | Type | Description |
|---|---|---|
"id" |
string |
ID of the download item. |
"displayInfo" |
object |
Information about the download item. |
The "displayInfo" object has the following properties:
| Property | Type | Description |
|---|---|---|
"filename" |
string |
Name of the download item. |
"receivedBytes" |
number |
Bytes from the download item already received. |
"speed" |
number |
Download speed in bits per second. |
"startTime" |
number |
Download start time in seconds since the UNIX epoch. |
"state" |
"progressing" | "paused" | "completed" | "interrupted" | "cancelled" |
Current state of the download. |
"timeRemaining" |
number |
Computed remaining time in seconds for the download to complete. |
"totalBytes" |
number |
Total size in bytes of the download item. |
"url" |
string |
Download URL. |
To manipulate download items, use the pauseResume() and removeItem() methods and pass the ID of the download item as an argument:
const id = "13534_56";

// If the download is paused, it will be resumed and vice versa.
await iodesktop.downloads.pauseResume(id);

// Remove the download item from the downloads list.
await iodesktop.downloads.removeItem(id);
To get notified of download item state changes, use the onUpdate() method and pass a callback for handling the event. The callback will receive a DownloadItem object as an argument. The event will be fired each time a chunk of any download item has been downloaded:
const handler = item => console.log(`State of download with ID ${item.id} is "${item.displayInfo.state}".`);

iodesktop.downloads.onUpdate(handler);
To clear all items from the download list, use the clearDownloadList() method:
await iodesktop.downloads.clearDownloadList();To open the location of a downloaded item, use the showInFolder() method and pass the ID of the download item as an argument:
const id = "13534_56";

await iodesktop.downloads.showInFolder(id);
Environment Variables
io.Connect apps can be allowed dynamic access to all available environment variables registered by the OS and the io.Connect framework via configuration.
ℹ️ For details on the environment variables registered by the io.Connect framework, see the Developers > Configuration > Overview > Environment Variables section.
Configuration
To allow an app to access all available environment variables, use the "allowEnvVars" property of the "details" top-level key in the app definition:
{
    "details": {
        "allowEnvVars": true
    }
}
Dynamic Access
To access all available environment variables registered by the OS and the io.Connect framework dynamically, use the env property of the iodesktop object injected in the global window object. The env property is an object containing all available environment variables as properties:
const envVars = iodesktop.env;

Object.entries(envVars).forEach((envVar) => {
    const [envVarName, envVarValue] = envVar;

    console.log(`${envVarName}: "${envVarValue}"`);
});
Request Headers
You can allow io.Connect web apps to manipulate the headers for web requests dynamically.
Configuration
To allow web apps to manipulate request headers dynamically, use the "allowHeadersManipulation" top-level key in the app definition:
{
    "allowHeadersManipulation": true
}
Dynamic Manipulation
To manipulate the request headers for web requests dynamically, use the customHeaders property of the iodesktop object injected in the global window object.
To set custom request headers, use the set() method. You can use the returned header ID later to retrieve or remove the header:
const header = { "My-Custom-Header": "custom-header-value" };

const headerId = await iodesktop.customHeaders.set(header);
You can also supply a web request filter as a second argument to set(), specifying which requests to target:
const header = { "My-Custom-Header": "custom-header-value" };
const filter = {
    urls: ["https://my-app.com/assets/*"],
    applications: ["my-app"],
    types: ["mainFrame", "image", "stylesheet"]
};

const headerId = await iodesktop.customHeaders.set(header, filter);
The filter object has the following properties:
| Property | Type | Description |
|---|---|---|
applications |
string[] |
Array of io.Connect app names. The headers of all web requests sent from the specified apps will be modified. |
types |
string[] |
Array of web request types. The possible array item values are "mainFrame", "subFrame", "stylesheet", "script", "image", "font", "object", "xhr", "ping", "cspReport", "media", "webSocket" and "other". You can target requests originating from the main frame or the sub frames, or specify the content type of the targeted web request. |
urls |
string[] |
Array of URLs. The headers of all web requests sent to the specified URLs will be modified. You can use the * wildcard symbol in the URL. |
⚠️ Note that this feature is available only for apps of type
"window". This means that using theapplicationsarray will work only for such apps. If you want to modify the request headers of other types of web apps (e.g., the Workspaces App or the Web Group App), use theurlsarray instead.
To retrieve all custom request headers, use the getAll() method:
const allCustomHeaders = await iodesktop.customHeaders.getAll();To retrieve a specific header, use the get() method and pass its ID as an argument:
const header = await iodesktop.customHeaders.get(headerId);To remove all custom request headers, use the removeAll() method:
await iodesktop.customHeaders.removeAll();To remove a specific header, use the remove() method and pass its ID as an argument:
await iodesktop.customHeaders.remove(headerId);Proxy Settings
You can configure the proxy settings on system level for all users, or allow io.Connect apps to manipulate them dynamically if different user groups must use different proxy settings.
Configuration
Available since io.Connect Desktop 9.3
⚠️ Note that the following proxy settings are fully aligned with the Electron proxy settings. For more details about the available settings and example usage, see the Electron documentation. If you are experiencing unresolvable problems with the Electron proxy settings, you can try using the settings described in the Legacy Settings section.
The proxy settings can be changed from the "proxy" top-level key in the system.json system configuration file of io.Connect Desktop:
{
    "proxy": {
        "mode": "pac_script",
        "pacScript": "https://my-pac-script.js"
    }
}
The "proxy" object has the following properties:
| Property | Type | Description |
|---|---|---|
"mode" |
"direct" | "auto_detect" | "pac_script" | "fixed_servers" | "system" |
Proxy mode. |
"pacScript" |
string |
URL pointing to a proxy auto-configuration script (PAC). |
"proxyBypassRules" |
string |
Rules indicating which URLs should bypass the proxy settings. |
"proxyRules" |
string |
Rules indicating which proxies to use. |
To allow an app to manipulate proxy settings dynamically, use the "allowProxySettingManipulation" property of the "details" top-level key in the app definition file:
{
    "details": {
        "allowProxySettingManipulation": true
    }
}
Dynamic Manipulation
To manipulate the proxy settings dynamically, use the iodesktop object injected in the global window object:
const settings = {
    mode: "pac_script",
    pacScript: "https://my-pac-script.js"
};

// Set proxy settings.
iodesktop.setProxySettings(settings);

// Get proxy settings.
const proxySettings = await iodesktop.getProxySettings();
The object passed as an argument to setProxySettings() has the same shape as the "proxy" object described in the Configuration section.
OS Info
You can allow apps to access OS information (list of running processes, OS version, io.Connect start time) through their app definition. The information can then be retrieved through the iodesktop object injected in the global window object when the app is started.
Configuration
To allow an app to access OS information, set the "allowOSInfo" property to true in the "details" top-level key:
{
    "details": {
        "allowOSInfo": true
    }
}
Dynamic Access
To retrieve the necessary OS information, use the iodesktop object injected in the global window object:
// Returns a list of all running processes.
const processes = await iodesktop.os.getProcesses();

// Extracting the PID, name and start time of the first process from the list.
const { pid, name, startTime } = processes[0];

// Returns the OS version as a string.
const version = iodesktop.os.getVersion();

// Returns the io.Connect start time as a string - e.g., "2021-10-20T06:54:49.411Z".
const startTime = iodesktop.glue42StartTime;
Clearing DNS & HTTP Cache
To allow an app to clear the DNS or HTTP cache, use the "allowClearingCache" top-level key in the app definition file. Methods for clearing the cache are available on the iodesktop object injected in the global window object.
Allowing an app to clear cache:
{
    "allowClearingCache": true
}
Clearing HTTP and DNS cache:
// Clearing the HTTP cache.
await iodesktop.clearCache();

// Clearing the DNS cache.
await iodesktop.clearHostResolverCache();
Hide & Show Windows
Available since io.Connect Desktop 9.4
If you need to show or hide a window dynamically (e.g., an authentication app) but don't want to initialize the entire @interopio/desktop library, use the showWindow() and hideWindow() methods of the iodesktop object injected in the global window object:
// Hide a window.
await iodesktop.hideWindow();

// Show a hidden window.
await iodesktop.showWindow();
Retrieving System Paths
Available since io.Connect Desktop 9.7.1
To retrieve any of the system paths used by io.Connect Desktop, use the getPath() method of the iodesktop object injected in the global window object and pass as an argument one of the following string values:
| Value | Description |
|---|---|
"appData" |
Retrieves the io.Connect Desktop working directory (e.g., C:\Users\<username>\AppData\Local\interop.io\io.Connect Desktop\Desktop). |
"desktop" |
Retrieves the desktop directory for the current user (e.g., C:\Users\<username>\Desktop). |
"documents" |
Retrieves the documents directory for the current user (e.g., C:\Users\<username>\Documents). |
"downloads" |
Retrieves the downloads directory for the current user (e.g., C:\Users\<username>Downloads). |
"exe" |
Retrieves the path to the io.Connect Desktop executable file (e.g., C:\Users\<username>\AppData\Local\interop.io\io.Connect Desktop\Desktop\io-connect-desktop.exe). |
"home" |
Retrieves the profile directory for the current user (e.g., C:\Users\<username>). |
"music" |
Retrieves the music directory for the current user (e.g., C:\Users\<username>\Music). |
"pictures" |
Retrieves the pictures directory for the current user (e.g., C:\Users\<username>\Pictures). |
"recent" |
Retrieves the recent files directory for the current user (e.g., C:\Users\<username>\AppData\Roaming\Microsoft\Windows\Recent). |
"temp" |
Retrieves the temporary directory for the current user (e.g., C:\Users\<username>\AppData\Local\Temp). |
"userData" |
Retrieves the user data directory for the current environment and region in which io.Connect Desktop is running (e.g., C:\Users\<username>\AppData\Local\interop.io\io.Connect Desktop\UserData\<ENV>-<REG>). |
"videos" |
Retrieves the videos directory for the current user (e.g., C:\Users\<username>\Videos). |
The following example demonstrates retrieving the desktop directory for the current user:
const desktopDir = await iodesktop.getPath("desktop");Platform Version
Available since io.Connect Desktop 10.0
To retrieve the platform version, use the uiVersion property of the iodesktop object injected in the global window object:
const platformVersion = iodesktop.uiVersion;The uiVersion property will return the default platform version or the custom version specified in the "uiVersion" property of the system.json system configuration file of io.Connect Desktop.
ℹ️ For details on how to specify a custom platform version, see the Developers > Configuration > System > Platform Version section.
