
More
Service Windows
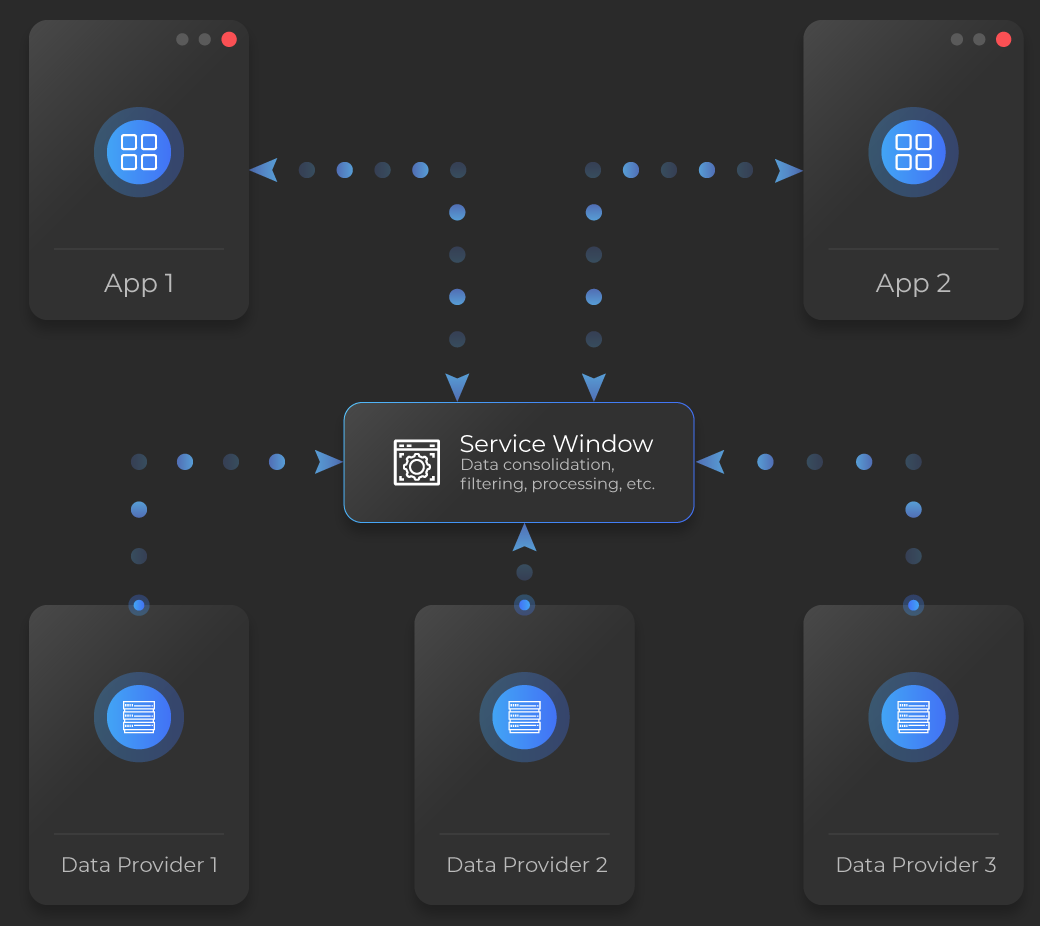
Service windows are hidden windows which perform a specific supporting role for your apps. They can be defined as any normal window (name, URL, etc.), the difference being that UI configuration isn't necessary, as it's assumed that the purpose of these windows is to provide some background service to your apps. Therefore, the user doesn't need to see them or interact with them.
Service windows may be useful in many scenarios. For instance, you may have a number of apps that will receive and process data from several different providers. Instead of setting up each app to receive and then process the data from every provider, you can create a hidden service window which will communicate with the providers, collect the data, pre-process it and route it to the respective apps. This way, your apps will handle communication with only one end point, all the necessary data is consolidated, processed and filtered at one central data hub from where it can be sent to any window. Depending on your needs and goals, you can configure your service windows to auto start on system startup, or to start when an app requests that service. The service windows approach offers you additional flexibility and versatility in designing solutions for the app services you need.
Service windows can be defined as "window", "exe" or "node" type apps. There are different ways to configure a service window, depending on whether you want the window to be automatically started when io.Connect Desktop is initiated. Use a combination of the following app definition properties to specify whether the window should be automatically started, invisible, or hidden from the io.Connect launcher:
| Property | Type | Description |
|---|---|---|
"autoStart" |
boolean |
If true, the window will be started automatically on io.Connect Desktop startup. |
"details" |
object |
Use the "hidden" Boolean property of the "details" object to set the window visibility. If true, the window will be invisible. |
"hidden" |
boolean |
If true, the app won't be available in the io.Connect launcher. |
"service" |
boolean |
If true, both the "autoStart" top-level key and the "hidden" property of the "details" object will be overridden and set to true. The window will be invisible and will start automatically on io.Connect Desktop startup. |
⚠️ Note that when using the
"service"property, it's pointless to use the"autoStart"top-level key and the"hidden"property of the"details"object, because the"service"key will override any values you may set for them.
The following example demonstrates how to use the "service" and "hidden" top-level keys to configure a service window that will start automatically, will be invisible and hidden from the io.Connect launcher:
{
    "name": "service-window",
    "type": "window",
    "service": true,
    "hidden": true,
    "details": {
        "url": "https://example.com/my-service-window",
    }
}
The following example demonstrates how to use the "hidden" and "autoStart" top-level keys and the "hidden" property of the "details" top-level key to configure a service window that will be hidden from the io.Connect launcher, won't start automatically and will be invisible:
{
    "name": "service-window",
    "type": "window",
    "hidden": true,
    "autoStart": false,
    "details": {
        "url": "https://example.com/my-service-window",
        "hidden": true
    }
}
⚠️ Note that service windows aren't closed when restoring a Layout.
ℹ️ For more details, see the Developers > Configuration > Application section and the app definition schema.
Citrix Apps
⚠️ Note that this feature is still experimental in io.Connect Desktop.
io.Connect Desktop provides support for Citrix Virtual Apps. Citrix apps can participate in the io.Connect environment alongside all other interop-enabled apps - they can be configured and added to the io.Connect launcher, saved in Layouts and Workspaces, and can use all io.Connect functionalities like Interop, Channels, and more.
Additionally, io.Connect Desktop can be run as a Citrix Virtual App itself, in which case any other Virtual Apps from the same VDA can be defined as normal apps. This will require configuring a dynamic port for the io.Connect Gateway.
ℹ️ For more details on configuring a Citrix app, see the Developers > Configuration > Application section. For details on configuring the system-wide Citrix Virtual Apps support, see the Developers > Configuration > System section.
⚠️ Note that the support for Citrix Virtual Apps may require additional client-specific configuration depending on the particular use case.
⚠️ Note that in order for io.Connect Desktop to run Citrix Virtual Apps, Citrix Workspace must be installed on the user machine and the user must be logged into it via their Citrix StoreFront URL and credentials. If you have access to a web-based StoreFront, you can configure your local Citrix Workspace by clicking on the "Activate" link in the settings or user preferences menu and running the downloaded file. The StoreFront SSL certificate must be trusted by the user's machine.
.NET Citrix Apps
To interop-enable a .NET Citrix app:
In your Visual Studio project, reference the io.Connect .NET library DLL file available in the NuGet packages for .NET 5+ and for .NET Framework.
Follow the standard procedure for interop-enabling .NET apps.
After initializing io.Connect, you can check whether your app is connected to io.Connect in the following manner:
using Tick42.StartingContext;

if (InitializeOptions.IsCitrixGD)
{
    // Running in Citrix, connected to io.Connect Desktop.
}
else if (InitializeOptions.IsCitrixVirtualApp)
{
    // Running in Citrix, not connected to io.Connect Desktop.
}
When your Citrix app is connected to io.Connect Desktop, you may want to remove any custom window decorations, since the top-level window chrome will be handled by io.Connect Desktop.
- Add
%**to the app arguments in the Citrix Application Settings:

- Define your app as an io.Connect Citrix app.
You will now be able to run your .NET Citrix app from io.Connect Desktop and interoperate with it using the various io.Connect APIs.
Java Citrix Apps
To interop-enable a Java Citrix app:
Follow the standard procedure for interop-enabling Java apps.
In the Citrix Application Settings, set the path to a
javaw.exeorjava.exefile, use standard VM arguments to launch your Java app, and add%**at the end of the app arguments:
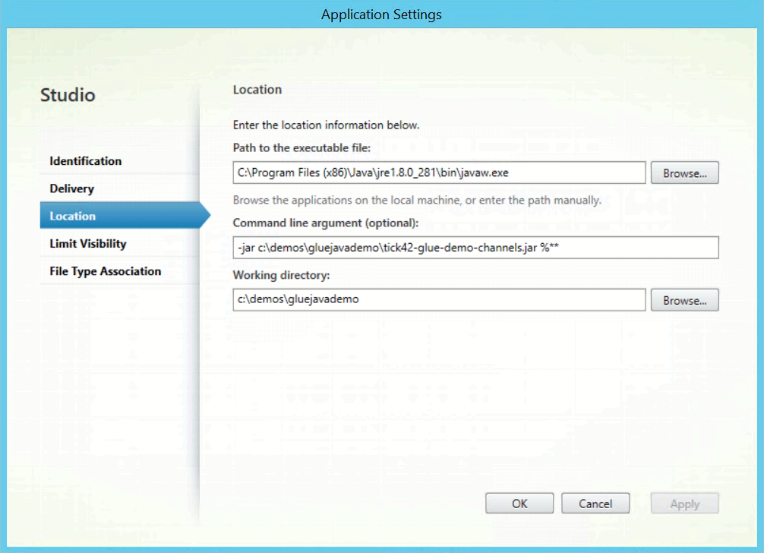
- Define your app as an io.Connect Citrix app.
You will now be able to run your Java Citrix app from io.Connect Desktop and interoperate with it using the various io.Connect APIs.
Preload Scripts
io.Connect Desktop enables you to define preload scripts to be injected in your app. It's possible to define preload scripts globally via the system.json system configuration file of io.Connect Desktop and also per app via the app definition files. The preload scripts will be executed before the actual web app is loaded and before each <iframe> on the page. Preload scripts allow for easily injecting io.Connect functionality into third-party web apps over which you have little to no control.
Configuration
To define preload scripts globally, use the "preloadScripts" property of the "windows" top-level key in the system.json file. To define preload scripts per app, use the "preloadScripts" property of the "details" top-level key in the app definition.
The "preloadScripts" property accepts as a value either an array of URLs pointing to the preload scripts to inject, or an object with the following properties:
| Property | Type | Description |
|---|---|---|
"scripts" |
string[] |
List of URLs pointing to preload scripts to be injected. |
"useBase64PreloadScripts" |
boolean |
This property allows you to control how io.Connect Desktop will import the preload scripts. If set to true, the preload scripts will be injected directly into the web page as Base64 strings via a <script> tag. In certain scenarios, depending on the browser security policies, this may prevent the preload scripts from loading and executing. If set to false (default), the platform will use the built-in mechanisms of the Electron framework to inject the preload scripts, which guarantees that the preload scripts will always load. It's highly recommended to leave the "useBase64PreloadScripts" property set to false. |
The following example demonstrates defining preload scripts on system level:
{
    "windows": {
        "preloadScripts": {
            "scripts": [
                "https://my-domain.com/my-script.js",
                "https://my-domain.com/my-other-script.js"
            ]
        }
    }
}
The following example demonstrates defining preload scripts for an app by providing only a list of URLs:
{
    "details": {
        "preloadScripts": [
            "https://my-domain.com/my-app-script.js",
            "https://my-domain.com/my-other-app-script.js"
        ]
    }
}
Available since io.Connect Desktop 9.1
The "scripts" property of the configuration object for the "preloadScripts" key also accepts an array of objects which you can use to specify detailed settings for the preload scripts:
{
    "windows": {
        "preloadScripts": {
            "scripts": [
                {
                    "url": "https://my-domain.com/my-script.js",
                    "fallback": "https://my-domain.com/my-fallback-script.js",
                    "timeout": 5000
                },
                {
                    "url": "https://my-domain.com/my-other-script.js",
                    "fallback": "https://my-domain.com/my-other-fallback-script.js",
                    "timeout": 5000
                }
            ]
        }
    }
}
Each object in the "scripts" array has the following properties:
| Property | Type | Description |
|---|---|---|
"critical" |
boolean |
If true, failure to load the preload script will be treated as a critical error and the platform will shut down. This property is valid only for globally defined preload scripts and isn't taken into account if used in an app definition. Available since io.Connect Desktop 9.7. |
"fallback" |
string |
URL pointing to a local or a remote preload script that will be used as a fallback in case the one specified in the "url" property doesn't load. io.Connect Desktop will reuse the cached fallback script and won't attempt to load again the one specified in the "url" property, unless the platform is shutdown or restarted. |
"timeout" |
number |
Interval in milliseconds to wait for the preload script to load. |
"url" |
string |
Required. URL pointing to a local or a remote preload script. |
When defining system level and app level preload scripts, consider the following behaviors:
- If the URLs of the app level scripts are different from the system ones, the app level scripts will be merged with the system ones (won't replace them). The order of injection can't be guaranteed.
- If an app level script definition is absolutely the same as a system level script definition, the system one will be retrieved and used.
- If an app level script has the same URL as a system level script, but has different settings for fallback or timeout, the app level settings for fallback and timeout will override the system ones for that script.
- The
criticalsetting applies only to system level preload scripts.
Caching
System level preload scripts are retrieved on start of the platform and are cached for the entire lifetime of the platform. On platform shutdown or restart, the cached preload scripts are cleared.
App level preload scripts are retrieved on first app start and are cached similarly to the system level scripts. If the same preload script is required by different apps, it will be loaded from the cache.
ℹ️ For details on how to change the default location for caching preload scripts, see the Developers > Configuration > System > Folders section.
Available since io.Connect Desktop 9.7
For development purposes, you can:
Clear the preload scripts cache manually by using the "Clear Preload Scripts Cache" option under the "Diagnostics" section in the io.Connect Desktop tray menu.
Use the
preloadScriptsproperty of theiodesktopobject injected in the globalwindowobject to retrieve a list of objects describing the available preload scripts. Use theregeneratePreloads()method of theiodesktopobject to clear the preload script cache:
// Retrieve a list of preload script definition objects.
const preloads = iodesktop.preloadScripts;

preloads.forEach(console.log);

// Clear the preload script cache.
await iodesktop.regeneratePreloads();
Global Protocol Handler
io.Connect Desktop can be registered as a default global protocol handler. You can also register your own custom protocol handlers.
The io.Connect protocol handler allows you to create and send links which will open a URL in an io.Connect Window. You can also create links that will start an interop-enabled app, load a specified Workspace or Layout and even invoke Interop methods with custom arguments.
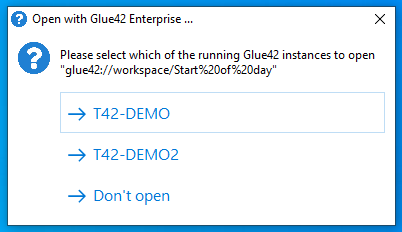
When the link is clicked, io.Connect Desktop will be started in order to handle it. If an instance of io.Connect Desktop is already running, it will be reused. If multiple instances are running (e.g., in different environments), then the user will be presented with a dialog from which to choose the io.Connect instance that will handle the link:
Configuration
The io.Connect protocol handler can be configured via the "protocolHandler" top-level key in the system.json system configuration file of io.Connect Desktop:
{
    "protocolHandler": {
        "enabled": true,
        "allowOpeningURLs": {
            "allowed": ["https://interop.io"],
            "forbidden": ["https://youtube.com/.*", "https://facebook.com/.*"]
        }
    }
}
⚠️ Note that the
"protocolHandler"key accepts either a single object, or an array of objects describing the protocol handlers to register. Passing an array of objects allows you to define more than one custom protocol handlers.
The "protocolHandler" object has the following properties:
| Property | Type | Description |
|---|---|---|
"allowOpeningURLs" |
boolean | object |
If true (default), will allow handling all URLs. Can also be set to an object containing a list of allowed or forbidden URLs for the protocol handler. This setting won't be applied to any custom protocol handlers. If you want to use this setting in your custom protocol implementation, you can access its value via the object passed as an argument to your custom protocol handler. |
"customHandler" |
string |
Interop method that will be used as a custom protocol handler. Defaults to "T42.GD.ProtocolHandler.Handle". |
"enabled" |
boolean |
If true (default), will enable registering the default io.Connect protocol handler, as well as any other custom protocol handlers. |
"protocol" |
string |
Custom name for the protocol prefix. Defaults to "ioconnect". |
"register" |
boolean |
If true (default), io.Connect Desktop will register the protocol handler in the system registry. Set to false if you want to register the protocol some other way. |
"startNewInstance" |
object |
If enabled, will start a new io.Connect instance whenever a command for the default io.Connect or any custom protocol handler is received. |
"type" |
"ioconnect" | "glue42" | "custom" |
Type of the protocol handler. If "custom", then the Interop method defined in "customHandler" will be invoked to handle the protocol command. Otherwise, it will be handled by the default io.Connect protocol handler. Defaults to "ioconnect". |
The "startNewInstance" object has the following properties:
| Property | Type | Description |
|---|---|---|
"defaultExecutable" |
object |
Describes the executable file that will be started if no other io.Connect instance is running. |
"enabled" |
boolean |
If true (default), will allow starting a new instance of io.Connect when opening links with the io.Connect protocol handler. |
"errorMessage" |
string |
Message that will override the default error message displayed when starting a new io.Connect instance is disabled. |
The "defaultExecutable" object has the following properties:
| Property | Type | Description |
|---|---|---|
"args" |
string[] |
List of command line arguments. Defaults to []. |
"iconPath" |
string |
Absolute or relative local path pointing to an icon file to be used for the new platform instance. You can use environment variables. Available since io.Connect Desktop 9.8. |
"path" |
string |
Path to an executable file that will be started if no other io.Connect instance is running. Note that if the path points to a script file that in turn will launch io.Connect Desktop, then you must pass the startup arguments from the script to io.Connect Desktop. Defaults to the io.Connect Desktop executable file. |
The "allowOpeningURLs" property can be set to a Boolean value or to an object with the following properties:
| Property | Type | Description |
|---|---|---|
"allowed" |
string[] |
List of allowed URLs. Defaults to []. |
"forbidden" |
string[] |
List of forbidden URLs. Defaults to []. |
You can use exact URL values or regular expressions to specify allowed and forbidden URLs.
Protocol Options
The default io.Connect protocol uses the following format:
ioconnect://<option>/<identifier>[?args&args]Use the following tips when using protocol options and specifying arguments:
- To pass arguments to a protocol option, use a single
?after the identifier, except withurl. For theurloption, use double??when passing arguments. Use&between the arguments when specifying more than one argument. - To access properties of objects passed as arguments to protocol options, use the standard dot notation for accessing properties - e.g.,
context.client.id=42. - To escape spaces in names passed as arguments to protocol options, use the
%20symbol for standard URL encoding - e.g.,ioconnect://workspace/Start%20Of%20Day.
As arguments, you can use all settings already associated with the respective protocol option and available in the io.Connect APIs:
For starting apps, you can use all options that are available via the app definition. You can also specify app context data values by using the
contextargument and standard dot notation for accessing thecontextobject properties - e.g.,ioconnect://app/clientlist?context.client.id=42.For restoring Layouts, you can use all options available in the
RestoreOptionsobject.For restoring Workspaces, you can use all options in the
RestoreWorkspaceConfigobject. You can also specify Workspace context data values by using thecontextargument and standard dot notation for accessing thecontextobject properties - e.g.,ioconnect://workspace/StartOfDay?context.client.id=42.
Apps
To start an interop-enabled app, use the app protocol option and pass the app name:
ioconnect://app/clientlistTo pass options when starting an interop-enabled app, use ? after the app identifier and & before each option:
ioconnect://app/clientlist?left=100&top=100To pass context when starting an interop-enabled app, use context:
ioconnect://app/clientlist?context.client.id=42Layouts
To restore a Global Layout, use the layout protocol option and pass the name of the Layout:
ioconnect://layout/StartOfDayTo pass RestoreOptions when restoring a Layout, use ? after the Layout identifier and & before each option:
ioconnect://layout/StartOfDay?closeRunningInstance=false&timeout=60000Workspaces
To open a Workspace, use the workspace protocol option and pass the Workspace name:
ioconnect://workspace/StartOfDayTo pass any of the options available in the RestoreWorkspaceConfig object when restoring a Workspace, use ? after the Workspace identifier and & before each option:
ioconnect://workspace/StartOfDay?title=My%20Workspace&isSelected=trueTo pass context for the Workspace, use context:
ioconnect://workspace/StartOfDay?context.client.id=42io.Connect Windows
To open a URL in an io.Connect Window, use the url protocol option and pass the URL:
ioconnect://url/https://interop.ioTo specify WindowSettings when opening a URL, use ?? after the URL and & before each setting:
ioconnect://url/https://interop.io??left=100&top=200Interop Methods
To invoke an Interop method, use the invoke protocol option and pass the method name:
ioconnect://invoke/ShutdownTo pass arguments and an InstanceTarget when invoking an Interop method, use args and target:
ioconnect://invoke/ShowClient?args.clientId=42&target=allCustom Protocol Handlers
Besides the default io.Connect protocol handler, you can define your own custom protocol handlers. You must specify the name of the protocol prefix and the name of the Interop method that will be used as a protocol handler. The specified Interop method will be invoked each time a command for your custom protocol is received. The Interop method that will handle your custom protocol may be registered by an auto started hidden service app or any other way you deem fit.
Configuration
The following example demonstrates defining two custom protocol handlers, one of which will be added to the system registry by io.Connect Desktop and the other won't:
{
    "protocolHandler": [
        {
            "enabled": true,
            "protocol": "my-custom-protocol",
            "type": "custom",
            "customHandler": "My.Custom.Protocol.Handler"
        },
        {
            "enabled": true,
            // This protocol won't be registered by the platform.
            // You have to add it to the system registry some other way.
            "register": false,
            "protocol": "my-other-custom-protocol",
            "type": "custom",
            "customHandler": "My.Other.Custom.Protocol.Handler"
        }
    ]
}
Implementation
When io.Connect Desktop receives a protocol command, each available protocol handler will be invoked consecutively until the command has been handled or there are no more handlers. The handlers are invoked one after another and each one is awaited to finish processing the command before the next one is invoked.
If your protocol handler implementation returns a result or an object with a handled property set to true, the command will be considered handled and no more handlers will be invoked. If your implementation doesn't return anything or returns an object with a handled property set to false, then the next available protocol handler will be invoked.
The following example demonstrates a basic implementation of a protocol handler:
// Name of the protocol handler as defined in the configuration.
const name = "My.Custom.Protocol.Handler";
// Protocol handler implementation.
const handler = (data) => {
    console.log(data);

    // If nothing or `{ handled: false }` is returned,
    // the next available protocol handler will be invoked.
    return { handled: true };
};

await io.interop.register(name, handler);
The object received as an argument by the protocol handler has the following properties:
| Property | Type | Description |
|---|---|---|
command |
string |
The executed protocol command. |
config |
object |
The protocol handler configuration object as defined in the system configuration of io.Connect Desktop. This information may be useful if, for instance, you want to extract the protocol name or implement custom logic for handling the "allowOpeningURLs" property. |
Registration Control
Available since io.Connect Desktop 9.8
In some scenarios, you may need to register or unregister the protocol handlers dynamically based on a certain condition.
To register or unregister all protocol handlers defined in the system configuration, invoke the already registered by the platform "T42.GD.Execute" Interop method and pass as an argument the "register-protocol-handler" or the "unregister-protocol-handler" command respectively:
// Registering the custom protocol handlers.
await io.interop.invoke("T42.GD.Execute", { command: "register-protocol-handler" });

// Unregistering the custom protocol handlers.
await io.interop.invoke("T42.GD.Execute", { command: "unregister-protocol-handler" });
Boot Sequence
The boot sequence of io.Connect Desktop is divided into four stages executed in the following order: "core" stage, "pre-sso" stage, "post-sso" stage and "user" stage. You can configure your system or regular user apps to start at the desired stage with the desired priority. You can also specify whether io.Connect Desktop must wait for the app to initialize before continuing the boot sequence.
Configuration
To specify the priority with which an app will be started in the boot sequence of the io.Connect Desktop platform, use the "runPriority" top-level key in the app definition file. It accepts either an object or a number as a value.
The "runPriority" object has the following properties:
| Property | Type | Description |
|---|---|---|
"priority" |
number |
Number determining the priority with which the system app will be started at the specified stage of the boot sequence of the platform. The greater the number, the greater the priority of the app. You can use decimal numbers to allow for more flexibility when reordering the boot sequence. Apps with the same priority will be started simultaneously. Set to 0 for lowest priority. Defaults to 0. |
"stage" |
"core" | "pre-sso" | "post-sso" | "user" |
Boot sequence stage at which to start the system app. Defaults to "core" for system app stores and to "user" for all other app stores. |
"timeout" |
number |
Interval in milliseconds to wait for the system app to initialize. Defaults to 60000. |
"waitForInitialization" |
boolean | "appSignal" | "interopReady" | "no" |
Specifies whether the platform must wait for the app to initialize before continuing the boot sequence. Defaults to "no" for system app stores and to "interopReady" for all other app stores. |
Stages
⚠️ Note that the boot sequence stages have different limitations related to which types of apps you can start in a stage, and to having access to the io.Connect APIs and the user identity. You should take this into account when configuring the boot sequence options for your apps, depending on the role of the app in your system and what functionality or information it requires to initialize properly.
⚠️ Note that if an SSO app (i.e., an app definition with a
"name"property set to"sso-application") is available, it will be started after the"pre-sso"stage has been completed. The"post-sso"stage won't begin until the SSO app invokes theiodesktop.authDone()method. If an SSO app isn't available, the"post-sso"stage will begin immediately after the"pre-sso"stage.
The following boot sequence stages are available:
| Stage | Description |
|---|---|
"core" |
This is the initial stage in which all critical system apps of io.Connect Desktop (e.g., io.Connect Gateway, HTTP servers) and the ones defined in the system app stores are started. At this stage, apps don't yet have access to the io.Connect APIs and the user identity, and only apps of type "exe" and "node" can be started. |
"pre-sso" |
At this stage, apps will have access to the io.Connect APIs, but not the user identity, and apps of type "window" can be started too. This means that at this stage you can initialize apps that require the io.Connect APIs, but don't need the specific set of app definitions and Layouts for the current user in order to function properly. Apps started at this stage must be defined in system app stores or in memory. |
"post-sso" |
At this stage, apps will have access to both the io.Connect APIs and the user identity. Apps started at this stage must be defined in system app stores or in memory and will run before the auto started apps from the regular user-specific app stores. |
"user" |
At this stage, apps defined in the regular user-specific app stores and apps from the in-memory store will be started. Available since io.Connect Desktop 9.2. |
ℹ️ For details on how to define system app stores, see the Developers > Configuration > System > System App Stores section.
The following example demonstrates how to set the boot sequence priority of an app that will be started with high priority in the "pre-sso" stage:
{
    "runPriority": {
        "stage": "pre-sso",
        "priority": 100
    }
}
The "runPriority" property can also be set with a number. In this case, the default is 0 and the app can be started only at the "core" stage.
Waiting for App Initialization
When setting the boot sequence for apps, you can use the "waitForInitialization" property to specify whether the io.Connect platform must wait for the app to initialize before continuing the boot sequence:
{
    "runPriority": {
        "stage": "pre-sso",
        "priority": 100,
        "waitForInitialization": true
    }
}
Available since io.Connect Desktop 9.2
In addition to a boolean value, the "waitForInitialization" property accepts also the following string values:
| Value | Description |
|---|---|
"appSignal" |
The app must explicitly send a signal to the platform that the necessary initialization has been completed. |
"interopReady" |
The platform will be automatically signaled when the Interop library has been fully initialized. Default for apps defined in regular user-specific app stores. |
"no" |
The platform won't wait for the app to initialize before continuing the boot sequence. Default for apps defined in system app stores. |
The following example demonstrates how to configure an app to be started at the "user" stage and to instruct the platform to wait for an explicit signal from the app that it's initialization has been completed:
{
    "runPriority": {
        "stage": "user",
        "priority": 101,
        "waitForInitialization": "appSignal"
    }
}
Signaling the Platform
To send a signal from your app that it has been fully initialized, you must invoke the already registered by the platform "T42.GD.Execute" Interop method and pass the "signal-app-ready" command as an argument:
const methodName = "T42.GD.Execute";
const args = { command: "signal-app-ready" };

await io.interop.invoke(methodName, args);
App Batch Start & Completion Signals
Available since io.Connect Desktop 9.5
To receive signals from io.Connect Desktop when a batch of apps with the same run priority starts and completes loading, register an Interop method and name it "T42.AppManager.AutoStart.Stage". If such method is registered, it will be invoked at the completion of the current priority batch, and then at the start and at the completion of all remaining run priority batches within the current and within all following boot sequence stages. The data returned from each invocation will contain the name of the current boot sequence stage, the value of the current run priority batch, a list of names of the apps participating in the current batch, and also indication whether the current run priority batch is starting to load or has completed loading.
Registering the "T42.AppManager.AutoStart.Stage" Interop method:
const methodName = "T42.AppManager.AutoStart.Stage";
const handler = ({ stage, phase, runPriority, apps }) => {
    console.log(`Run priority batch "${runPriority}" in stage "${stage}" is ${phase === "stageStarting" ? "starting" : "completed"}.`);

    console.log(`Apps: ${apps}`);
};

await io.interop.register(methodName, handler);
Each invocation of the method will return data in the shape of an object with the following properties:
| Property | Type | Description |
|---|---|---|
apps |
string[] |
List of names of the apps participating in the current run priority batch. |
phase |
"stageStarting" | "stageCompleted" |
Indicates whether the current run priority batch of apps is starting to load or has completed loading. |
runPriority |
number |
The run priority value of the current app batch. |
stage |
"core" | "pre-sso" | "post-sso" | "user" |
The name of the current boot sequence stage. |
Platform Initialization Success & Failure Signals
Available since io.Connect Desktop 9.10
In certain scenarios, you may want your app that has been started in one of the early boot sequence stages to receive a signal from the io.Connect platform when the platform has been successfully initialized or in case of initialization failure.
To receive such signals, register an Interop method and name it "T42.Platform.Events". If registered, this method will be invoked by the platform when it initializes successfully or in case of failure.
Registering the "T42.Platform.Events" Interop method:
const methodName = "T42.Platform.Events";
const handler = ({ eventType, timestamp, data }) => {
    console.log(`Platform initialization ${eventType === "platform-started" ? "successful" : "failed"}.`);

    if (data.error) {
        console.log(`Error message: ${data.error.message}, error stack: ${data.error.stack}.`);
    }
};

await io.interop.register(methodName, handler);
Each invocation of the method will return data in the shape of an object with the following properties:
| Property | Type | Description |
|---|---|---|
data |
object |
Data object containing event details. In case of successful platform initialization, this will be an empty object. In case of platform initialization failure, this will be an object with an error object property. The error object will have message and stack string properties containing the error message and the error stack respectively. |
eventType |
"platform-started" | "platform-failed" |
Type of the platform event (i.e., whether the platform was started successfully or failed to initialize). |
timestamp |
string |
Timestamp of the platform event. |
Multiple Instances
By default, multiple instances of io.Connect Desktop can be run simultaneously, each in a different environment and region. You can prevent running multiple platform instances via configuration, and you can also control the behavior when the user attempts to start additional instances in the same environment and region.
Configuration
To control running multiple instances of io.Connect Desktop, use the "allowMultipleInstances" top-level key in the system.json system configuration file.
The following example demonstrates how to prevent users from running multiple instances of io.Connect Desktop:
{
    "allowMultipleInstances": "never"
}
The "allowMultipleInstances" property accepts the following values:
| Value | Description |
|---|---|
"inDifferentEnvRegion" |
Default. Allows running multiple instances only in different environments and regions. |
"never" |
Disables running multiple instances. |
Handling Attempts for Starting Additional Instances
Available since io.Connect Desktop 9.7.1
By default, when there is an already running instance of io.Connect Desktop and the user tries to start a second instance in the same environment and region (e.g., by double clicking the desktop shortcut or the Windows taskbar icon), this will be prevented and the shell app will be focused (or the splash screen, or the login window, depending on the current platform initialization state).
This behavior can be prevented or you can define an entirely custom behavior for this situation in case you aren't using a shell app, or simply want something else to happen when the user tries to start a second platform instance.
To achieve this, you must register an Interop method named "T42.GD.SecondInstance" which io.Connect Desktop will invoke without arguments when the user attempts to start a second platform instance in the same environment and region. This method can be registered by a service window that is started automatically with the platform, or by any other of your interop-enabled apps you consider appropriate.
If you want to prevent focusing the shell app, the method must return an object with a prevent property set to true:
const methodName = "T42.GD.SecondInstance";
const handler = () => {
    return { prevent: true };
};

await io.interop.register(methodName, handler);
If you want to define a custom behavior, provide your custom implementation for the method:
const methodName = "T42.GD.SecondInstance";
const handler = async () => {
    const win = io.windows.find("window-to-focus");

    await win.focus();
};

await io.interop.register(methodName, handler);
Remote Archived Apps
io.Connect Desktop can download, unarchive and run archived web or native apps hosted at a remote location. To specify the location of your archived app and headers for the request, use the "asset" top-level key in the app definition file.
The "asset" object has the following properties:
| Property | Type | Description |
|---|---|---|
"headers" |
object[] |
Array of objects, each with required "name" and "value" properties, defining the headers that will be added to the request for downloading the archived app. |
"noCache" |
boolean |
If true, the Cache-Control: no-cache header will be added. |
"src" |
string |
URL pointing to the location of the archived app that will be downloaded and extracted. |
The following example demonstrates how to define the location of a remote archived web app, specify headers for the request, include the Cache-Control: no-cache header, and define the app entry point:
{
    "name": "my-archived-web-app",
    "type": "window",
    "asset": {
        "src": "https://example.com/my-archived-web-app.zip",
        "headers": [
            {
                "name": "header-name",
                "value": "header-value"
            }
        ],
        "noCache": true
    },
    "details": {
        "url": "$ASSET_LOCATION$/home.html"
    }
}
⚠️ Note that if you don't specify an entry point for your web app in the
"url"property, io.Connect Desktop will try to access it via anindex.htmlfile.
The following example demonstrates how to define the location of a remote archived native app:
{
    "name": "my-archived-native-app",
    "type": "exe",
    "asset": {
        "src": "http://example.com/my-archived-native-app.zip"
    },
    "details": {
        "command": "MyArchivedNativeApp.exe",
        "path": "$ASSET_LOCATION$"
    }
}
The default location for downloading remote apps is <installation_location>/interop.io/io.Connect Desktop/UserData/<ENV>-<REG>/remoteApps/<app_name>, where <ENV>-<REG> represents the environment and region of io.Connect Desktop (e.g., DEMO-INTEROP.IO) and <app_name> is the name of the app as defined in its configuration. You can use the $ASSET_LOCATION$ macro pointing to the default location of the extracted app when defining the "path" or the "url" property of your app, depending on its type.
ℹ️ For details on specifying locations for the system folders of io.Connect Desktop, see the Developers > Configuration > System section.
Client Certificates
The users in an organization may be required to use various certificates for authentication when accessing different URLs. When a certificate is required, io.Connect Desktop opens a dialog that shows the available certificates for the user to choose:

Users can check the "Always use the selected certificate if possible" checkbox to instruct io.Connect Desktop to attempt to use the selected certificate for any further requests. In case the selected certificate can't be applied to a future request, the dialog will open again. You can configure the visibility of this checkbox and whether it should be checked by default. Use the "clientCertificates" property of the "windows" top-level key in the system.json system configuration file of io.Connect Desktop:
{
    "windows": {
        "clientCertificates": {
            "alwaysUseCheckbox": {
                "enabled": true,
                "checked": true
            }
        }
    }
}
Users can reset the default certificates through the "Advanced" menu item in the tray menu of io.Connect Desktop:
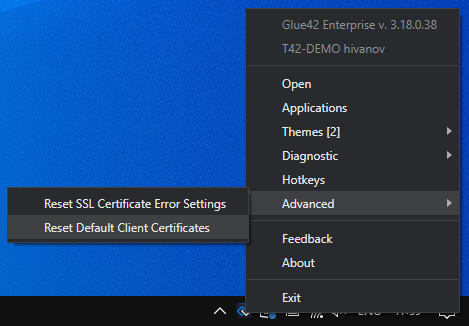
If the "Reset Default Client Certificates" menu item is greyed out, this means that no certificates have been set as default yet.
The following specifics for resetting certificates should be taken into account:
- Upon restart of io.Connect Desktop, the selected default certificates are automatically reset.
- When the user resets the default certificates from the tray menu:
- If a certificate has already been used successfully for a request, Chromium will keep using it despite the certificate having been reset in io.Connect Desktop and the dialog for selecting a certificate won't open for subsequent requests for the same resource. Only a restart of io.Connect Desktop will truly reset the certificate and trigger the prompt page.
- If a certificate has been rejected by the server when attempting a request for a resource, resetting the default certificates from the tray menu will result in the dialog for selecting a certificate appearing again when the user makes a request for that same resource.
When for some reason a certificate doesn't pass the internal Chromium validation before being sent to the server, a dialog appears that offers options to the user to block or allow this certificate. The allowed certificates are then remembered for future use:
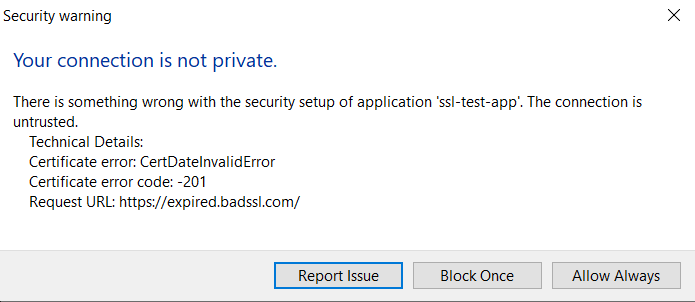
The "Reset SSL Certificates Error Settings" option of the "Advanced" menu item of tray menu can be used to reset the already remembered allowed certificates, which will result in the dialog appearing again when a previously allowed invalid certificate is used.
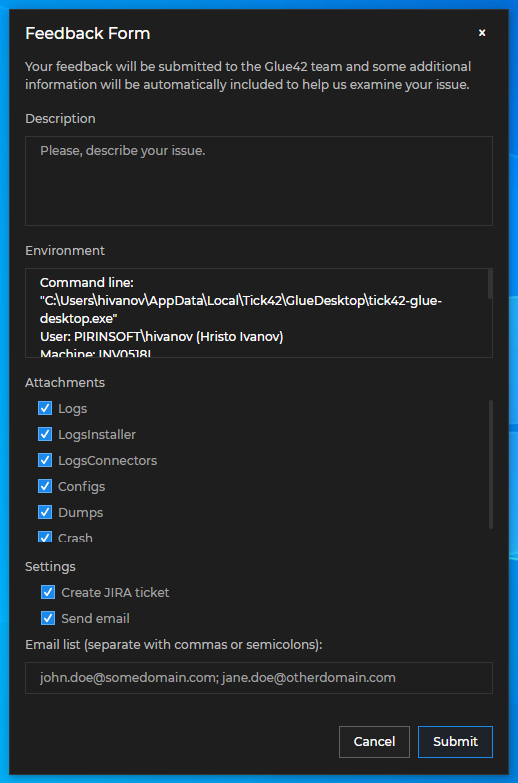
Feedback Form
io.Connect Desktop has a built-in Feedback Form that allows users to send feedback with improvement suggestions or bug reports. To report a problem or submit a suggestion, describe it in the "Description" field and optionally attach logs and configs to the report. The form can be configured to send an email with the report to the io.Connect team. The Feedback Form is a web app and can be completely customized.
Feedback Button
The Feedback Form can be opened directly from an app instance by using the "Feedback" button in the app window header.
To enable or disable the "Feedback" button globally for all apps, use the "showFeedbackButton" property of the "windows" top-level key in the system.json system configuration file of io.Connect Desktop:
{
    "windows": {
        "showFeedbackButton": true
    }
}
To enable or disable the "Feedback" button per app, use the "showFeedbackButton" property of the "details" top-level key in the app definition:
{
    "details": {
        "showFeedbackButton": false
    }
}
To specify the emails of the app owners, use the "supportEmails" top-level key in the app definition. The email addresses defined in this property will be added to the Feedback Form if it has been triggered from that app:
{
    "supportEmails": ["app.owner1@example.com", "app.owner2@example.com"]
}
Configuration
To configure the Feedback Form, use the "issueReporting" top-level key in the system.json system configuration file of io.Connect Desktop. The following is an example Feedback Form configuration:
{
    "issueReporting": {
        "attachmentsViewMode": "category",
        "mail": {
            "enabled": true,
            "zipAttachments": true,
            "bugSubjectPrefix": "Error:",
            "reportSubjectPrefix": "Feedback:",
            "recipients": ["support@example.com", "dev-support@example.com"],
            "allowEditRecipients": true,
            "maxAttachmentMB": "10"
        },
        "folderAttachments": [
            {
                "name": "Screenshots",
                "folderPath": "%IO_CD_USER_DATA_DIR%/logs",
                "zipFolderPath": "io.Connect Desktop/Screenshots",
                "filter": "*.png",
                "category": "Screenshots",
                "selected": false,
                "recursive": true
            },
            {
                "name": "io.Connect Desktop-AppLogs",
                "folderPath": "%IO_CD_USER_DATA_DIR%/logs",
                "zipFolderPath": "io.Connect Desktop/Logs",
                "filter": "*.log*",
                "category": "App Logs",
                "selected": true,
                "recursive": true
            },
            {
                "name": "io.Connect Desktop-Crashes",
                "folderPath": "%IO_CD_USER_DATA_DIR%/crashes/reports",
                "zipFolderPath": "io.Connect Desktop/Crashes",
                "filter": "*.dmp",
                "category": "Crashes",
                "recursive": false
            }
        ],
        "form": {
            "width": 350,
            "height": 500
        }
    }
}
The "issueReporting" object has the following properties:
| Property | Type | Description |
|---|---|---|
"attachmentsViewMode" |
"file" | "category" |
Defines how the attachments will be displayed in the Feedback Form. Possible values are "file" or "category". If set to "file", all attachable files will be displayed as separate items, otherwise several main categories will be displayed and if the category is selected by the user, all files in it will be attached. |
"attachScreenshots" |
boolean |
If true, will attach screenshots of all monitors to the issue report. |
"enabled" |
boolean |
If true (default), the Feedback Form will be enabled in io.Connect Desktop. Set to false to disable it. When disabled, the Feedback Form won't be displayed automatically in case of platform crashes and the users won't be able to access it from the platform tray menu or from the "Feedback" button of your interop-enabled apps. Available since io.Connect Desktop 9.10. |
"folderAttachments" |
object[] |
Attachments configuration. For more details, see the Attachments section. |
"form" |
object |
Object that can be used to specify various properties for the io.Connect Window containing the Feedback Form, or to provide a URL pointing to a custom Feedback app. |
"mail" |
object |
Email configuration. For more details, see the Email section. |
The configuration for automatically sending an email when submitting a Feedback Form is found under the required "mail" property of the "issueReporting" top-level key. It accepts an object with the following properties:
| Property | Type | Description |
|---|---|---|
"action" |
"send" | "display" |
Defines the action to be performed when submitting the Feedback Form. If set to "send" (default), the email will be sent immediately (if possible, depending on security settings). If set to "display", an email draft will be shown to be reviewed and sent manually by the user. Valid only for Outlook and MAPI email clients. Available since io.Connect Desktop 10.0. |
"allowEditRecipients" |
boolean |
If true, the user will be allowed to manually add more recipients. |
"bugSubjectPrefix" |
string |
Prefix for the email subject when the issue is a bug. |
"enabled" |
boolean |
If true, will enable the option to send an email when submitting the issue. |
"maxAttachmentMB" |
string |
The maximum size of the attachments in MB. |
"recipients" |
string[] |
List of email addresses to which the issue report will be sent. |
"reportSubjectPrefix" |
string |
Prefix for the email subject when sending feedback. |
"zipAttachments" |
boolean |
If true, the attachments will be archived. |
Attachments
The configuration for attaching files when submitting a Feedback Form is found under the required "folderAttachments" property of the "issueReporting" top-level key. It accepts an array of objects, each with the following properties:
| Property | Type | Description |
|---|---|---|
"category" |
string |
Required. Category for the attached item. |
"filter" |
string |
Required. Regex filter that will be applied to each file in the folder - e.g., "*.log". |
"folderPath" |
string |
Required. Path to the folder that will be attached. |
"name" |
string |
Required. Name for the attachment. |
"recursive" |
boolean |
If true, will collect and attach all files from all folders located inside the specified folder. Set to false to collect the files only in the specified folder. |
"selected" |
boolean |
If true, the category (or all files under this category) in the Feedback Form will be selected by default. |
"zipFolderPath" |
string |
Required. Path in the archived folder. |
Form
To configure the io.Connect Window containing the Feedback Form, use the "form" property of the "issueReporting" top-level key. It accepts an object with the following properties:
| Property | Type | Description |
|---|---|---|
"height" |
number |
Height in pixels for the Feedback Form. |
"showEnvironmentInfo" |
boolean |
If true, the Feedback Form will show a field with details about the io.Connect environment. |
"transparent" |
boolean |
If true, the io.Connect Window containing the Feedback Form will have a transparent background. Available since io.Connect Desktop 9.1. |
"url" |
string |
URL pointing to the location of the Feedback app. |
"width" |
number |
Width in pixels for the Feedback Form. |
⚠️ Note that the
"transparent"property will set a transparent background only for the io.Connect Window that contains the Feedback app. To achieve actual transparency, you must also set a transparent background for your app from its styles.
Extending the Feedback Form
The @interopio/components-react library enables you to create your own Feedback app for io.Connect Desktop. The library provides hooks and default components which you can use to build your own Feedback app by using, modifying or replacing the available components and functionalities.
To use the library in your project, execute the following command:
npm install @interopio/components-react⚠️ Note that the
@interopio/components-reactlibrary doesn't include a built Feedback app. A Feedback app is provided in io.Connect Desktop. You can also use and customize the Feedback app template.
Configuration
To use your custom Feedback app built with the @interopio/components-react library, use the "form" property of the "issueReporting" top-level key in the system.json system configuration file of io.Connect Desktop. Set the "url" property of the "form" object to the URL of your custom Feedback app:
{
    "issueReporting": {
        "form": {
            "url": "http://localhost:3000"
        }
    }
}
The "form" object has the following properties:
| Property | Type | Description |
|---|---|---|
"height" |
number |
Height in pixels for the Feedback Form. |
"showEnvironmentInfo" |
boolean |
If true, the Feedback Form will show a field with details about the io.Connect environment. |
"url" |
string |
URL pointing to the location of the Feedback app. |
"width" |
number |
Width in pixels for the Feedback Form. |
ℹ️ For more available customizations of the Feedback app via configuration, see the Feedback Form > Configuration section.
Hooks
The useIssueReportingContext() hook provides context information about the Feedback app, as well as methods for the default Feedback functionalities which you can use directly in your custom components:
const {
    close,
    config,
    onThemeChanged,
    openUrl,
    setBounds,
    submit,
    submitCompleted,
} = useIssueReportingContext();| Property | Type | Description |
|---|---|---|
close() |
function |
Closes the Feedback app. |
config |
object |
Object describing the configuration for the Feedback Form. |
onThemeChanged() |
function |
Method that can be used to track theme changes. Accepts a callback as an argument that will be invoked every time the theme changes. The callback receives as an argument the name of the new theme. |
openUrl() |
function |
Opens a URL in the default browser. Accepts the URL to open as an argument. |
setBounds() |
function |
Sets the bounds of the Feedback Form. Accepts arguments for left, top, width and height (in that order) specifying the position of the Feedback Form on the screen and its size in pixels. |
submit() |
function |
Submits an issue report. |
submitCompleted |
boolean |
Boolean flag indicating whether the issue report submit process has been completed. |
The config object has the following properties:
| Property | Type | Description |
|---|---|---|
allowEditRecipients |
boolean |
Flag indicating whether the user is allowed to manually add or remove email recipients. |
applicationTitle |
string |
Title of the Feedback app. |
attachments |
object[] |
Array of objects each with id, name and category properties describing the available attachments. |
attachmentsViewMode |
"file" | "category" |
Describes how the attachments are displayed in the Feedback app. |
buildVersion |
string |
Platform build version as specified in the "build" top-level key in the system.json file of io.Connect Desktop. |
env |
string |
Platform environment as specified in the "env" top-level key in the system.json configuration file of io.Connect Desktop. |
environmentInfo |
string |
Platform environment details. |
errorMessage |
string |
Error message sent by the platform. |
isError |
boolean |
Flag indicating whether the submitted feedback is about a platform error. |
mailingList |
string |
List of default email recipients. |
region |
string |
Platform region as specified in the "region" top-level key in the system.json configuration file of io.Connect Desktop. |
selectedCategories |
string[] |
List of selected attachments or attachment categories. |
sendEmail |
boolean |
Flag indicating whether an email with the issue report will be sent to the specified recipients. |
showEnvironmentInfo |
boolean |
Flag indicating whether the Feedback app will show a field with environment details about the platform. |
theme |
string |
The name of the current theme. |
version |
string |
Platform version. |
Components
All default components can be reused and composed with custom code. If usage of such component has been detected, its default behavior will be applied. For instance, if you use the <SubmitButton /> component, it will automatically submit the issue report when the button is clicked, without the need of custom code to induce this behavior. If you pass the same component more than once, an error will be thrown.
To remove a component, pass a <Fragment /> component. If you want to use a default functionality (e.g., for closing the Feedback Form) in your custom components, use the useIssueReportingContext() hook to acquire it and pass it to your component.
In your custom Feedback app, you should place the <Feedback /> components in the <IssueReportingProvider /> component. This component is a React context provider component that provides feedback-related data and functionality accessible via the useIssueReportingContext() hook.
The following example demonstrates a basic usage of the library:
import { IssueReportingProvider } from "@interopio/components-react";
import CustomFeedback from "./CustomFeedback";

const App = () => {
    return (
        <IssueReportingProvider>
            <CustomFeedback />
        </IssueReportingProvider>
    );
};

export default App;
Feedback Component
The <Feedback /> component is used for rendering the Feedback Form. The following example demonstrates basic usage of the component:
import { Feedback, IssueReportingProvider } from "@interopio/components-react";
import CustomHeader from "./CustomHeader";

const App = () => {
    return (
        <IssueReportingProvider>
            <Feedback
                components={{
                    Header: CustomHeader
                }}
            />
        </IssueReportingProvider>
    );
};

export default App;
Header Component
The <Header /> component holds the <Title /> and the <CloseButton /> button components. The following example demonstrates creating a header for the Feedback app with a custom title and an additional custom header button. The default <CloseButton /> component is used with its default functionality for closing the Feedback app:
import {
    Title,
    CloseButton,
    ButtonGroup,
    useIssueReportingContext
} from "@interopio/components-react";
import CustomButton from "./CustomButton";

// Custom header title.
const CustomTitle = () => {
    const { config } = useIssueReportingContext();
    const { applicationTitle } = config;
    const title = applicationTitle ? `My ${applicationTitle}` : "My Custom Feedback app";

    return <Title className="draggable" text={title} />;
};

// This component holds the header buttons.
const CustomHeaderButtons = () => {
    // Get the deafult funactionality for closing the Feedback app.
    const { close } = useIssueReportingContext();

    return (
        <ButtonGroup>
            <CustomButton />
            <CloseButton onClick={close} />
        </ButtonGroup>
    );
};

// Custom header for the Feedback app.
const CustomHeader = () => {
    return (
        <div>
            <CustomTitle />
            <CustomHeaderButtons />
        </div>
    );
};

export default CustomHeader;
To use the custom header for the Feedback app, pass it to the <Feedback /> component:
import { Feedback, IssueReportingProvider } from "@interopio/components-react";
import CustomHeader from "./CustomHeader";

const App = () => {
    return (
        <IssueReportingProvider>
            <Feedback
                components={{
                    Header: CustomHeader
                }}
            />
        </IssueReportingProvider>
    );
};

export default App;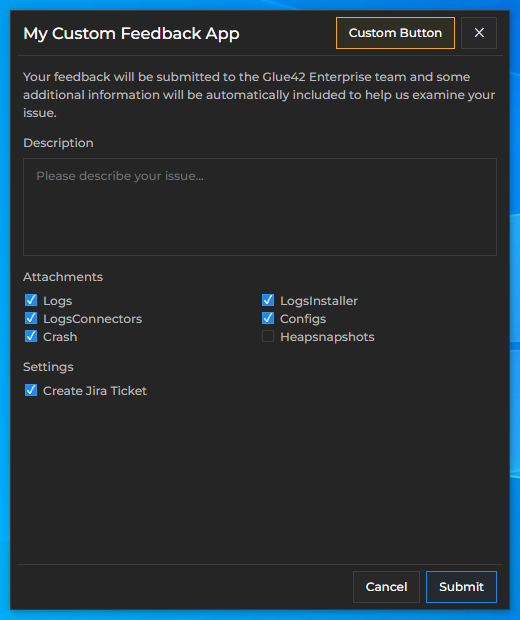
Body Component
You can use the <Body /> component to create a body for the Feedback app containing the desired issue reporting options - e.g., issue description field, attachments, email options. The @interopio/components-react library provides various components to choose from when constructing the view of your custom form: <TextArea />, <Checkbox />, <Block />, <Input />, <Select /> and more (see Feedback Component).
The following example demonstrates creating a body for the Feedback app containing custom text informing the user what will happen when they click the "Submit" button and a text area for describing the issue:
import {
    Block,
    Textarea,
    Checkbox,
    useIssueReportingContext
} from "@interopio/components-react";

// Custom body for the Feedback app.
const CustomBody = ({ handleSubmit, submitting }) => {
    const { config } = useIssueReportingContext();
    const { buildVersion } = config;
    const customText = `Your feedback will be submitted to the ${buildVersion} team`;

    // The body contains the custom text and a text area for describing the issue.
    return (
        <div>
            <form onSubmit={event => handleSubmit(event)}>
                <Block text={customText} />

                <Block text="Description">
                    <Textarea disabled={submitting} />
                </Block>
            </form>
        </div>
    );
};

export default CustomBody;
To use the custom body for the Feedback app, pass it to the <Feedback /> component:
import { Feedback, IssueReportingProvider } from "@interopio/components-react";
import CustomHeader from "./CustomFooter";
import CustomBody from "./CustomFooter";

const App = () => {
    return (
        <IssueReportingProvider>
            <Feedback
                components={{
                    Header: CustomHeader,
                    Body: CustomBody
                }}
            />
        </IssueReportingProvider>
    );
};

export default App;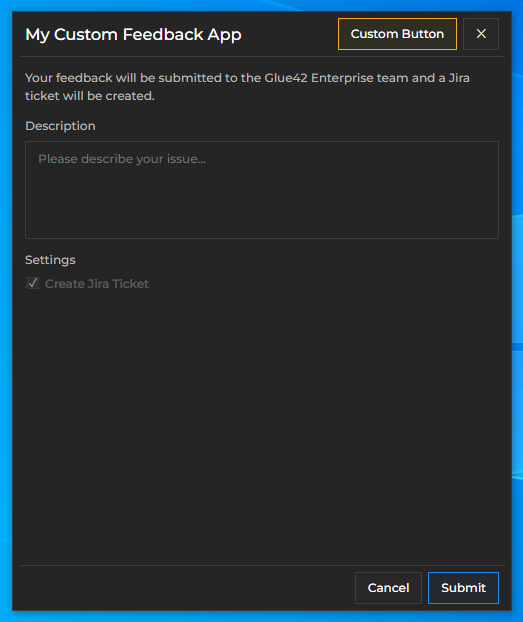
Footer Component
By default, the <Footer /> component holds the <FooterButtons /> component that renders conditionally either the <SubmitButton /> and the <CancelButton /> components, or a "Close" button based on whether submitting the issue report has been completed. During submission, the <Footer /> component renders the <Progress /> component showing the submission progress. When the submission is completed, the <Footer /> component renders an <Alert /> component showing the status of the submission.
The following example demonstrates adding a custom footer button:
import {
    SubmitButton,
    CancelButton,
    ButtonGroup,
    useIssueReportingContext
} from "@interopio/components-react";
import CallSupportButton from "./CallSupportButton";

// This component holds the footer buttons.
const CustomFooterButtons = () => {
    const { close } = useIssueReportingContext();

    return (
        <ButtonGroup>
            <SubmitButton form="feedback" type="submit" />
            <CallSupportButton />
            <CancelButton onClick={close} />
        </ButtonGroup>
    );
};

// Custom footer for the Feedback app.
const CustomFooter = () => {
    return (
        <div>
            <CustomFooterButtons />
        </div>
    );
};

export default CustomFooter;
To use the custom footer for the Feedback app, pass it to the <Feedback /> component:
import { Feedback, IssueReportingProvider } from "@interopio/components-react";
import CustomHeader from "./CustomFooter";
import CustomBody from "./CustomFooter";
import CustomFooter from "./CustomFooter";

const App = () => {
    return (
        <IssueReportingProvider>
            <Feedback
                components={{
                    Header: CustomHeader,
                    Body: CustomBody,
                    Footer: CustomFooter
                }}
            />
        </IssueReportingProvider>
    );
};

export default App;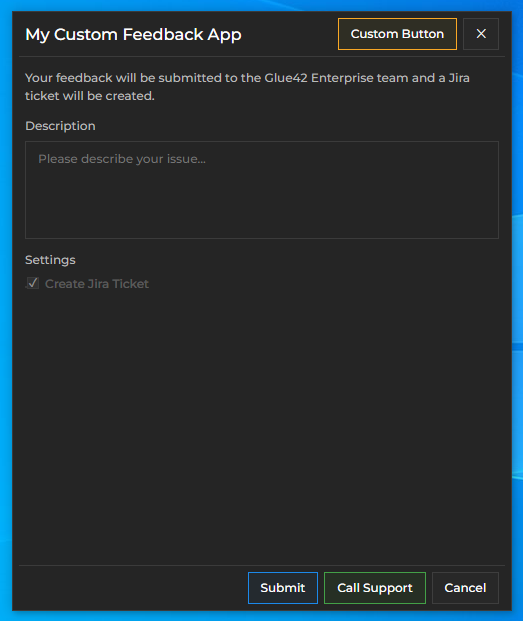
Open App
The Open app of io.Connect Desktop is accessible via the tray menu. It's designed for users to be able to quickly and easily open io.Connect Windows from the UI by providing only a URL.
Advanced users can use the JSON editor in the "Advanced Options" section to provide any valid app definition properties for opening a window.
The following example demonstrates how to open a flat io.Connect Window, add the Channel Selector to it, and join the window to the "Red" Channel:
{
    "mode": "flat",
    "channelSelector": {
        "enabled": true,
        "channelId": "Red"
    }
}
About App
The default About app of io.Connect Desktop is accessible from the tray menu. It shows details about io.Connect Desktop and its components, also license and any available meta information:
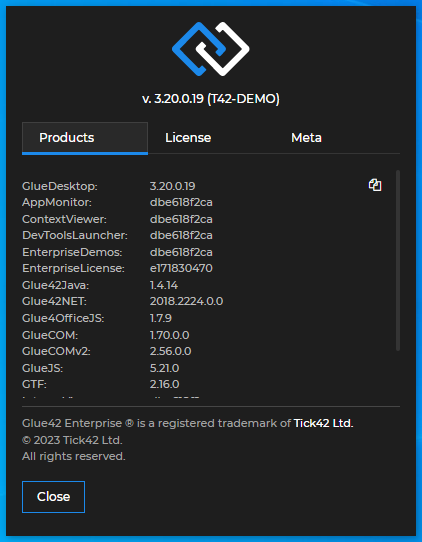
To customize the About app of io.Connect Desktop, use the "about" top-level key in the system.json system configuration file.
The "about" object has the following properties:
| Property | Type | Description |
|---|---|---|
"height" |
number |
Height in pixels for the About app. |
"hideTrademark" |
boolean |
Hide the trademark information section in the About app. |
"url" |
string |
URL pointing to the location of the About app. |
"width" |
number |
Width in pixels for the About app. |
To remove the trademark information at the bottom of the page, use the "hideTrademark" property:
{
    "about": {
        "hideTrademark": true
    }
}
You can also change the entire content displayed in the About app and its size by providing a URL to be loaded instead of the default app and specifying the desired width and height.
The following example demonstrates how to modify the size and the content of the About app:
{
    "about": {
        "url": "https://interop.io/",
        "width": 500,
        "height": 500
    }
}
Opening URLs in the Default Browser
io.Connect Desktop comes with a predefined app named "open-browser", which can be used to open a URL in the default web browser.
The following example demonstrates how to open a URL in the default browser by using the JavaScript App Management API:
const options = {
    // Specify the name of the default app for opening URLs in the default browser.
    name: "open-browser",
    // Provide the URL to open as context data for the started app instance.
    context: {
        url: "https://interop.io"
    }
};

await io.apps.instances.start(options);
⚠️ Note that only URLs with HTTP or HTTPS protocols can be opened.
Web Page Search
Search in web apps opened in io.Connect Windows just like in a browser with the CTRL + F command:
Use ENTER and SHIFT + ENTER to scroll through the results. Click ESC to close the search bar.
Available since io.Connect Desktop 9.7
To enhance the user experience with the Web Page Search feature, you can provide settings for it. It's possible to enable and configure a window pool for the Web Page Search, which will ensure that there are available instances of it ready to be displayed whenever an additional instance is required. You can specify the number of windows to keep in the pool and the interval at which to create them. Keep in mind that each additional instance in the pool will require more memory. Usually, two instances are enough to provide a smooth user experience.
To provide settings for the Web Page Search feature of io.Connect Desktop, use the "webPageSearch" top-level key in the system.json system configuration file of io.Connect Desktop:
{
    "webPageSearch": {
        "pool": {
            "enabled": true,
            "max": 3
        }
    }
}
The "webPageSearch" object has the following properties:
| Property | Type | Description |
|---|---|---|
"enabled" |
boolean |
If true (default), will enable the search in page feature. |
"pool" |
object |
Settings for the window pool used for creating the Web Page Search window. If enabled, will allow you to specify how many windows to keep in the pool and at what interval to create them. Keep in mind that each additional instance in the pool will require more memory. Usually, two instances are enough to provide a smooth user experience. |
The "pool" object has the following properties:
| Property | Type | Description |
|---|---|---|
"enabled" |
boolean |
If true, will enable using a window pool for creating the Web Page Search window. Defaults to false. |
"interval" |
number |
Interval in milliseconds at which to prepare new window instances for the Web Page Search when the window pool needs to be filled. Defaults to 500. |
"max" |
number |
Maximum number of instances to keep in the window pool for the Web Page Search. Keep in mind that each additional instance in the pool will require more memory. Usually, two instances are enough to provide a smooth user experience. Defaults to 2. |
Context Menu
io.Connect Desktop provides a native right-click context menu available in all io.Connect web apps for which it has been enabled. It provides standard editing actions (select, cut, copy, paste, undo, redo), zoom and spelling options.
Available since io.Connect Desktop 9.4
The native context menu supports three different modes: "Edit" mode, "Edit with Suggestions" mode, and "Selection" mode. Each mode is automatically applied based on whether the text can be edited or only selected. The following demonstrates each of the context modes:
The native context menu can be enabled for all web apps, Workspaces and web groups on a global level and per app.
To configure the context menu globally, use the "contextMenu" property of the "windows" top-level key in the system.json system configuration file:
{
    "windows": {
        "contextMenu": {
            "enabled": true
        }
    }
}
To configure the context menu per app, use the "contextMenu" property of the "details" top-level key in the app definition:
{
    "details": {
        "contextMenu": {
            "enabled": false
        }
    }
}
Telemetry Data
io.Connect Desktop exposes telemetry data containing info related to the system environment, the running web apps, and the available apps stores.
On system level, you can gather data about:
- Focus duration, start and stop events for apps.
- Step-by-step system startup flow events. Can be used to investigate slow startups.
- All system log entries.
- System CPU and memory usage.
For web apps, you can gather data about:
- All network request per app.
- All app console logs.
- Web page exceptions caught by the window
"error"event. - CPU and memory usage per process.
For app stores, you can gather data about:
- All app store console logs.
- All journey events.
- All app store log entries.
- All app store network requests.
Telemetry data events can also be cleared. To get or clear telemetry data, you must invoke the "T42.Telemetry" Interop method passing the respective command and configuration for getting or clearing telemetry data entries.
Configuration
Telemetry data is disabled by default. To enable it, set the "telemetry" top-level key in the system.json configuration file of io.Connect Desktop to true:
{
    "telemetry": {
        "enabled": true
    }
}
The "telemetry" object has the following properties:
| Property | Type | Description |
|---|---|---|
"enabled" |
boolean |
If true, will enable telemetry data published by io.Connect Desktop. If false, telemetry data won't be gathered or published. |
"features" |
object |
Telemetry data sets that you can enable or disable from being published by io.Connect Desktop. Available since io.Connect Desktop 9.5. |
The "features" object has the following properties:
| Property | Type | Description |
|---|---|---|
"apps" |
boolean |
If true, will enable publishing telemetry data related to web app performance. |
"stores" |
boolean |
If true, will enable publishing telemetry data related to app stores. |
"system" |
boolean |
If true, will enable publishing telemetry data related to system performance. |
Getting Data
To get telemetry data, invoke the "T42.Telemetry" Interop method. As a second argument for the invocation, pass an object with command and config properties. For the command property, use "GetEvents" as a value to specify that the method should get telemetry data. Use the config property to specify what type of telemetry data you want to receive - for the system environment, for the running web apps, or for both:
// Name of the Interop method.
const methodName = "T42.Telemetry";
// Settings for the method invocation.
const args = {
    command: "GetEvents",
    config: { system: true, apps: true }
};
// Invoking the "T42.Telemetry" method to get telemetry data.
const result = await io.interop.invoke(methodName, args);
// Extracting the returned data object.
const data = result.returned;

console.log(data);
The object passed as an argument for the method invocation has the following properties:
| Property | Type | Description |
|---|---|---|
command |
"GetEvents" | "ClearEvents" |
Specifies the action to execute - get or clear telemetry data. |
config |
object |
Specifies what type of telemetry data to get or clear. |
The config object for requesting telemetry data has the following properties:
| Property | Type | Description |
|---|---|---|
apps |
boolean | object |
Specifies whether to get web app data. Pass an object to refine the data request (see Refining Telemetry Requests). |
system |
boolean | object |
Specifies whether to get system data. Pass an object to refine the data request (see Refining Telemetry Requests). |
Data Shape
The object returned from the invocation of the "T42.Telemetry" Interop method when requesting telemetry data, has the following shape:
const data = {
    type: "gd",
    data: {
        system: {},
        apps: [],
        stores : {}
    }
};
The system object has the following properties:
| Property | Type | Description |
|---|---|---|
journeyEvents |
object[] |
Each item of the array holds information about focus duration, start and stop events for a specific web app. |
logErrors |
object[] |
Each item of the array holds an error entry from the system logs. |
perfData |
object |
Holds information about overall and per app CPU and memory usage. |
startupEvents |
object[] |
Each item of the array holds information about a single startup flow event. |
The apps property is an array of objects each with the following properties:
| Property | Type | Description |
|---|---|---|
app |
string |
The app name as defined in its configuration file. |
console |
object[] |
Each item of the array holds information about a message logged to the console. |
errors |
object[] |
Each item of the array holds information about a web page exception caught by the window "error" event. |
info |
object |
Contains specific data about the app - instance ID, API version, window type, URL and more. |
instance |
string |
Unique ID within the io.Connect environment. |
requests |
object[] |
Each item of the array holds information about a specific network request made by the app. |
The stores object has the following properties:
| Property | Type | Description |
|---|---|---|
console |
object |
Contains information about the number of console messages, their total size and the time of the last update. |
journeyEvents |
object |
Contains information about the number of journey events, their total size and the time of the last update. |
logs |
object |
Contains information about the number of logs, their total size and the time of the last update. |
requests |
object |
Contains information about the number of requests, their total size and the time of the last update. |
Refining Telemetry Requests
When requesting telemetry data, you can specify what type of system and web app data entries you want to receive. Use the system and apps properties of the config object refine your telemetry request:
const methodName = "T42.Telemetry";
const args = {
    command: "GetEvents",
    config: {
        // Omit data about startup flow events and CPU and memory usage.
        system: { withStartupEvents: false, withPerfData: false },
        // Omit data about console messages logged by web apps.
        apps: { withConsole: false }
    }
};
const result = await io.interop.invoke(methodName, args);
const data = result.returned;

console.log(data);
The system property of the config object accepts an object with the following properties:
| Property | Type | Description |
|---|---|---|
withJourneyEvents |
boolean |
Whether to receive data about focus duration, start and stop events for web apps. |
withLog |
boolean |
Whether to receive data about system log entries. |
withPerfData |
boolean |
Whether to receive data about system CPU and memory usage. |
withStartupEvents |
boolean |
Whether to receive data about the system startup flow events. |
The apps property of the config object accepts an object with the following properties:
| Property | Type | Description |
|---|---|---|
withConsole |
boolean |
Whether to receive data about console messages logged by web apps. |
withErrors |
boolean |
Whether to receive data about web page exceptions caught by the window "error" event. |
withRequests |
boolean |
Whether to receive data about network requests made by web apps. |
Clearing Data
To clear telemetry data, invoke the "T42.Telemetry" Interop method and pass "ClearEvents" as a value to the command property of the argument object for the method invocation. Use the config object to specify what type of telemetry data entries to clear:
// Name of the Interop method.
const methodName = "T42.Telemetry";
// Settings for the method invocation.
const args = {
    command: "ClearEvents",
    config: {
        requests: true,
        journeyEvents: true,
        logs: true,
        console: true
    };
};
// Invoking the "T42.Telemetry" method to clear telemetry data.
const result = await io.interop.invoke(methodName, args);
// Extracting the returned data object.
const data = result.returned;

// Will print an empty object, as all entries have been cleared.
console.log(data);
The config object for clearing telemetry data has the following properties:
| Property | Type | Description |
|---|---|---|
console |
boolean |
Whether to clear data about console messages logged by web apps. |
journeyEvents |
boolean |
Whether to clear data about focus duration, start and stop events for web apps. |
logs |
boolean |
Whether to clear data about system log entries. |
requests |
boolean |
Whether to clear data about network requests made by web apps. |
Browser Extensions
io.Connect Desktop supports loading additional Chrome extensions and Chrome DevTools extensions.
To add regular Chrome extensions to io.Connect Desktop, use the "extensions" top-level key in the system.json system configuration file of io.Connect Desktop. To add Chrome DevTools extensions, use the "devToolsExtensions" top-level key. Both properties accept a list of URLs pointing to the location of the browser extension.
The following example demonstrates how to configure io.Connect Desktop to load a regular Chrome extension b:
{
    "extensions": ["https://path-to-chrome-extension"]
}
Available since io.Connect Desktop 9.7
The "extensions" and "devToolsExtensions" top-level keys accept also a list of objects with the following properties:
| Property | Type | Description |
|---|---|---|
"allowFileAccess" |
boolean |
If true, will allow the extension to read local files over the file:// protocol and to inject content scripts in local pages. It's required to set this to true if you want to load an extension from a local file path. Defaults to false. |
"path" |
string |
Path to the extension. |
The following example demonstrates how to allow access to the file system in order to load a Chrome extension from a local file path:
{
    "extensions": [
        {
            "path": "C:/path-to-chrome-extension",
            "allowFileAccess": true
        }
    ]
}
Adding DevTools Extensions
The following guide demonstrates how to add a Chrome DevTools extension to io.Connect Desktop.
To add a DevTools extension supported by Electron, you need to have the extension installed and add a configuration for it in the system.json file of io.Connect Desktop and in the configuration file of your app. The following example demonstrates how to add the React DevTools extension to io.Connect Desktop:
Install the React DevTools Chrome extension.
Locate the extension on your local machine - the default location for the React DevTools extension is
%LocalAppData%/Google/Chrome/User Data/Default/Extensions/fmkadmapgofadopljbjfkapdkoienihi. (You can move the extension installation folder wherever you like.)Open the
system.jsonsystem configuration file of io.Connect Desktop and add the path to the React DevTools extension under the"devToolsExtensions"top-level array. Set the"allowFileAccess"property totrueto allow loading the extension from a local file path:
{
    "devToolsExtensions": [
        {
            "path": "C:/Users/<username>/AppData/Local/Google/Chrome/User Data/Default/Extensions/fmkadmapgofadopljbjfkapdkoienihi/4.23.0_0",
            "allowFileAccess": true
        }
    ]
}
Replace <username> with your local username. The path must point to the version folder of the extension containing the manifest.json file. Remember to escape the backslash characters.
- Open the JSON configuration file of your app and add the following configuration under the
"details"top-level key:
{
    "security": {
        "sandbox": false
    }
}
For instance:
{
    "name": "My App",
    "details": {
        "url": "http://localhost:3000",
        "security": {
            "sandbox": false
        }
    }
}- Start io.Connect Desktop, open your interop-enabled app and you should be able to see the added extension to the Chrome DevTools when you open the developer console. In this case, you will need a React app in order to be able to see the React DevTools extension.