
Windows
Overview
The Window Management API is accessible via the io.windows object.
See the JavaScript Window Management examples on GitHub.
Global Dynamic Configuration
To configure global io.Connect Windows settings dynamically, use the configure() method and pass a WindowsConfiguration object as a required argument.
The following example demonstrates how to hide the caption of window groups and enable the "Extract" button:
const config = {
    hideGroupCaption: true,
    showExtractButton: true
};

await io.windows.configure(config);
ℹ️ For details on providing settings for io.Connect Windows globally via the
system.jsonsystem configuration file of io.Connect Desktop, see the Developers > Configuration > System > Window Management and the Developers > Configuration > System > Window Settings sections.
ℹ️ For details on configuring individual io.Connect Windows dynamically, see the Window Operations > Configuration section.
Opening Windows
To open a new io.Connect Window, use the open() method:
const name = "io-connect-docs";
const url = "https://docs.interop.io";
// Specify location for the new window.
const options = {
    top: 200,
    left: 200
};

const ioConnectWindow = await io.windows.open(name, url, options);
The name and url arguments are required. The window name must be unique. The third argument is an optional WindowCreateOptions object which specifies various settings for the new io.Connect Window - bounds, styles, mode, button settings and more.
Handling the Browser window.open()
Available since io.Connect Desktop 9.1
When using the browser window.open() method for opening child windows in io.Connect Windows, you can pass io.Connect Window options as a third argument:
const url = "https://example.com";
// io.Connect Window options as a comma-separated string with `name=value` pairs.
const options = "mode=frameless, hasSizeAreas=true, width=300, height=500";

window.open(url, undefined, options);
The following table lists the available options:
| Option | Type | Description |
|---|---|---|
hasSizeAreas |
boolean |
If false, the window won't have resizing areas and the user won't be able to resize it by dragging its borders. Defaults to true for HTML, flat, and tab windows. Defaults to false for frameless windows. |
height |
number |
Height in pixels for the new window. |
hidden |
boolean |
If true, the window will start as a hidden window. |
left |
number |
Distance in pixels of the top left window corner from the left edge of the screen. |
maxHeight |
number |
Maximum height in pixels for the new window. Available since io.Connect Desktop 9.3. |
maxWidth |
number |
Maximum width in pixels for the new window. Available since io.Connect Desktop 9.3. |
minHeight |
number |
Minimum height in pixels for the new window. Available since io.Connect Desktop 9.3. |
minWidth |
number |
Minimum width in pixels for the new window. Available since io.Connect Desktop 9.3. |
mode |
"flat" | "tab" | "html" | "frameless" |
io.Connect Window mode. |
outlivesOpener |
boolean |
If true, will prevent child windows from being closed when their parent is closed. |
top |
number |
Distance in pixels of the top left window corner from the top edge of the screen. |
transparent |
boolean |
If true, the window will be transparent. Valid only for frameless windows. Defaults to false. Available since io.Connect Desktop 9.9. ⚠️ Note that as of io.Connect Desktop 9.10.1, due to limitations related to the underlying Electron framework, frameless transparent windows can't have resizing areas (i.e., the hasSizeAreas property won't have any effect when transparent is set to true). |
width |
number |
Width in pixels for the new window. |
ℹ️ For details on how to control the behavior for handling the browser
window.open()globally, see the Developers > Configuration > System > Window Settings section.
ℹ️ For details on how to control the behavior for handling the browser
window.open()per app, see the Developers > Configuration > Application > Handling the Browser window.open() section.
Opening PDF Files
To open a PDF file in an io.Connect Window, use the open() method. Pass the URL to the PDF file and optionally specify parameters in the URL for opening the PDF file:
// This will open the PDF file with the PDF toolbar turned off.
const PDF_URL = "https://url-to-pdf.com/file-name.pdf#toolbar=0";

await io.windows.open("PDF File", PDF_URL);
To specify parameters in the URL, use the following template:
<URL to PDF file>#<parameter>=<value>To specify multiple parameters in the URL, use & to separate them:
<URL to PDF file>#<parameter>=<value>&<parameter>=<value>&<parameter>=<value>⚠️ Note that
#,&and=are special characters which you must not use in parameter values because they can't be escaped.
The following example will display page 3 of the PDF file, hide the PDF toolbar, set the zoom factor to 150% and scroll the page vertically and horizontally by 100px (pixels are relative to the zoom factor):
const PDF_URL = "https://url-to-pdf.com/file-name.pdf#page=3&toolbar=0&zoom=150,100,100";

await io.windows.open("PDF File", PDF_URL);
The following table lists all supported URL parameters for opening PDF files:
| Parameter | Description | Examples |
|---|---|---|
page |
Specifies which page to display. Accepts an integer as a value. The first page of the document has a value of 1. | To open the PDF file to page 3, use page=3. |
toolbar |
Whether to enable or disable the PDF toolbar. Accepts 0 or 1 as values. | To hide the PDF toolbar, use toolbar=0. |
zoom |
Specifies the zoom factor and also the vertical and horizontal scroll position of the page in regard to the top left corner of the window. Accepts integer or floating point values. | To set the zoom factor to 150.5%, use zoom=150.5. To set the zoom factor to 120% and scroll the page 200px vertically and 100px horizontally, use zoom=120,200,100. |
view |
Specifies the view mode of the page using values defined in the PDF language specification. See the possible values in the next table. Use the page parameter before view. |
To fit the page in the window, use view=Fit. To fit the page vertically, use view=FitV. To fit the page horizontally and scroll it 200px vertically, use view=FitH,200. |
The following table lists the possible values for the view parameter:
| Value | Description | Example |
|---|---|---|
Fit |
Fits the entire page horizontally and vertically in the window. If the vertical and horizontal magnification factors are different, the smaller one will be used for fitting the page. In the other dimension the page will be centered. | view=Fit |
FitH |
Fits the page horizontally in the window. | view=FitH |
FitH,<top> |
Fits the page horizontally and scrolls it vertically from the top edge of the window with the specified integer or floating point value. | view=FitH,200 |
FitV |
Fits the page vertically in the window. | view=FitV |
FitV,<left> |
Fits the page vertically and scrolls it horizontally from the left edge of the window with the specified integer or floating point value. | view=FitV,200 |
Window Settings
To specify settings for the io.Connect Windows, pass a WindowCreateOptions object to the open() method:
const name = "io-connect-docs";
const url = "https://docs.interop.io";
// Specify location for the new window.
const options = {
    height: 640,
    width: 560,
    left: 100,
    top: 100,
    mode: "flat",
    title: "io.Connect Documentation",
    backgroundColor: "#1a2b30",
    focus: false
};

const ioConnectWindow = await io.windows.open(name, url, options);
All available settings that can be passed via configuration or dynamically are described in the app definition schema under the "windows" key and in the WindowCreateOptions object respectively.
Finding Windows
All functions for finding io.Connect Windows return an IOConnectWindow object (or a collection of such objects).
Listing
To obtain a collection of all io.Connect Windows, use the list() method:
const allIOConnectWindows = io.windows.list();Current Window
To get a reference to the current window, use the my() method:
const currentWindow = io.windows.my();⚠️ Note that the
my()method by design won't work (will returnundefined) when used in special apps like the Workspaces App or the Web Group App, and also in Node.js apps.
By Name
To find a window by name, use the find() method:
const name = "io-connect-docs";
const ioConnectWindow = io.windows.find(name);
By ID
To find a window by ID, use the findById() method:
const ID = "2506_04";
const ioConnectWindow = io.windows.findById(ID);
Auto Arranging Windows
Available since io.Connect Desktop 9.1
io.Connect Windows can be auto arranged programmatically in a grid on the screen. Auto arrangement is enabled by default. To disable it for an app, set the "allowAutoArrange" top-level property in the app definition to false:
{
    "allowAutoArrange": false
}
To auto arrange the io.Connect Windows located on a given display, or to restore their previous states, use the autoArrange() method and optionally pass a display ID specifying the display whose windows to arrange:
const displayID = 26573;

await io.windows.autoArrange(displayID);
⚠️ Note that windows with special functionality like docked windows and Workspaces don't participate in auto arranging.
The following demonstrates auto arranging and restoring programmatically the windows on a given display:
All windows on the specified display will be auto arranged in a grid. If the method is invoked a second time and the user hasn't broken manually the arrangement, the windows will be restored to their previous states. If you don't specify a display ID, the windows on the display where the io.Connect shell app is located will be auto arranged.
Window Operations
The Window Management API enables you to control an IOConnectWindow instance programmatically. The properties and the methods of an IOConnectWindow instance enable you to access or change various window settings and execute actions on the window instance like focusing, closing, zooming, cloning, printing, and more.
Dynamic Configuration
To configure individual io.Connect Windows dynamically, use the configure() method of an IOConnectWindow instance and pass a WindowConfiguration object as a required argument.
The following example demonstrates removing the resizing areas of a window to prevent the user from resizing it:
const config = {
    hasSizeAreas: false
};

await myWindow.configure(config);
ℹ️ For details on providing settings for individual io.Connect Windows via the app definition file, see the Developers > Configuration > Application section.
ℹ️ For details on providing global io.Connect Window settings dynamically, see the Global Dynamic Configuration section.
Stickiness
The io.Connect Window stickiness enables users to easily organize the windows on their desktop in visual groups. Window stickiness is enabled by default, but can be controlled programmatically and by enabling the "Sticky" button for end users.
To set the stickiness or the visibility of the "Sticky" button programmatically on a global level, use the configure() method. Pass a WindowsConfiguration object as a required argument:
// Required object with configuration settings.
const windowsConfig = {
    // Turn off the stickiness and hide the "Sticky" button globally.
    sticky: false,
    showStickyButton: false
};

await io.windows.configure(windowsConfig);
To set the stickiness of an io.Connect Window instance, use the setSticky() method and pass a Boolean value as an argument:
const myWindow = io.windows.my();

// Turn off the stickiness for the current window.
await myWindow.setSticky(false);
To check whether the window is sticky, use the isSticky of an IOConnectWindow instance:
// Returns a Boolean value.
const isSticky = myWindow.isSticky;
ℹ️ For details on how to enable or disable the "Sticky" button globally, see the Developers > Configuration > System > Window Settings section.
ℹ️ For details on how to enable or disable the "Sticky" button per app, see the Developers > Configuration > Application > Sticky Button section.
Title
To get the title of an io.Connect Window, use the title property or the getTitle() method of an IOConnectWindow instance:
const title = myWindow.title;
// or
const winTitle = await myWindow.getTitle();
To set the title of a window, use the setTitle() method:
await myWindow.setTitle("New Title");Bounds
The bounds of a window describe its position (top and left coordinates) and size (width and height) on the screen.
⚠️ Note that if your app logic includes both zooming a window and retrieving its size with the
window.innerHeightorwindow.innerWidthDOM properties, you have to consider the fact that the browser will report adjusted size values based on the zoom factor. In such cases, it's recommended to usewindow.outerHeightandwindow.outerWidth, or theboundsproperty of anIOConnectWindowinstance.
To get the bounds of an io.Connect Window, use the bounds property or the getBounds() method of an IOConnectWindow instance:
const bounds = myWindow.bounds;
// or
const winBounds = await myWindow.getBounds();
To move or resize an io.Connect Window, use the moveTo(), resizeTo() or moveResize() methods.
To move a window:
// Top and left coordinates (in pixels) for the top-left window corner.
await myWindow.moveTo(200, 300);
To resize a window:
// Width and height (in pixels) for the window.
await myWindow.resizeTo(300, 400);
To move and/or resize a window:
// New bounds for the window.
const bounds = {
    top: 200,
    left: 300,
    width: 300,
    height: 400
};

await myWindow.moveResize(bounds);
Taskbar Icon
To retrieve the Windows taskbar icon of the current window, use the getIcon() method of an IOConnectWindow instance:
const myWindow = io.windows.my();
const icon = await myWindow.getIcon();
To change the Windows taskbar icon of the current window, use the setIcon() method of an IOConnectWindow instance and pass a new image:
const myWindow = io.windows.my();
// Pass a URL, file URL, raw Base64 string, or a Base64 data URL.
const newIcon = "https://example.com/my-icon.png";

await myWindow.setIcon(newIcon);
Channel
To get the name of the Channel to which the window is currently joined, use the getChannel() method of an IOConnectWindow instance:
const channelName = await myWindow.getChannel();

if (channelName) {
    // Use the Channels API to manipulate the Channel context.
}
Once you have the name of the Channel to which the window is currently joined, you can use the Channels API to manipulate the Channel context.
Placement
The placement feature of the Window Management API provides a way for an io.Connect Window to occupy a specific position on the screen. This position can be set only once - initially, on window creation, or can be kept throughout the entire lifetime of the window. The placement feature solves the problem of reacting adequately to changes of the screen resolution or the size of the app virtualization window hosting the io.Connect Window, ensuring that the io.Connect Window always stays at the desired screen position and with the desired dimensions. This is especially useful if you are developing a toolbar or a notifications panel that shouldn't be resized by the users and must always stay at the same position on the screen.
Current Placement Settings
To retrieve the current placement settings for a window, use the placementSettings property of an IOConnectWindow instance:
const placementSettings = myWindow.placementSettings;Placing Windows
To place a window at a specific position on the screen, use the place() method of an IOConnectWindow instance and pass a PlacementSettings object as an argument.
The following example demonstrates how to place the window at the top of the screen, stretched horizontally (horizontalAlignment defaults to "stretch" when verticalAlignment is set) and with height set to 40 pixels. The snapped property is set to true in order to instruct io.Connect Desktop that this io.Connect Window must always occupy that position, even when the screen resolution changes or the app virtualization window hosting it has been resized:
const settings = {
    // Instruct the platform to always place this window at the specified position
    // on the display even after resolution, scaling, and monitor changes.
    snapped: true,
    verticalAlignment: "top",
    height: 40
};

await myWindow.place(settings);
⚠️ Note that the settings specified in the
place()method won't be merged with the existing placement settings (if any), but will entirely overwrite them.
ℹ️ For details on how to specify placement settings via the app definition, see the Developers > Configuration > Application > Placement section.
Clearing Window Placement
Available since io.Connect Desktop 9.9
To clear the placement settings for a window, use the clearPlacement() method of an IOConnectWindow instance and pass a ClearPlacementSettings object as an argument.
⚠️ Note that the
clearPlacement()method will work only after placement operations with snapping enabled (i.e.,snappedhas been set totrue).
Optionally, you can restore the last known bounds of the window or provide new bounds for it. To be able to restore the last known bounds of the window, you must have previously instructed the platform to save the window bounds before executing the placement operation. To achieve this, use the saveBounds property of the PlacementSettings object passed as an argument to the place() method.
The following example demonstrates how to save the last known bounds of a window before placing it on the screen:
const placementSettings = {
    // Setting `snapped` to `true` enables you to clear the placement settings for the window later.
    snapped: true,
    verticalAlignment: "top",
    // Save the bounds of the window before executing the placement operation.
    saveBounds: true
};

await myWindow.place(placementSettings);
The following example demonstrates how to clear the placement settings for a window and restore it's last known bounds:
const clearPlacementSettings = {
    // Restore the last known bounds of the window.
    restoreBounds: true
};

await myWindow.clearPlacement(clearPlacementSettings);
Dock
Available since io.Connect Desktop 9.1
io.Connect Windows can be docked to a specified edge on the screen. Docking is supported only for HTML and frameless windows and is disabled by default.
⚠️ Note that as of io.Connect Desktop 10.0, docking for HTML windows is deprecated and is now available only for frameless windows.
⚠️ Note that by design docked windows don't participate in Global Layouts.
To enable docking and specify docking placement settings, use the "docking" property of the "details" top-level key in the app definition:
{
    "details": {
        "docking": {
            "enabled": true
        }
    }
}
ℹ️ For more details on how to specify docking settings via the app definition, see the Developers > Configuration > Application > Docking section.
Docking Windows
To dock an io.Connect Window, use the dock() method and pass a DockingOptions object as a required argument:
const options = {
    position: "top",
    claimScreenArea: true
};

const dockingPlacement = await myWindow.dock();
Available since io.Connect Desktop 10.0
When docking a window, you can also save its last known bounds. This will allow you to undock the window later and restore it to the saved bounds:
const options = {
    position: "top",
    saveBounds: true
};

const dockingPlacement = await myWindow.dock();
Undocking Windows
Available since io.Connect Desktop 10.0
To undock a window, use the undock() method and optionally pass an UndockingOptions object as an argument:
const options = {
    // If the window bounds were saved when the window was docked,
    // the undocking operation will restore the window to the saved bounds.
    restoreBounds: true
};

await myWindow.undock();
You can also specify new bounds to which to restore the undocked window:
const options = {
    // If this is provided, the `restoreBounds` property will be ignored.
    newBounds: {
        top: 100,
        left: 100,
        width: 400,
        height: 600
    }
};

await myWindow.undock();
Docking Placement
To retrieve the current docking placement of the window, use the getDockingPlacement() method:
const dockingPlacement = await myWindow.getDockingPlacement();Docking Configuration
Available since io.Connect Desktop 10.0
To retrieve the current docking configuration of a window, use the getDockingConfig() method. The getDockingConfig() method resolves with a DockingConfig() object:
const dockingConfig = await myWindow.getDockingConfig();To set the docking configuration of a window, use the setDockingConfig() method and pass a DockingConfig() object as a required argument:
const dockingConfig = {
    enabled: true,
    claimScreenArea: true
};

await myWindow.setDockingConfig(dockingOptions);
Clone
Available since io.Connect Desktop 9.2
⚠️ Note that this feature is available only for web groups.
Cloning allows you to duplicate io.Connect Windows with their current state. Windows can be cloned programmatically or by enabling the "Clone" button for end users. If the cloned window is a tab window, it will be added to the same tab group. All other types of windows will be cascaded:
To clone a window, use the clone() method of an IOConnectWindow instance and optionally pass an object containing valid app definition properties as an argument:
// Optional settings for the cloned window.
const options = { mode: "flat" };

await myWindow.clone(options);
ℹ️ For details on how to enable or disable the "Clone" button globally, see the Developers > Configuration > System > Window Settings section.
ℹ️ For details on how to enable or disable the "Clone" button per app, see the Developers > Configuration > Application > Clone Button section.
Visibility
To check whether an io.Connect Window is visible, use the isVisible() property of an IOConnectWindow instance:
const isWindowVisible = myWindow.isVisible;To change the window visibility, use the show(), hide() or setVisible() methods of an IOConnectWindow instance.
To hide a window:
await myWindow.hide();To make a window visible:
await myWindow.show();To change the window visibility:
// Hide the window.
await myWindow.setVisible(false);

// Show the window.
await myWindow.setVisible(true);
State
To get the io.Connect Window state (normal, maximized or minimized), use the state property of an IOConnectWindow instance:
const windowState = myWindow.state;

switch (windowState) {
    case "normal":
        // ...
        break;
    case "maximized":
        // ...
        break;
    case "minimized":
        // ...
        break;
};
Use the maximize(), minimize() and restore() methods to change the window state.
To maximize a window:
await myWindow.maximize();To minimize a window:
await myWindow.minimize();To restore a minimized or maximized window:
await myWindow.restore();To check whether the window is in a collapsed state, use the isCollapsed property:
const isWindowCollapsed = myWindow.isCollapsed;Use the collapse() and expand() methods to collapse and expand a window:
// Collapse a window.
await myWindow.collapse();

// Expand a window.
await myWindow.expand();
Close
To close an io.Connect Window, use the close() method of an IOConnectWindow instance:
await myWindow.close();The close() method accepts a CloseOptions object as an argument in which you can specify whether to allow the window to prevent closing and whether to show a confirmation dialog to the user:
const options = {
    // Both options are set to `false` by default.
    allowPrevent: true,
    showDialog: true
};

await myWindow.close(options);
⚠️ Note that the
close()method will override all window prevent close settings - e.g., if theclose()method is invoked without any options in order to close a window that itself prevents closing with theonClosing()event handler, that window will be closed immediately and a confirmation dialog won't be shown to the user.
Focus
To check whether an io.Connect Window is on focus, use the isFocused property of an IOConnectWindow instance:
const isWindowFocused = myWindow.isFocused;To bring a window on focus, use the focus() method:
await myWindow.focus();Zoom
io.Connect Desktop supports zooming in and out of windows of web apps. Zooming can be controlled via configuration (globally and per app) or programmatically via the available methods and properties of a window instance.
You can zoom in and out of windows in several ways:
CTRL + =(zoom in) andCTRL + -(zoom out);CTRL + MOUSE SCROLL;CTRL + 0- resets to the default zoom factor;- mouse pad gestures;
- using the right-click context menu (if enabled);
ℹ️ For details on how to specify zoom settings globally, see the Developers > Configuration > System > Window Settings section.
ℹ️ For details on how to specify zoom settings per app, see the Developers > Configuration > Application > Zooming section.
To retrieve the zoom factor of an io.Connect Window, use the zoomFactor property of an IOConnectWindow instance:
const zoomFactor = myWindow.zoomFactor;To change the window zoom factor, use the zoomIn(), zoomOut() and setZoomFactor() methods:
// Zoom in by one step.
await myWindow.zoomIn();

// Zoom out by one step.
await myWindow.zoomOut();

// The specified zoom factor must be a valid factor value defined in the system configuration.
await myWindow.setZoomFactor(125);
Carefully consider all cases if you intend to pass a zoom factor value based on logic in your app. Negative values will cause unexpected behavior. Passing positive values lower than 25 will cause zoom out with a factor of 25. Positive values higher than 500 will cause zoom in with a factor of 500. Passing 0 as a factor will preserve the previous zoom factor.
⚠️ Note that if your app logic includes both zooming a window and retrieving its size with the
window.innerHeightorwindow.innerWidthDOM properties, you have to consider the fact that the browser will report adjusted size values based on the zoom factor. In such cases, it's recommended to usewindow.outerHeightandwindow.outerWidth, or theboundsproperty of anIOConnectWindowinstance.
Z-Order
To set a window on top of the z-order, use the setOnTop() method of an IOConnectWindow instance:
await myWindow.setOnTop(true);You can also use "always" as an argument:
await myWindow.setOnTop("always");⚠️ Note that using using
trueas an argument will allow the io.Connect Window to be on top only until the window is visible and not joined to an io.Connect Window group. If the window is hidden programmatically or the user snaps it to another io.Connect Window or window group, it will no longer be on top of the z-order when it becomes visible or when the user tears it off from the group. Using"always"as an argument will instruct the window to remain permanently on top of the z-order, regardless of changes to its visibility or whether it joins or leaves an io.Connect Window group.
Snap
To snap an io.Connect Window programmatically to another io.Connect Window or window group, use the snap() method of an IOConnectWindow instance. Provide the ID or the IOConnectWindow instance of the target window to which to snap the current window, and optionally provide a RelativeDirection:
const targetID = "17508_3";
const direction = "bottom";

await myWindow.snap(targetID, direction);
⚠️ Note that the size of the snapped window (width and/or height) will be aligned automatically to the size of the window or the window group to which it was snapped.
To preserve the original size of the snapped io.Connect Window, pass a SnappingOptions object as an argument instead. Use the autoAlign property to specify the desired behavior:
const targetID = "17508_3";
const options = {
    direction: "bottom",
    // The original size of the window will be preserved.
    autoAlign: false
};

await myWindow.snap(targetID, options);To print a web page opened in an io.Connect Window, use the print() method. It accepts a PrintOptions object as an optional argument:
const printOptions = {
    silent: true,
    landscape: true,
    copies: 2,
    pageSize: "A4"
};

await myWindow.print(printOptions);
To print a web page as a PDF file, use the printToPDF() method. It accepts a PrintToPDFOptions object as an optional argument:
const printOptions = {
    silent: true,
    autoSave: true,
    copies: 2,
    pageRanges: [{ from: 0, to: 10 }, { from: 12, to: 15 }],
    pageSize: "A4"
};

await myWindow.printToPDF(printOptions);
ℹ️ For details on how to specify global settings for printing, see the Developers > Configuration > System > Window Settings section.
ℹ️ For details on how to specify per app settings for printing, see the Developers > Configuration > Application > Printing section.
Download
To download a file, use the download() method. Pass a URL to the file to download and an optional DownloadOptions object:
const downloadURL = "https://example.com/logo.png";
// Optional download settings.
const options = {
    autoOpenDownload: true,
    // The file extension is taken from the downloaded file.
    name: "my-logo"
};

const { path, size, url } = await myWindow.download(downloadURL, options);

console.log(`Download path: ${path}, File size: ${size}, URL: ${url}`);
The method returns a DownloadResult object containing the path to the downloaded file, the file size and the download URL.
Available since io.Connect Desktop 10.3 & @interopio/desktop 6.21
To specify a location per download, use the path property of the DownloadOptions object:
const downloadURL = "https://example.com/logo.png";
const options = { path: "C:/Downloads/my-folder" };

const { path, size, url } = await myWindow.download(downloadURL, options);
The path property in DownloadOptions takes precedence over the global download path set via the setSavePath() method of the iodesktop object. Using the download() method of an IOConnectWindow instance may prevent potential race conditions when multiple windows attempt to download files concurrently and set different save paths globally via the setSavePath() method.
Download Manager
Available since io.Connect Desktop 9.2
The downloads property of the iodesktop object injected in the global window object allows you to programmatically control the download items of the Download Manager and to retrieve and set the default location for downloads.
Download Location
To retrieve or set the default download location, use the getSavePath() and the setSavePath() methods:
// Get the current location for downloaded files.
const currentPath = await iodesktop.downloads.getSavePath();

// Set the location for downloaded files.
await iodesktop.downloads.setSavePath("C:\\Users\\Me\\Desktop");
⚠️ Note that using the
setSavePath()method from multiple windows concurrently may lead to race conditions. To prevent this, you can use thepathproperty of theDownloadOptionsobject passed as a second argument to thedownload()method of anIOConnectWindowinstance.
To open the location of a downloaded item, use the showInFolder() method and pass the ID of the download item as an argument:
const id = "13534_56";

await iodesktop.downloads.showInFolder(id);
Auto Saving Downloads
Available since io.Connect Desktop 10.3 & @interopio/desktop 6.21
To retrieve or set the auto save state for downloads, use the getAutoSave() and the setAutoSave() methods:
// Disabling auto saving of downloads.
await iodesktop.downloads.setAutoSave(false);

// Retrieving the current auto save state.
const autoSave = await iodesktop.downloads.getAutoSave();

if (autoSave) {
    console.log("Auto saving of downloads is enabled.");
} else {
    console.log("Auto saving of downloads is disabled.");
}
The setAutoSave() method takes precedence over the "autoSave" property specified in the system configuration or the app definition, and can be overridden by using the autoSave property of the DownloadOptions object when using the download() method of an IOConnectWindow instance.
If auto saving is enabled, but the download path specified via configuration or dynamically can't be resolved, a system save dialog will be shown to the user.
Listing Download Items
To retrieve a list of all download items available in the Download Manager, use the list() method:
const downloads = await iodesktop.downloads.list();The list() method resolves with a list of DownloadItem objects, each with the following properties:
| Property | Type | Description |
|---|---|---|
"id" |
string |
ID of the download item. |
"displayInfo" |
object |
Information about the download item. |
The "displayInfo" object has the following properties:
| Property | Type | Description |
|---|---|---|
"filename" |
string |
Name of the download item. |
"receivedBytes" |
number |
Bytes from the download item already received. |
"speed" |
number |
Download speed in bits per second. |
"startTime" |
number |
Download start time in seconds since the UNIX epoch. |
"state" |
"progressing" | "paused" | "completed" | "interrupted" | "cancelled" |
Current state of the download. |
"timeRemaining" |
number |
Computed remaining time in seconds for the download to complete. |
"totalBytes" |
number |
Total size in bytes of the download item. |
"url" |
string |
Download URL. |
To clear all items from the download list, use the clearDownloadList() method:
await iodesktop.downloads.clearDownloadList();Manipulating Download Items
To manipulate download items, use the pauseResume() and removeItem() methods and pass the ID of the download item as an argument:
const id = "13534_56";

// If the download is paused, it will be resumed and vice versa.
await iodesktop.downloads.pauseResume(id);

// Remove the download item from the downloads list.
await iodesktop.downloads.removeItem(id);
Download Events
To get notified of download item state changes, use the onUpdate() method and pass a callback for handling the event. The callback will receive a DownloadItem object as an argument. The event will be fired each time a chunk of any download item has been downloaded:
const handler = item => console.log(`State of download with ID ${item.id} is "${item.displayInfo.state}".`);

iodesktop.downloads.onUpdate(handler);
ℹ️ For details on how to specify global settings for downloads, see the Developers > Configuration > System > Window Settings section.
ℹ️ For details on how to specify per app settings for downloads, see the Developers > Configuration > Application > Downloads section.
Native File Drag & Drop
The startDrag() method of the IOConnectWindow object allows you to save files from a web page to the OS when the user starts dragging a web page element. This is based on the Electron Native File Drag & Drop functionality. You can use this method as a handler for the "dragstart" event when the user starts to drag a web page element.
The startDrag method accepts a StartDragOptions object specifying options for the file to save:
const myDraggableElement = document.getElementById("draggable");
const myDragHandler = (event) => {
    event.preventDefault();

    // Options for the file to save.
    const dragOptions = {
        type: "file",
        data: "file-data-as-a-string",
        filename: "my-file.txt"
    };

    // Save the file to the OS when the users starts dragging the element.
    await myWindow.startDrag(dragOptions);
};

myDraggableElement.addEventListener(myDragHandler);
Dialogs
io.Connect Desktop offers default dialogs that are displayed during various platform events, such as system shutdown or restart, when a window that prevents closing is about to be closed, and more:
The default platform dialogs are configurable and you can show dialogs programmatically by using predefined dialog templates or by creating completely custom ones.
ℹ️ For details on configuring the io.Connect dialogs, see the Developers > Configuration > System > Dialogs section.
Showing Dialogs
The showDialog() method of an IOConnectWindow instance enables you to show dialogs dynamically.
The showDialog() method accepts a DialogOptions object as an argument in which you can specify dialog options - select a predefined io.Connect dialog type and fine-tune it, or create a completely customized one. The only required options are type and message for the dialog to show.
The following predefined dialog types are available:
| Dialog Type | Description |
|---|---|
"Ok" |
Contains an "OK" button. |
"OkCancel" |
Contains "OK" and "Cancel" buttons. |
"SingleInputDialog" |
Contains an input field, "Save" and "Don't Save" buttons. |
"YesNo" |
Contains "Yes" and "No" buttons. |
"YesNoCancel" |
Contains "Yes", "No" and "Cancel" buttons. |
The following example demonstrates displaying a predefined io.Connect dialog:
const myDialog = {
    type: "SingleInputDialog",
    title: "Email Required",
    message: "Please, provide your email address:",
    inputPlaceholder: "john.doe@example.com",
    inputPattern: "[a-z0-9]@my-org.com",
    inputPatternErrorMessage: "Invalid email address!"
};

await myWindow.showDialog(myDialog);
Dialog Mode
The DialogOptions object has an optional mode property which determines the blocking behavior of the dialog. The mode property is of type DialogMode which is an enumeration with two possible values:
| Value | Description |
|---|---|
"Global" |
All visible containers (including frameless io.Connect Windows) will be blocked for user interaction. |
"WindowContainer" |
Only the container (a Workspaces Frame, or an io.Connect Window group) of the window that is showing the dialog will be blocked for user interaction. All windows within a blocked container are blocked too. |
The following example demonstrates showing a custom dialog with the mode property set to "Global":
const myDialog = {
    type: "MyCustomDialog",
    title: "Custom Title",
    message: "Custom Message",
    // Will block all visible window containers for user interaction.
    mode: "Global"
};

await myWindow.showDialog(myDialog);
Functionality
To provide functionality to the dialog buttons or react when the user closes the dialog, use the DialogResult object returned from showing the dialog. The result is returned when the user clicks on a dialog button or closes the dialog.
The following example demonstrates showing a predefined io.Connect dialog with "OK" and "Cancel" buttons and responding to the user interaction:
const myDialog = {
    type: "OkCancel",
    title: "My Dialog Title",
    message: "My dialog message."
};

const handleDialogResult = (action, button) => {
    if (action === "closed") {
        // React to user closing the dialog.
        console.log("Dialog closed.");
        return;
    } else {
        if (button === "affirmative") {
            // React to user clicking the "OK" button.
            console.log("OK button clicked.");
        } else {
            // React to user clicking the "Cancel" button.
            console.log("Cancel button clicked.");
        }
    }
};

const { action, button } = await myWindow.showDialog(myDialog);

handleDialogResult(action, button);
Tab Flash
To make the tab of a window in a tab group flash, use the flashTab() method of an IOConnectWindow instance. Pass a Boolean value to make the tab start or stop flashing:
// Start flashing the window tab.
await myWindow.flashTab(true);
The tab will stop flashing automatically when the user clicks on it to focus the tab window. Making a window tab flash may be useful if you want to prompt the user to take action in a window that is currently behind other tabbed windows.
Pinning & Unpinning Tabs
Available since io.Connect Desktop 9.5
⚠️ Note that this feature is available only for tab windows in web groups.
The tabs of io.Connect Windows in web groups can be pinned. Pinned tabs are placed before the regular tab windows and they contain only the window title. Pinned tab windows don't have a "Close" button, effectively preventing the user from closing them:
To check whether a tab window is pinned, use the isPinned property of an IOConnectWindow instance:
const isPinned = myWindow.isPinned;

console.log(`The tab window is ${isPinned ? "pinned": "not pinned."}.`);
To pin and unpin tab windows, use the pin() and unpin() methods:
// Pins the tab of the current window.
await myWindow.pin();

// Unpins the tab of the current window, reverting it to a normal tab with a "Close" button.
await myWindow.unpin();
ℹ️ For details on how to pin tab windows via app definition, see the Developers > Configuration > Application > Pinning Tab Windows section.
Workspace Drop
Available since io.Connect Desktop 9.5
To check whether the current window can be dropped in a Workspace, use the allowWorkspaceDrop property of an IOConnectWindow instance:
const canBeDropped = myWindow.allowWorkspaceDrop;To specify whether an io.Connect Window can be dropped in a Workspace, use the setAllowWorkspaceDrop() method. It accepts a Boolean value as an argument determining whether the user will be able to drop the current window in a Workspace:
// Preventing the user from dropping the window in a Workspace.
await myWindow.setAllowWorkspaceDrop(false);
Execute Code
Available since io.Connect Desktop 9.5
Executing JavaScript code within the context of the current or another io.Connect Window is disabled by default. To enable it, set the "allowScriptExecution" top-level key in the app definition to true:
{
    "allowScriptExecution": true
}
To execute code in the context of an io.Connect Window, use the executeCode() method of an IOConnectWindow instance. It accepts as a required argument the code to execute provided as a string. The method resolves with the result returned from the executed code, or rejects if the result of the code is a rejected Promise:
// Find the io.Connect Window in which you want to execute the code.
const ID = "2506_04";
const ioConnectWindow = io.windows.findById(ID);
// Provide the code to execute as a string.
const myCode = "(() => { return 42; })()";

const result = await ioConnectWindow.executeCode(myCode);

console.log(result);
Drag
Available since io.Connect Desktop 9.9
To start dragging a window programmatically when the left mouse button is pressed, use the dragMove() method of an IOConnectWindow instance. Optionally, provide as an argument a DragMoveOptions object holding the location of the mouse cursor within the window at the time the dragging operation was initiated. The io.Connect platform will use that location to place the window under the mouse cursor when the mouse is moving (e.g., in case the mouse has already moved several pixels in any direction before the dragging operation has been initiated by the platform).
The following example demonstrates how to initiate a window dragging operation when the user holds down the left mouse button inside a predefined element of an app designated as a move area:
const myMoveArea = document.getElementById("my-move-area");
const myWindow = io.windows.my();
const handler = (event) => {
    event.stopPropagation();

    // Check whether the left mouse button was pressed.
    if (event.button === 0) {
        // Retrieve the coordinates of the mouse cursor when the left mouse button was pressed.
        const options = {
            location: {
                x: event.pageX,
                y: event.pageY
            }
        };

        // Start dragging the window.
        myWindow.dragMove(options);
    }
};

myMoveArea.addEventListener("mousedown", handler);
⚠️ Note that the
dragMove()method works only when the left mouse button is pressed. Attempting to use this method with any other mouse button will cause the platform to throw an error.
Context
Each io.Connect Window has a dedicated context. The window context is a JavaScript object which may contain any information regarding the window instance in the form of key/value pairs.
Contexts can be set initially on window creation and updated dynamically. Context changes can be tracked by subscribing to an event which fires when the window context has been updated (see Window Events).
⚠️ Note that saving large volumes of custom data as window context (e.g., thousands of lines of table data) can lead to significant delays. A user usually has several (in some cases - many) running apps and Workspaces (which can also contain many apps) and if one or more of the apps saves large amounts of context data, this will significantly slow down the saving process (e.g., on shutdown or when saving a Layout). Saving custom context works best with smaller amounts of data. If your app needs to save large amounts of data, you have to think about how to design this process better - for instance, you may store IDs, indices, etc., as context data, save the actual data to a database, and when you restore the app, fetch the data using the data IDs saved as window context.
Get
To get the context of an io.Connect Window, use the getContext() method of an IOConnectWindow instance:
const winContext = await myWindow.getContext();Update
To update the context of an io.Connect Window, use the updateContext() method of an IOConnectWindow instance:
const newContext = { io: 4242 };

await myWindow.updateContext(newContext);
This method will update the current context object with the provided properties and values, adding any new properties and updating the values of existing ones.
Set
To open an io.Connect Window with initially set context, use the context property of the WindowCreateOptions object:
const name = "io.Connect Docs";
const url = "https://docs.interop.io";
// Specify window context.
const options = {
    context: { io: 42 }
};

const ioConnectWindow = await io.windows.open(name, url, options);
To replace the current window context, use the setContext() method of an IOConnectWindow instance:
const newContext = { io: 42 };
const winContext = await myWindow.setContext(newContext);
This method will completely overwrite the existing context object, replacing its current value with the specified one.
Events
Methods for tracking io.Connect Window events are available at top-level of the Window Management API and on the IOConnectWindow instance. The following sections describe some of the available window events with examples of how to handle them.
Most of the window event methods return an unsubscribe function which you can use to stop tracking the respective event.
Window Added or Removed
To get notified when io.Connect Windows are opened and closed, use the onWindowAdded() and onWindowRemoved() methods of the Window Management API and pass handlers for the respective events:
const handlers = {
    onAdded: (ioConnectWindow) => {
        console.log(`Window added: ${ioConnectWindow.name}`);
    },

    onRemoved: (ioConnectWindow) => {
        console.log(`Window removed: ${ioConnectWindow.name}`);
    }
};

io.windows.onWindowAdded(handlers.onAdded);
io.windows.onWindowRemoved(handlers.onRemoved);
Arrangement Change
Available since io.Connect Desktop 9.1
To get notified when the arrangement of io.Connect Windows changes, use the onArrangementChanged() method:
const handler = ({ areWindowsArranged, displayId }) => {
    console.log(`The windows on display ${displayId} are ${areWindowsArranged ? "arranged" : "restored (or arrangement was broken by user)"}.`)
};

io.windows.onArrangementChanged(handler);
⚠️ Note that the
onArrangementChanged()method notifies about changes in the arrangement state of io.Connect Windows arranged or restored to their previous states on a given display by using theautoArrange()method. TheareWindowsArrangedflag will betruewhen the windows are arranged initially. If the event is fired because the windows have been restored to their previous states, or because the user has broken manually the window arrangement, thenareWindowsArrangedwill befalse.
Bounds Change
To get notified when the bounds of io.Connect Window change, use the onBoundsChanged() method of an IOConnectWindow instance and pass an event handler:
const handler = (ioConnectWindow) => {
    console.log(`Window bounds: ${JSON.stringify(ioConnectWindow.bounds)}`);
};

myWindow.onBoundsChanged(handler);
Use this event to get notifications every time the position or the size of the window changes.
Placement Change
To get notified when the placement settings of an io.Connect Window change, use the onPlacementSettingsChanged() method of an IOConnectWindow instance and pass an event handler:
const handler = (ioConnectWindow) => {
    console.log(`Window placement settings: ${JSON.stringify(ioConnectWindow.placementSettings)}`);
};

myWindow.onPlacementSettingsChanged(handler);
⚠️ Note that the
onPlacementSettingsChanged()method notifies about dynamic updates of the window placement settings, not the window bounds. To track changes of the window bounds (e.g., when the user resizes or moves the window, or when the window is moved or resized programmatically) use theonBoundsChanged()method.
Docking Change
Available since io.Connect Desktop 9.1
To get notified when the docking placement of an io.Connect Window changes, use the onDockingChanged() method of an IOConnectWindow instance and pass an event handler:
const handler = (ioConnectWindow, dockingPlacement) => {
    const isDocked = dockingPlacement.docked;

    console.log(isDocked ? `Window was docked at the ${dockingPlacement.position} of the screen.` : "Window was undocked.")
};

myWindow.onDockingChanged(handler);
Context Update
To get notified when the context of an io.Connect Window is updated, use the onContextUpdated() method of an IOConnectWindow instance and pass an event handler:
const handler = (context, ioConnectWindow) => {
    console.log(`The context of "${ioConnectWindow.name}" has been updated: ${JSON.stringify(context)}`);
};

myWindow.onContextUpdated(handler);
Close & Refresh
To get notified when an io.Connect Window is about to be refreshed or closed, use its onClosing() and onRefreshing() methods.
The close and refresh handlers can be enabled or disabled globally via the system configuration of io.Connect Desktop or individually for each window in its respective app definition file. You can also specify a timeout in milliseconds for their execution.
Handlers Configuration
To configure the close and refresh handlers globally for all windows, use the "refreshHandlers" and "closeHandlers" properties under the "windows" top-level key in the system.json system configuration file of io.Connect Desktop:
{
    "windows": {
        "refreshHandlers": {
            "enabled": true,
            "timeout": 2000
        },
        "closeHandlers": {
            "enabled": true,
            "timeout": 2000
        }
    }
}
To configure close and refresh handlers only for specific windows, use the "refreshHandlers" and "closeHandlers" properties under the "details" top-level key in the app definition files:
{
    "details": {
        "refreshHandlers": {
            "enabled": false,
            "timeout": 2000
        },
        "closeHandlers": {
            "enabled": true,
            "timeout": 2000
        }
    }
}
Window Close Handler
The onClosing() method allows you to execute code before the window is closed. The event handler can be asynchronous and will be awaited up to the configured timeout:
const handler = async () => {
    await asyncOperation();
};

myWindow.onClosing(handler);
Preventing Window Close
The handler passed to the onClosing() method accepts as an argument a prevent() function that can be used to prevent closing the window. The prevent() function accepts as an argument a PreventClosingOptions object in which you can specify whether to show a confirmation dialog to the user:
const handler = async (prevent) => {
    const options = { showDialog: false };

    prevent(options);
};

myWindow.onClosing(handler);
Window Refresh Handler
The onRefreshing() method allows you to execute code before the window is refreshed. The event handler can be asynchronous and will be awaited up to the configured timeout:
const handler = async () => {
    await asyncOperation();
};

myWindow.onRefreshing(handler);
Preventing Page Refresh
To prevent page refresh, use the prevent() function that is passed as an argument to the onRefreshing() handler:
const handler = (prevent) => {
    const inputField = document.getElementById("input-field");
    const shouldNotRefresh = inputField.value !== "" ? true : false;

    if (shouldNotRefresh) {
        prevent();
    }
};

myWindow.onRefreshing(handler);
Navigating
To get notified when an io.Connect Window is about to navigate to a new address, use its onNavigating() method. Pass a handler for the event which will receive as an argument an object containing the new address in its newUrl property:
const handler = (info) => {
    console.log(`Navigating to: ${info.newUrl}`);
};

myWindow.onNavigating(handler);
Window Groups
io.Connect Windows can be snapped together. One or more windows stuck together form a Group.
The Window Management API offers methods for managing io.Connect Window groups. The Groups API is accessible via the io.windows.groups object.
Finding Groups
Listing
To get a collection of all window groups, use the list() method:
const allGroups = io.windows.groups.list();Current Group
To get the group of the current window, use the group property of an IOConnectWindow instance or the my property of the Groups API:
const myGroup = myWindow.group;
// or
const group = io.windows.groups.my;
By Window
To find an io.Connect Window group by a window ID or an IOConnectWindow object, use the findGroupByWindow() method:
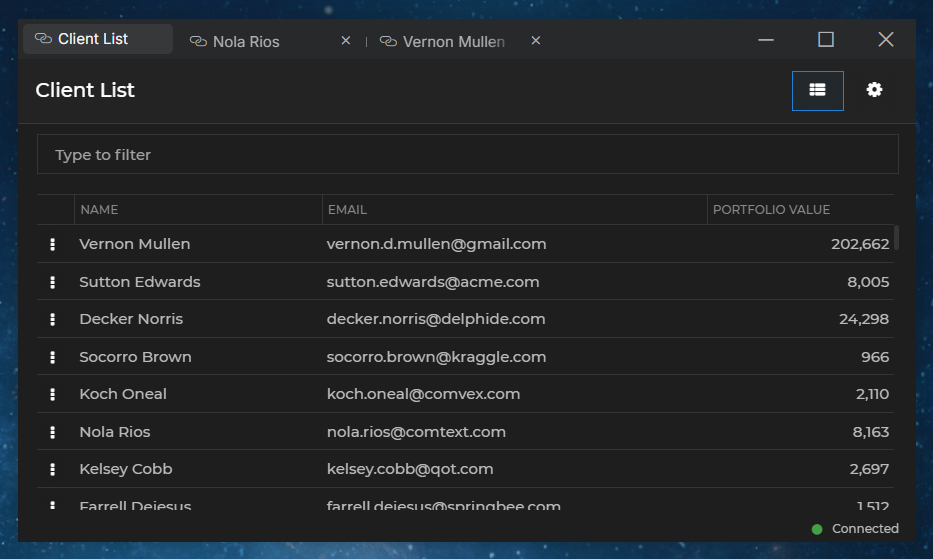
const ioConnectWindow = io.windows.find("clientlist");
const windowID = ioConnectWindow.id;

const group = io.windows.groups.findGroupByWindow(windowID);
// or
const winGroup = io.windows.groups.findGroupByWindow(ioConnectWindow);
Creating Groups
Available since io.Connect Desktop 9.3
To create window groups, use the create() method and pass a CreateGroupsOptions object as a required argument. The following example demonstrates creating a minimized group consisting of two windows with specified bounds, one of which is tabbed and contains two apps, and the other is flat. Two of the loaded apps will be joined to a Channel and a context object will be attached to the created group:
const options = {
    // List of window groups that will be created.
    groups: [
        {
            title: "My Group",
            state: "minimized",
            // List of io.Connect Windows that will participate in the group.
            frames: [
                {
                    mode: "tab",
                    bounds: { top: 0, left: 0, width: 500, height: 700 },
                    // Apps to be loaded in the io.Connect Windows. It's only required to provide the app name,
                    // but you can also specify additional window settings.
                    applications: [ { name: "my-app", channelSelector: { enabled: true, channelId: "Red" } }, { name: "my-other-app"} ]
                },
                {
                    mode: "flat",
                    bounds: { top: 0, left: 500, width: 400, height: 700 },
                    applications: [ { name: "my-third-app", channelSelector: { enabled: true, channelId: "Red" } } ]
                }
            ]
        }
    ],
    // Context that will be attached to all created groups.
    context: { io: 42 }
};
const groups = await io.windows.groups.create(options);
Closing Groups
Available since io.Connect Desktop 9.3
To close a window group, use the close() method and pass as a required argument either the Group object, or the ID of the group to be closed:
// Closing a group by ID.
await io.windows.groups.close(myGroup.id);
The close() method accepts a CloseOptions object as a second argument in which you can specify whether to allow the window group to prevent closing and whether to show a confirmation dialog to the user:
const options = {
    // Both options are set to `false` by default.
    allowPrevent: true,
    showDialog: true
};

await io.windows.groups.close(myGroup.id, options);
Group Operations
Title
To get the title of an io.Connect Window group, use the getTitle() method of a Group instance:
const groupTitle = await myGroup.getTitle();To set the title of a window group, use the setTitle() method of a Group instance:
await myGroup.setTitle("New Title");State
To maximize an io.Connect Window group, use the maximize() method of a Group instance:
myGroup.maximize();To restore a window group, use the restore() method of a Group instance:
myGroup.restore();Group Header
To check whether the header of an io.Connect Window group is visible, use the isHeaderVisible property of a Group instance:
const isGroupHeaderVisible = myGroup.isHeaderVisible;To hide the header of a window group, use the hideHeader() method of a Group instance:
await myGroup.hideHeader();To hide the header of a window group, use the showHeader() method of a Group instance:
await myGroup.showHeader();ℹ️ For details on configuring group header visibility globally, see the Developers > Configuration > System > Window Management section.
ℹ️ For details on configuring group header visibility per app, see the Developers > Configuration > Application > Group Header section.
Visibility
To check the visibility of a group, use the isVisible property of a Group instance:
const isVisible = myGroup.isVisible;To hide a window group, use the hide() method of a Group instance:
await myGroup.hide();To show a previously hidden window group, use the show() method of a Group instance. You can also pass an optional Boolean flag indicating whether to activate the group and focus the last focused window in it:
await myGroup.show(true);Reload
Available since io.Connect Desktop 9.8.1
⚠️ Note that this feature is available only for web groups.
To reload a window group, use the reload() method of a Group instance:
await myGroup.reload();Hibernation
io.Connect Window groups can be hibernated and resumed to save system resources. By default, the app windows participating in the group will be closed and the entire Group object will be destroyed when a window group is hibernated. When the group is resumed, it will have a new ID and a new Group object will be created. This is due to the fact that the io.Connect Window groups by design are temporary, and unlike Layouts and Workspaces, aren't meant to be persisted. To be able to preserve and use the original Group object when hibernating and resuming window groups, you must set the "closeOnHibernate" property of the "applications" top-level key to false in the system.json system configuration file of io.Connect Desktop. Otherwise, each time a group is resumed, it will have a new ID:
{
    "applications": {
        "closeOnHibernate": false
    }
}
To check whether a group is hibernated, use the isHibernated property of a Group object:
const isHibernated = myGroup.isHibernated;To hibernate a window group, use the hibernate() method on top level of the Groups API and pass the group ID as an argument:
await io.windows.groups.hibernate(myGroup.id);To resume a window group, use theresume() method on top level of the Groups API and pass the group ID as an argument. You can also pass an optional Boolean flag as a second argument indicating whether to activate the group and focus the last focused window in it:
await io.windows.groups.resume(myGroup.id, true);Finding Windows in Groups
To get a collection of all io.Connect Windows participating in an io.Connect Window group, use the windows property of a Group instance:
const allGroupWindows = myGroup.windows;To find a window in an io.Connect Window group by window ID, use the find() method of a Group instance:
const windowID = "25406_2";
const ioConnectWindow = myGroup.find(windowID);
Ungrouping Windows
To extract a window from an io.Connect Window group, use the ungroup() method of an IOConnectWindow instance and pass an optional UngroupOptions object as an argument:
const options = {
    bounds: {
        width: 400,
        height: 300
    },
    focus: true
};

const ioConnectWindow = await myWindow.ungroup(options);
If you don't specify any options for ungroup(), the window will be moved up and to the right by default after being ungrouped:
Using the ungroup() method on a tab window will extract the entire tab group:
Close
Available since io.Connect Desktop 9.3
To close a window group, use the close() method of a Group instance:
await myGroup.close();The close() method accepts a CloseOptions object as an argument in which you can specify whether to allow the window group to prevent closing and whether to show a confirmation dialog to the user:
const options = {
    // Both options are set to `false` by default.
    allowPrevent: true,
    showDialog: true
};

await myGroup.close(options);
Window Neighbors
To get the neighbors of a window in an io.Connect Window group, use the topNeighbours, leftNeighbours, rightNeighbours and bottomNeighbours properties of an IOConnectWindow instance:
const topNeighbours = myWindow.topNeighbours;
const leftNeighbours = myWindow.leftNeighbours;
const rightNeighbours = myWindow.rightNeighbours;
const bottomNeighbours = myWindow.bottomNeighbours;
An empty collection will be returned if the window doesn't have any neighbor windows in the respective direction.
Group Events
The Groups API offers several methods for tracking group events, both on top level of the API and on the Group instance.
The group event methods return an unsubscribe function which you can use to stop tracking the respective event.
Group Added or Removed
To get notified when window groups are added or removed from the io.Connect framework, use the onGroupAdded() and onGroupRemoved() methods on top level of the Groups API:
const handlers = {
    onAdded: ioConnectGroup => console.log(`Group with ID "${ioConnectWindow.id}" added.`),
    onRemoved: ioConnectGroup => console.log(`Group with ID "${ioConnectWindow.id}" removed.`)
};

io.windows.groups.onGroupAdded(handlers.onAdded);
io.windows.groups.onGroupRemoved(handlers.onRemoved);
Window Added or Removed
To get notified when windows are added or removed from an io.Connect Window group, use the onWindowAdded() and onWindowRemoved() methods of a Group instance and pass handlers for the respective events:
const handlers = {
    onAdded: (ioConnectGroup, ioConnectWindow) => console.log(`Window "${ioConnectWindow.title}" added to group with ID "${ioConnectGroup.id}".`),
    onRemoved: (ioConnectGroup, ioConnectWindow) => console.log(`Window "${ioConnectWindow.title}" removed from group with ID "${ioConnectGroup.id}".`)
};

myGroup.onWindowAdded(handlers.onAdded);
myGroup.onWindowRemoved(handlers.onRemoved);
Header Visibility
To get notified for changes in the visibility of the header of an io.Connect Window group, use the onHeaderVisibilityChanged() method of a Group instance and pass an event handler:
const handler = ioConnectGroup => console.log(`Header visibility of group with ID "${ioConnectGroup.id}" has changed.`);

myGroup.onHeaderVisibilityChanged(handler);
Group Visibility
To get notified for changes in the visibility of window groups, use the onVisibilityChanged() method of a Group instance:
const handler = group => console.log(`Visibility of group with ID "${group.id}" has changed.`);

myGroup.onVisibilityChanged(handler);
Hibernation
To get notified when window groups are hibernated or resumed, use the onHibernated() and onResumed() methods on top level of the Groups API:
// The callback for `onHibernated()` receives only the group ID as an argument,
// while the callback for `onResumed()` receives the entire `Group` object.
const handlers = {
    onHibernated: groupId => console.log(`Group with ID "${groupId}" is hibernated.`),
    onResumed: group => console.log(`Group with ID "${group.id}" is resumed.`)
};

io.windows.groups.onHibernated(handlers.onHibernated);
io.windows.groups.onResumed(handlers.onResumed);
Close
Available since io.Connect Desktop 9.2
⚠️ Note that this feature is available only for web groups.
To get notified when a window group is about to be closed, use the onClosing() method of a Group instance. The handler passed to the onClosing() method will be awaited up to 30 seconds before the window group is closed. It accepts as an argument a prevent() function that can be used to prevent closing the group. The prevent() function accepts as an argument a PreventClosingOptions object in which you can specify whether to show a confirmation dialog to the user:
const handler = async (prevent) => {
    const options = { showDialog: false };

    prevent(options);
};

myGroup.onClosing(handler);
Tab Windows
To open an io.Connect Window as a tab window, set the mode property of the WindowCreateOptions object to "tab":
const name = "io-connect-docs";
const url = "https://docs.interop.io";
// Set `mode` to "tab".
const options = {
    mode: "tab"
};

const ioConnectWindow = await io.windows.open(name, url, options);
Tab Group
Use the tabGroupId property of the WindowCreateOptions object to specify a tab group for the tab window. Tab windows with identical tabGroupId value will be opened in the same tab group:
const name = "io-connect-docs";
const url = "https://docs.interop.io";
// Specify a tab group.
const options = {
    tabGroupId: "my-tab-group"
};

const ioConnectWindow = await io.windows.open(name, url, options);
Use the tabGroupId property of an IOConnectWindow instance to retrieve the tab group ID of a window:
const tabGroup = myWindow.tabGroupId;Attaching & Detaching Tabs
To attach a tab to an existing tab window, use the attachTab() method of an IOConnectWindow instance. Pass a window ID or an IOConnectWindow object as a first argument:
const name = "io-connect-docs";
const url = "https://docs.interop.io";
const options = {
    mode: "tab"
};

const newTab = await io.windows.open(name, url, options);

// Attach a new tab window to an existing tab window.
// It's assumed that `myWindow` is a tab window.
await myWindow.attachTab(newTab);
To detach a tab from a tab group, use the detachTab() method of an IOConnectWindow instance. The detachTab() method accepts a DetachOptions object as an optional argument. Use it to specify bounds and other options for the detached tab:
const detachOptions = {
    bounds: {
        top: 200,
        left: 200,
        height: 400,
        width: 300
    }
};

// Detach `myWindow` from the tab group.
// It's assumed that `myWindow` is a tab window.
await myWindow.detachTab(detachOptions);
Frame Buttons
The Window Management API allows placing custom buttons in the frame area of the window and handling clicks on them.
Frame button in a flat window:
Frame button in a tab window:
Frame button in an HTML window:

Adding Buttons
To add or replace an existing frame button, use the addFrameButton() method of an IOConnectWindow instance. It accepts a ButtonInfo object as a required first argument. The buttonId (must be unique) and the imageBase64 (button image encoded as a Base64 string) properties of the ButtonInfo object are required:
const buttonInfo = {
    buttonId: "search-button",
    tooltip: "Search",
    order: 1,
    imageBase64: "iVBORw0KGgoAAAAN..."
}

await myWindow.addFrameButton(buttonInfo);
Use the order property to control the position of the buttons in the frame, and the tooltip property to provide concise information about the frame button to the user.
Removing Buttons
To remove a frame button, use the the removeFrameButton() method of an IOConnectWindow instance and pass the ID of the button to remove:
const buttonID = "search-button";

await myWindow.removeFrameButton(buttonID);
Button Events
The frame button event methods return an unsubscribe function that you can use to stop tracking the respective event.
To track frame button clicks, use the onFrameButtonClicked() method of an IOConnectWindow instance and pass an event handler:
const clickHandler = (buttonInfo, ioConnectWindow) => {
    if (buttonInfo.buttonId === "search-button") {
        console.log(`The Search button of "${ioConnectWindow.name}" was clicked.`);
    }
};

myWindow.onFrameButtonClicked(clickHandler);
To track adding or removing frame buttons, use the onFrameButtonAdded() and onFrameButtonRemoved() methods of an IOConnectWindow instance and pass handlers for the respective events:
const handlers = {
    onAdded: (buttonInfo, ioConnectWindow) => {
        console.log(`Frame button with ID "${buttonInfo.buttonId}" was added to "${ioConnectWindow.name}".`);
    },

    onRemoved: (buttonInfo, ioConnectWindow) => {
        console.log(`Frame button with ID "${buttonInfo.buttonId}" was removed from "${ioConnectWindow.name}".`);
    }
};

myWindow.onFrameButtonAdded(handlers.onAdded);
myWindow.onFrameButtonRemoved(handlers.onRemoved);
Flydown Windows
Flydown windows are helper windows which can be easily configured to appear when the user hovers over an area in your window. This spares you the need to write boilerplate code for showing and hiding additional windows. Flydowns windows are created from already existing hidden windows that are displayed dynamically as flydowns when necessary.
ℹ️ See the JavaScript Flydown example on GitHub.
ℹ️ The delay times for showing and hiding flydown windows can be set using the global io.Connect Window configuration.
Creating Flydowns
To create a flydown window, use the createFlydown() method which is available both on top-level of the API and on an IOConnectWindow instance.
If you use createFlydown() on top-level of the API, you must specify the ID of the target window as a first argument and a FlydownOptions object as a second. If you use it on a window instance, the current window will be used as a target and you have to pass only a FlydownOptions object as an argument.
First, create a hidden window which you will use as a flydown and then display the actual flydown. Open a window with the open() method and set the hidden property of the WindowCreateOptions object to true. Alternatively, you can use a hidden app which has been auto started or started before creating the flydown. Use the createFlydown() method to display the flydown and pass as required arguments the target window ID and a FlydownOptions object.
⚠️ Note that flydown windows are meant to act as helper windows that can be quickly loaded and displayed to the user on hover. This means that you shouldn't use heavy apps as flydown windows in order to avoid possible loading issues.
The following example demonstrates how to create a flydown window:
const name = "my-flydown";
const url = "https://example.com/my-flydown";
const options = { hidden: true };

// Open a hidden window to be used as a flydown.
const myFlydownWindow = await io.windows.open(name, url, options);

const myWindowID = io.windows.find("my-window").id;
// Define a unique zone identifier for each zone that will trigger the flydown.
const zoneID = "uniqueZoneIdentifier";
const flydownWindowID = myFlydownWindow.id;
// Define the bounds of the zone within the window that will trigger displaying the flydown.
const zoneBounds = { left: 42, top: 42, height: 42, width: 42 };
const flydownOptions = {
    windowId: flydownWindowID,
    // The flydown will appear at the specified position relative to the target zone.
    targetLocation: "bottom",
    size: {
        width: 200,
        height: 200
    },
    zones: [
        {
            id: zoneID,
            // The flydown will appear on hover within the specified bounds.
            bounds: zoneBounds,
            flydownSize: {
                width: 300,
                height: 400
            }
        }
    ]
};

// Create the actual flydown.
const flydown = await io.windows.createFlydown(myWindowID, flydownOptions);
The targetLocation and windowId properties can be set both in the FlydownOptions object or in each FlydownZone object within the zones array. The values set in the FlydownOptions object will be used as default values if no such value is specified in a FlydownZone object. If you specify a value for any of these properties both in the FlydownOptions object and in a FlydownZone object, the one in the FlydownZone object will take precedence over the one in the FlydownOptions object.
The size of the flydown window, however, is handled a little differently. Since its value can be either a size object or a callback for calculating the size (see Dynamic Size Calculation), there are several cases if you set the flydown size both in the FlydownOptions object (via the size property) and in a FlydownZone object ( via the flydownSize property). In any case, the values in the FlydownZone object have higher priority, except when you pass a callback in the FlydownOptions object and specific size in the FlydownZone object - then the callback in the FlydownOptions object will be taken into account.
Flydown Active Area
To create a flydown window which is triggered by a particular area within your app and remains active (visible) as long as the user stays within a certain range of the app window, use the activeArea property in the options object.
// Range where the flydown will remain active - values are relative to the target window.
const activeArea = { left: 20, top: 20, height: 60, width: 60 };
const flydownOptions = {
    windowId: flydownWindowID,
    // The flydown will appear at this position relative to the target (zone).
    targetLocation: "bottom",
    size: {
        width: 200,
        height: 200
    },
    // The flydown won't disappear while the user is hovering within that range.
    activeArea: activeArea,
    zones: [
        {
            id: zoneID,
            // The flydown will appear on hover within these bounds.
            bounds: buttonBounds,
            flydownSize: {
                width: 300,
                height: 400
            }
        }
    ]
};

const flydown = await io.windows.createFlydown(MyWindowID, flydownOptions);
Dynamic Size Calculation
To change the size of your flydown window dynamically, pass a callback function to the size property in the FlydownOptions object (or to the flydownSize property in the FlydownZone object) instead of a specific size:
const myWindow = io.windows.my();
const flydownOptions = {
    windowId: flydownWindowID,
    targetLocation: "bottom",
    size: (data, cancel) => {
        // Make calculations here.
        const width = 200;
        const height = 80;

        const size = { width, height };

        return size;
    },
    zones: [
        {
            id: zoneID,
            bounds: buttonBounds
        }
    ]
};

// The `targetWindowId` property is omitted, as `createFlydown()` is called on a window instance.
const flydown = await myWindow.createFlydown(flydownOptions);
Canceling Flydowns
The cancel argument of the callback that can be passed to the size property (or the flydownSize property) is a function that you can use to cancel the flydown:
// Condition on which to cancel the flydown.
const shouldBeCanceled = true;
const flydownOptions = {
    windowId: flydownWindowID,
    targetLocation: "bottom",
    size: (data, cancel) => {
        if (shouldBeCanceled) {
            cancel();
        }

        const size = {
            width: 200,
            height: 200
        };

        return size;
    },
    zones: [
        {
            id: zoneID,
            bounds: buttonBounds
        }
    ]
};

const flydown = await myWindow.createFlydown(flydownOptions);
⚠️ Note that you shouldn't make heavy calculations in the callback for determining the flydown size. You must return a response within 100 ms. Return a
Promiseif your logic is asynchronous.
The Flydown object has a destroy property which is a function that you can use to destroy the zones that trigger the flydowns. This will only remove the flydown trigger zones and not the actual windows used as flydowns:
const flydownOptions = {
    windowId: flydownWindowID,
    targetLocation: "bottom",
    size: (data, cancel) => {
        if (shouldBeCanceled) {
            cancel();
        }

        const size = {
            width: 200,
            height: 200
        };

        return size;
    },
    zones: [
        {
            id: zoneID,
            bounds: buttonBounds
        }
    ]
};

const flydown = await myWindow.createFlydown(flydownOptions);

// Remove the flydown trigger zones.
await flydown.destroy();
Popup Windows
Popup windows are helper windows that can appear when the user clicks an area in your app.
ℹ️ See the JavaScript Popup example on GitHub.
Implementing the behavior of popup windows can be a tedious task - you must handle all cases in which the popup may go out of screen, handle user input from multiple windows which may involve confusion with timeouts and potential race conditions. While not impossible, it's an endeavor prone to many errors while the end result is most often unreliable. The methods for creating popup windows provided by the Window Management API handle all these problems and almost no additional code is required to make popup windows work smoothly in all cases.
Creating Popup Windows
Available since io.Connect Desktop 10.0
To create a popup window dynamically, use the createPopup() method on top level of the API. Optionally, you can pass a CreatePopupOptions object as an argument and specify settings for the popup window.
The created popup window will be frameless and hidden. The createPopup() method will resolve with a CreatePopupResult object which will contain two window abstractions - a browser window object which you can use to manipulate the DOM content of the popup window, and an io.Connect Window object which you can use to show and hide the popup window or to extract the ID and pass it to the showPopup() method to display the popup window:
// Options for creating the popup window.
const options = {
    width: 200,
    height: 100
};

const myPopup = await io.windows.createPopup(options);

// Manipulating the DOM content of the popup window.
myPopup.browserWindow.document.body.innerText = "My Popup";

// Displaying the popup window.
await myPopup.ioConnectWindow.show();
Showing Popup Windows
Alternatively, you can define or open a hidden window which you will use as a popup and after that display it as a popup via the showPopup() method.
The showPopup() method is available on top level of the API and also on the IOConnectWindow instance.
If you use showPopup() on top-level of the API, you must specify the ID of the target window as a first argument and a PopupOptions object as a second. If you use it on a window instance, the current window will be used as a target and you have to pass only a PopupOptions object as an argument.
To create a window that will be used as a popup, use the open() method and set the hidden property of the WindowCreateOptions object to true. You can also use a hidden app which has been auto started or started before creating the popup. After that, use the showPopup() method to display the popup window and pass as required arguments the target window ID and a PopupOptions object.
⚠️ Note that if you are using a hidden app or a window opened via the
open()method as a popup window, this window must be configured as a frameless window. You must explicitly define it or create it as such by setting the"mode"property in its app definition or themodeproperty of theWindowCreateOptionsobject to"frameless".
The following example demonstrates how to create and display a popup window:
// Creating a popup window.
const myPopup = await io.windows.createPopup();

// Manipulating the DOM content of the popup window.
myPopup.browserWindow.document.body.innerText = "My Popup";

const myWindowID = io.windows.find("my-window").id;
// Area which will trigger the popup when the user clicks on it.
const buttonBounds = { left: 42, top: 42, width: 42, height: 42 };
const popupOptions = {
    windowId: myPopup.ioConnectWindow.id,
    targetBounds: buttonBounds,
    size: {
        width: 100,
        height: 200
    },
    targetLocation: "bottom"
};

// Displaying the popup window.
const popup = await io.windows.showPopup(myWindowID, popupOptions);
API Reference
For a complete list of the available Window Management API methods and properties, see the Window Management API reference documentation.