
Changelog
io.Connect Desktop 9.8
Release date: 07.04.2025
| Components | Version |
|---|---|
| Electron | 35.1.2 |
| Chromium | 134.0.6998.178 |
| Node.js | 22.14.0 |
The following libraries are bundled with io.Connect Desktop 9.8 and will be used for auto injection:
| Injected Library | Version |
|---|---|
@interopio/desktop |
6.10 |
@interopio/fdc3 |
2.5 |
New Features
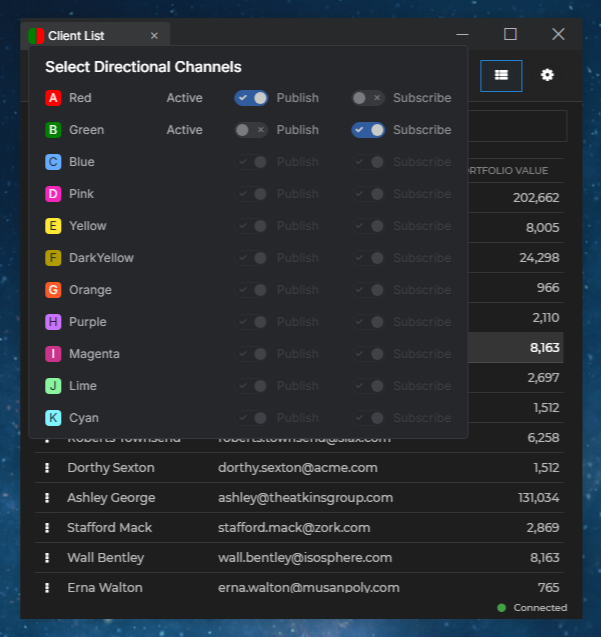
Directional Multi Channel Selector
The directional multi Channel Selector allows the window to join multiple Channels, but also enables the user to restrict the window from publishing or from subscribing to the currently joined Channels:
To enable the directional multi Channel Selector globally for all apps, use the
"type"property of the"channelSelector"object under the"windows"top-level key in thesystem.jsonsystem configuration file of io.Connect Desktop:{ "windows": { "channelSelector": { "type": "directionalMulti" } } }To enable the directional multi Channel Selector per app when in multi Channel mode, use the
"type"property of the"channelSelector"object under the"details"top-level key in the app definition:{ "details": { "channelSelector": { "enabled": true, "type": "directionalMulti" } } }⚠️ Note that all considerations for working with the multi Channel Selector apply to the directional multi Channel Selector as well.
Clearing Channel Context Data
To clear the context data of the current Channel, use the
clearChannelData()method:await io.channels.clearChannelData();The
dataproperty of theChannelContextobject will be set to an empty object.To clear the context data of a specific Channel, pass the Channel name as an argument:
await io.channels.clearChannelData("Red");
Displaying the Title of the Selected Tab in the Windows Taskbar
By default, io.Connect Desktop displays the title of the window group when the user hovers over the group icon in the Windows taskbar. You can instruct the platform to display the title of the currently selected tab instead when the user hovers over the icon of a single tab group in the Windows taskbar:
To do so, use the
"showSelectedTabTitleInTaskbar"property of the"tabs"object under the"group"key. The"group"object is located under the"windowManagement"top-level key in thesystem.jsonsystem configuration file of io.Connect Desktop:{ "windowManagement": { "group": { "tabs": { "showSelectedTabTitleInTaskbar": true } } } }

Modifying Response Headers
It's now possible to configure io.Connect Desktop and your interop-enabled web apps to remove response headers received from external server or to modify their directives.
To configure the behavior for handling the response headers globally for all web web apps, use the
"responseHeaders"property of the"windows"top-level key in thesystem.jsonsystem configuration file of io.Connect Desktop. The"responseHeaders"property accepts as a value an object holding combinations of string keys and object values describing the response headers to modify or to remove. Each key in the"responseHeaders"object must correspond to an HTTP header name. Each object value has the following properties:
Property Type Description "directives"object[]List of response header directives to be modified. It's possible to remove a directive, to replace its value, or to append a value to its current value. "remove"booleanIf true, the entire response header will be removed.Each object in the
"directives"array has the following properties:
Property Type Description "action""append"|"remove"|"replace"Action to be performed on the directive. Set to "remove"to remove the directive. Set to"replace"to replace the current value. Set to"append"to append a value to the current directive value. When replacing or appending a value, it's required to specify a new value."name"stringName of the directive to modify. "value"stringNew value for the directive. Required when replacing or appending a directive value. The following example demonstrates how to configure io.Connect Desktop to modify the
Content-Security-Policyresponse header for all web apps by appending a value to itsframe-ancestorsdirective:{ "windows": { "responseHeaders": { "Content-Security-Policy": { "directives": [ { "name": "frame-ancestors", "action": "append", "value": "https://another-trusted-site.com/" } ] } } } }To configure the behavior for handling the response headers per app, use the
"responseHeaders"property of the"details"top-level key in the app definition.The following example demonstrates how to modify the
Content-Security-Policyresponse header by removing a directive from it:{ "details": { "responseHeaders": { "Content-Security-Policy": { "directives": [ { "name": "frame-ancestors", "action": "remove" } ] } } } }
Preventing Multiple Workspace Instances
By default, Workspace Layouts can be restored multiple times as multiple simultaneous instances. To control the behavior for allowing multiple Workspace instances dynamically, use the
allowMultipleproperty of theWorkspaceLayoutSaveConfigobject when saving a Workspace Layout:const config = { name: "my-workspace", workspaceId: "workspace-id", // Prevent spawning multiple instances of this Workspace. allowMultiple: false }; await io.workspaces.layouts.save(config);⚠️ Note that if the Workspace is saved in a Global Layout and the
"restoreWorkspacesByReference"property in the Workspaces App definition is set tofalse, theallowMultipleproperty won't have any effect when the Global Layout containing the Workspace is restored. This is valid irrespective of whether the property is used programmatically or in the Workspaces App definition. For more details, see the Capabilities > Windows > Workspaces section.
Controlling the Workspace Loading Strategies Dynamically
To retrieve the current loading strategy for a Workspace, use the
loadingStrategyproperty of aWorkspaceinstance:const myWorkspace = await io.workspaces.getWorkspace(workspace => workspace.id === "workspace-id"); // Retrieving the loading strategy of a Workspace. const currentStrategy = myWorkspace.loadingStrategy;To set the loading strategy for a Workspace dynamically, use the
setLoadingStrategy()method of aWorkspaceinstance and pass aLoadingStrategyvalue as a required argument:const loadingStrategy = "lazy"; await myWorkspace.setLoadingStrategy(loadingStrategy);Use the
setLoadingStrategy()method to override the current loading strategy for the Workspace that may have been specified via configuration or programmatically when creating or restoring the Workspace.⚠️ Note that the loading strategy specified via the
setLoadingStrategy()method will be preserved in the Workspace Layout only if the Workspace is saved afterwards and the"persistCurrentStrategy"flag is set totruein the Workspaces App definition. For more details, see the Capabilities > Windows > Workspaces section.
Protocol Handler Registration Control
Dynamic protocol registration control may be useful if you need to register or unregister the protocol handlers conditionally depending on the environment in which the platform is running.
To register or unregister all protocol handlers defined in the system configuration, invoke the already registered by the platform
"T42.GD.Execute"Interop method and pass as an argument the"register-protocol-handler"or the"unregister-protocol-handler"command respectively:// Registering the custom protocol handlers. await io.interop.invoke("T42.GD.Execute", { command: "register-protocol-handler" }); // Unregistering the custom protocol handlers. await io.interop.invoke("T42.GD.Execute", { command: "unregister-protocol-handler" });
Icon for Platform Instances Started via Protocol Handlers
To specify an icon that will be used for the new platform instance started via a protocol handler, use the
"iconPath"property of the"defaultExecutable"object in the protocol handler configuration object:{ "protocolHandler": [ { "enabled": true, "protocol": "custom", "startNewInstance": { "enabled": true, "defaultExecutable": { "iconPath": "%GDDIR%/assets/images/my-icon.ico" } } } ] }
Command Line Arguments for ClickOnce Apps
To specify command line arguments for a ClickOnce app, use the
"appParameters"property of the"details"top-level key in the app definition. The"appParameters"property accepts as a value an object with key/value pairs describing the names and the values of the command line arguments to pass to the ClickOnce app:{ "details": { "appParameters": { "parameter1": "value1", "parameter2": "value2" } } }
Timeouts for Publishing Telemetry Data
To specify timeouts for awaiting telemetry data to be published before the io.Connect platform shuts down, use the following properties of the
"otel"top-level key in thesystem.jsonsystem configuration file of io.Connect Desktop:
Property Type Description "finalExportGracePeriodMs"numberInterval in milliseconds to wait for any remaining telemetry data to be published by any apps before proceeding with the platform shutdown. Defaults to 0."finalExportTimeoutMs"numberInterval in milliseconds to wait for any remaining telemetry data to be exported during shutdown of the platform. This is the maximum awaiting interval and the platform may shutdown before it expires if all telemetry data has already been published. Defaults to 0.The following example demonstrates configuring the timeouts for publishing telemetry data before the io.Connect platform shuts down:
{
    "otel": {
        "enabled": true,
        "finalExportGracePeriodMs": 7000,
        "finalExportTimeoutMs": 10000
    }
}
Improvements & Bug Fixes
Upgraded to Electron 35.1.2 (Chromium 134).
It's now possible to use the Channels API in apps started outside the io.Connect platform. The only limitation is that it isn't possible to prevent modifying the Channel restrictions for such apps. This means that the
"preventModifyingRestrictionsFor"property of the"channelSelector"object under the"details"top-level key in the app definition won't have any effect for apps started outside the io.Connect platform.Improved behavior of resizing Workspace windows programmatically with the
setSize()method of aWorkspaceWindowinstance.Improved reporting of the
"app_memory"metric for closed app instances.Improved the process for publishing telemetry data when the platform is shutting down.
Fixed an issue related to restoring Layout containing reusable apps when using web groups.
Fixed issues with showing and hiding the Notification Panel via API calls.
Application Adapters
Word Adapter
Improvements & Bug Fixes
Improved the behavior for transferring large data chunks to a Word document.
Fixed an issue related to the io.Connect tab in the Word ribbon when displaying multiple registered Interop methods for handling data from Word.