
Changelog
io.Connect Desktop 9.4
Release date: 06.08.2024
| Components | Version |
|---|---|
| Electron | 31.2.0 |
| Chromium | 126.0.6478.127 |
| Node.js | 20.15.0 |
The following libraries are bundled with io.Connect Desktop 9.4 and will be used for auto injection:
| Injected Library | Version |
|---|---|
@interopio/desktop |
6.3 |
@interopio/fdc3 |
2.1 |
⚠️ Note that spawning BAT and CMD files on Windows has been disabled since Node.js v20 due to security concerns related to argument parsing. To avoid this issue, set the
"useShellExecute"property totrueunder the"details"top-level key in the app definitions for your BAT and CMD files.
New Features
Tab Overflow for Web Groups
To configure the tabs in a window group to overflow and be shown in a dropdown menu, instead of becoming smaller and smaller each time a new tab is added to the group, use the
"overflow"property found under the"tabs"property of the"group"object under the"windowManagement"top-level key in thesystem.jsonsystem configuration file:{ "windowManagement": { "group": { "tabs": { "overflow": true } } } }When tab overflow is enabled, the extra tabs on the right side of the tab header will be collected in a dropdown menu in their original order. The user can open the menu and select the desired tab (or close a tab directly from the menu). The tabs will be scrolled horizontally and the selected tab will be focused. This may improve the user experience, as the window tabs won't shrink and their titles will still be visible, irrespective of the number of windows in the group:
⚠️ Note that the
"overflow"property is valid only for web groups.
Scheduled Platform Restart & Shutdown
From the io.Connect Desktop launcher you can now schedule restart or shutdown of the platform. Use the "Settings" section of the launcher to schedule periodic restart and shutdown times:
Context Menu
The built-in context menu of io.Connect Desktop now supports three different modes: "Edit" mode, "Edit with Suggestions" mode, and "Selection" mode. Each mode is automatically applied based on whether the text can be edited or only selected. The following demonstrates each of the context modes:
The context menu can be enabled for all web apps, Workspaces and web groups on a global level and per app. To enable or disable the built-in context menu globally, use the
"contextMenu"property of the"windows"top-level key in thesystem.jsonsystem configuration file:{ "windows": { "contextMenu": { "enabled": true } } }To override the global configuration per app, use the
"contextMenu"property of the"details"top-level key in the app definition. The following example demonstrates disabling the context menu for the Web Group App:{ "name": "web-group-app", "type": "webGroup", "hidden": true, "details": { "url": "http://localhost:3000/", "contextMenu": { "enabled": false } } }⚠️ Note that the
"contextMenu"property is valid only for apps of type"window","workspaces"and"webGroup".⚠️ Note that the
"contextMenuEnabled"and"contextMenuMode"properties found under the"details"top-level key in the app definition have been deprecated. To provide settings for the context menu, use the"contextMenu"object instead.
New Implementation of io.Insights
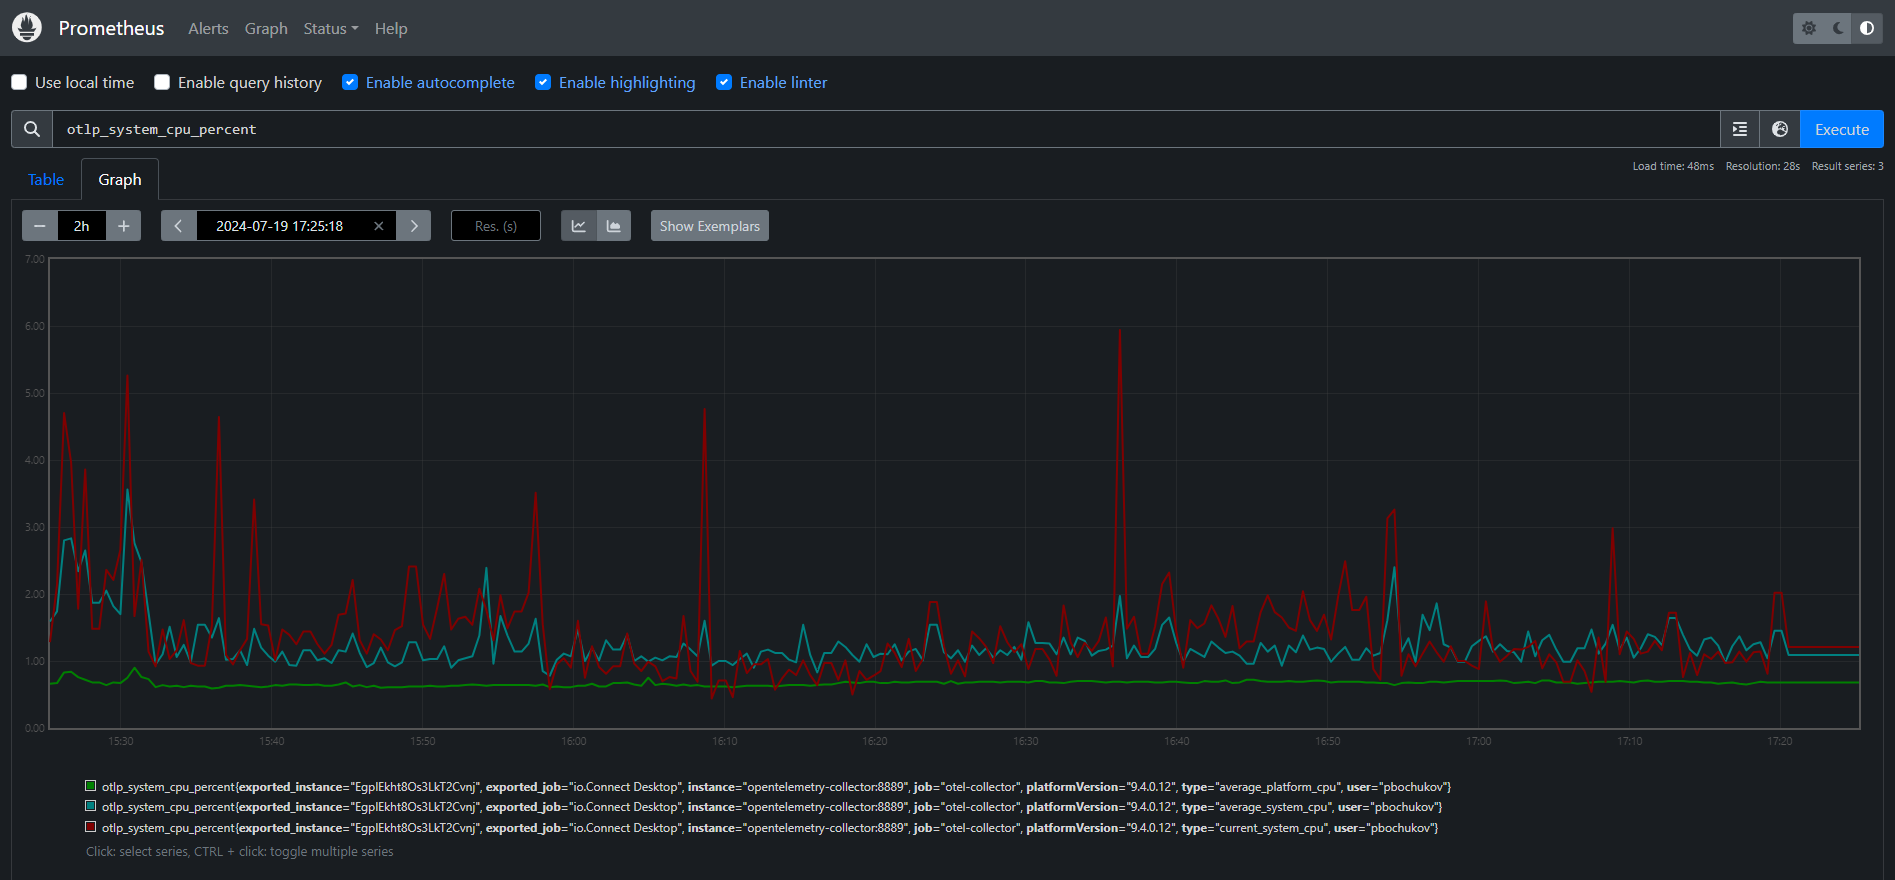
io.Insights has a brand new implementation based on the OpenTelemetry standard and now comes as a configurable built-in feature of io.Connect Desktop for clients that have purchased a license for io.Insights. This solution enables you to gather extensive data in the form of metrics, traces and logs. A wide array of default metrics are available that provide details about system, platform and app performance. These metrics are gathered and published automatically and are completely configurable.
The following is an example visualization in Prometheus of data (current and average system CPU usage and average platform CPU usage) extracted from the
system_cpudefault metric:
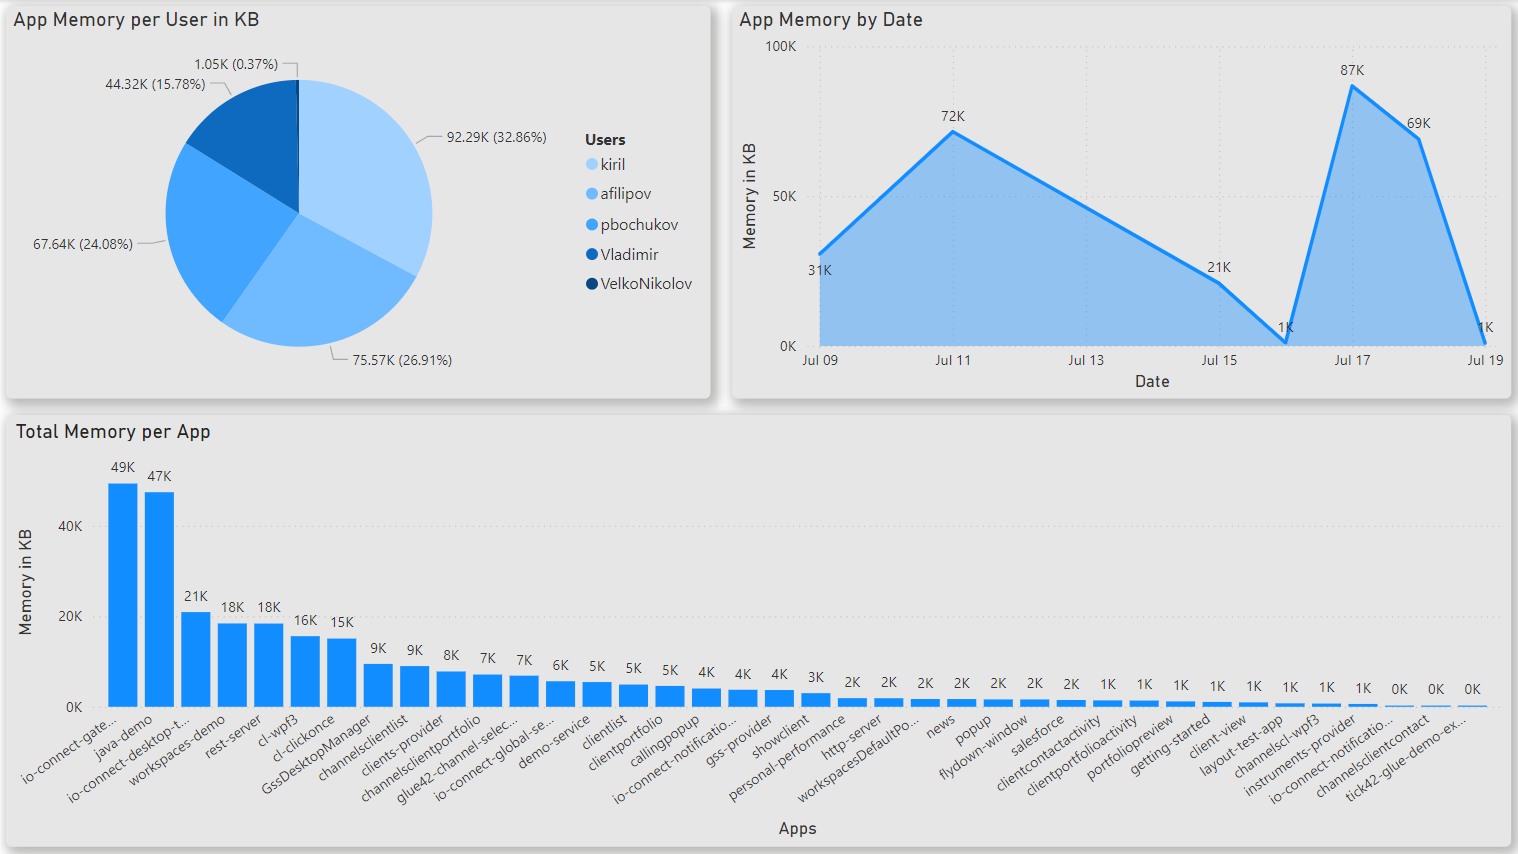
Power BI Dashboard visualizing data for app memory usage extracted from the
app_memorydefault metric:
⚠️ Note that the support for the legacy io.Insights implementation will continue as per any existing contractual agreements with clients.
New Configuration Settings for io.Manager
New configuration settings are available about caching and persisting data from io.Manager locally, and about the requests sent to io.Manager.
To provide settings for persisting data from io.Manager, use the
"cache"property of the"server"top-level key in thesystem.jsonsystem configuration file:{ "server": { "enabled": true, "url": "http://localhost:4356/api", "cache": { // Enable caching. "enabled": true, // Specify a location for the persisted files. "location": "%LocalAppData/io-manager/%GLUE-ENV%-%GLUE-REGION%/cache", // Delete cached files from previous sessions to io.Manager. "clearOld": true } } }To provide settings for the requests sent to io.Manager, use the
"requests"property of the"server"top-level key:{ "server": { "enabled": true, "url": "http://localhost:4356/api", "requests": { // Interval in milliseconds to wait for a response to the `openSession` request to io.Manager before proceeding from cache. "openSessionTimeout": 90000, // Interval in milliseconds to wait for a response to the `closeSession` request to io.Manager. "closeSessionTimeout": 15000, // Interval in milliseconds to wait for a response from io.Manager. "timeout": 90000 } } }
Capturing Frameless Windows
It's now possible to capture screenshots of frameless windows using the
capture()method of anIOConnectWindowobject:const name = "myWindow"; const url = "https://interop.io"; const options = { mode: "frameless" }; // Open a frameless window. const myWindow = await io.windows.open(name, url, options); // Capture a screenshot of the window. const base64Image = await myWindow.capture();
Dynamic Styles for Web Group Tabs
The
<Tab />component of the@interopio/groups-ui-reactlibrary (used for creating a custom Web Group App) now accepts two additional functions as props -addContainerClass()andremoveContainerClass(). These functions can be used for adding or removing CSS classes from the element containing the current tab. The following example demonstrates adding and removing a custom class to a tab based on whether the tab is currently selected:import Group, { Tab } from "@interopio/groups-ui-react"; const CustomTab = (props) => { // Check whether the current tab is selected. if (props.selected) { // Add a custom class to the element containing the tab. props.addContainerClass("my-special-tab"); } else { // Remove a custom class from the element containing the tab. props.removeContainerClass("my-special-tab"); } return <Tab {...props} />; }; // Add the customized tab to the Web Group App. const App = () => { return ( <Group components={{ tabs: { Element: CustomTab } }} /> ); }; export default App;
Default Tab Selection for Web Groups
By default, when the user closes a tab in a window group with multiple tabs, the tab immediately to its left (or immediately to its right, if the closed tab was the first one in the tab group) is automatically focused. You can override this behavior and instruct io.Connect Desktop to focus the tab that was previously selected by the user instead. Use the
"selectPreviousOnClose"property found under the"tabs"property of the"group"object under the"windowManagement"top-level key in thesystem.jsonsystem configuration file:{ "windowManagement": { "group": { "tabs": { "selectPreviousOnClose": true } } } }⚠️ Note that the
"selectPreviousOnClose"property is valid only for web groups.
Loading Strategy for Web Groups
It's now possible to specify a loading strategy for restoring tabbed window groups. The available options are to load all apps in the tabs simultaneously, or to load only the visible apps first and then load hidden apps on demand (only when the user clicks on a tab to activate it). To specify a loading strategy for web groups, use the
"loadingStrategy"property found under the"tabs"property of the"group"object under the"windowManagement"top-level key in thesystem.jsonsystem configuration file:{ "windowManagement": { "group": { "tabs": { "loadingStrategy": "lazy" } } } }Possible values for the
"loadingStrategy"property are"direct"(default) or"lazy".⚠️ Note that the
"loadingStrategy"property is valid only for web groups.
Inner Sizing Borders of Web Groups
The mechanism for controlling the inner borders used for resizing the windows within a window group can now be configured. It's possible to select between the default internal mechanism based on native Windows methods and the platform-independent mechanism used in the Web Group App itself. To specify the desired mechanism, use the
"groupInnerSizingMode"property of the"sizing"object under the"windowManagement"top-level key in thesystem.jsonsystem configuration file. Set this property to"internal"(default) to select the default resizing mechanism, or to"external"to select the platform-independent mechanism used in the Web Group App:{ "windowManagement": { "sizing": { "groupInnerSizingMode": "external" } } }⚠️ Note that the
"groupInnerSizingMode"property is valid only for web groups.
Collapse & Expand for Classic Groups
To specify the behavior for collapsing and expanding grouped windows, use the
"mode"property of the"collapseExpand"object under the"windowManagement"top-level key in thesystem.jsonsystem configuration file. By default, this property is set to"Single". This means that when you collapse a window in a group, the height and shape of the group may change (depending on where the collapsed window is situated), because the neighboring windows at the bottom of the collapsed window (if any) won't try to compensate the lost group height by expanding. To override this behavior and instruct the io.Connect Windows to try to compensate the height of a collapsed window in a group by expanding, set the"mode"property of the"collapseExpand"object to"Proportional":{ "windowManagement": { "collapseExpand": { "mode": "Proportional" } } }⚠️ Note that the
"collapseExpand"property is valid only for classic groups.⚠️ Note that depending on the position of the collapsed window within the group structure, it may not always be possible for the neighboring windows to fill the empty space left by collapsing it.
⚠️ Note that when the group is maximized, the neighboring windows will always try to fill in the empty space left by a collapsed window, irrespective of the mode used.
Collapsing a window in a group when using
"Single"mode:Collapsing a window in a group when using
"Proportional"mode:
Activating the Workspaces Frame
You can now use the
activateFrameproperty of theRestoreWorkspaceConfigobject and theactivateproperty of theFrameTargetingOptionsobject to activate and focus the Workspaces App when creating and restoring Workspaces or initializing empty Frames:// Activating the Workspaces App when restoring a Workspace. const name = "My Workspace"; const options = { activateFrame: true }; const workspace = await io.workspaces.restoreWorkspace(name, options); // Activating the Workspaces App when initializing an empty Frame. const emptyFrame = await io.workspaces.createEmptyFrame(); const configuration = { workspaces: [ { children: [], config: { title: "My Workspace" }, frame: { activate: true } } ] }; await emptyFrame.init(configuration);⚠️ Note that you can also use the already existing
"activateFrame"property in the Workspaces App definition to specify a default value.
Updating Specific Properties in Channel Contexts
The Channels API now offers the
setPath()andsetPaths()methods for updating specific properties in a Channel context. They accept aPathValueobject or an array ofPathValueobjects respectively as a first required argument. As a second optional argument, you can pass the name of a Channel whose context to update. If a Channel name isn't specified, the context of the current Channel will be updated. The paths to update must be specified as dot-separated strings (e.g.,"prop1.prop2"). If the path doesn't exist, it will be created.The following example demonstrates updating a property in the context of the current Channel:
const update = {
    path: "text.color",
    value: "grey"
};

await io.channels.setPath(update);

// Assuming the Channel context data has this shape:
// { backgroundColor: "red" }, it will be updated as follows:
// { backgroundColor: "red", text: { color: "grey" } }
The following example demonstrates updating two properties in the context of a specified Channel:
const channelName = "Red";
const updates = [
    { path: "table.cells", value: { width: 50, height: 30 } },
    { path: "text.color", value: "white" }
];

await io.channels.setPaths(updates, channelName);

// Assuming the Channel context data has this shape:
// { backgroundColor: "red", text: { color: "grey" } }, it will be updated as follows:
//
// {
//     backgroundColor: "red",
//     text: {
//         color: "white"
//     },
//     table: {
//         cells: {
//             width: 50,
//             height: 30
//         }
//     }
// }
Resetting Layouts
To reset a Layout, use the
reset()method and pass aResetLayoutOptionsobject as a required argument. The only required property in theResetLayoutOptionsobject islayoutIdwhere you must provide the ID of the Layout to reset:// Retrieve details about the currently restored Layout that you want to reset. const myLayout = (await io.layouts.getRestoredLayoutsInfo()).layoutInfo.find(l => l.name === "My Layout"); const options = { // Provide the ID of the Layout to reset. layoutId: myLayout.id, // Will exclude hidden apps from the reset operation. visibleOnly: true, // Will create missing app instances. createMissing: true, // Will preserve the current state of the app instances (window context and selected Channel). resetState: false }; const result = await io.layouts.reset(options);
Retrieving Restored Layouts Info
To retrieve information about the currently active Global Layout (ID, type, name, participating app instances), as well as about any previously active Global Layouts that may still have running instances of their participating apps, use the
getRestoredLayoutsInfo()method.This method may be useful if you want to get the IDs of all Global Layouts that the user has restored (and that still have running instances of their participating apps) in order to use them in operations like resetting a Global Layout.
// Retrieve information about all restored Global Layouts.
const allRestoredLayoutsInfo = (await io.layouts.getRestoredLayoutsInfo()).layoutInfo;
// Get the current Global Layout in order to compare the Layout names.
const currentLayout = await io.layouts.getCurrentLayout();

// Find the details about the current Global Layout.
const myLayoutInfo = allRestoredLayoutsInfo.find(layoutInfo => layoutInfo.name === currentLayout.name);

// Use the Layout ID.
console.log(myLayoutInfo.id);
In-Memory Layout Store
It's now possible to use an in-memory store for Layouts. Configuring io.Connect Desktop to use an in-memory store for Layouts means that the user will be able to perform all available Layout operations (such as saving and restoring Layouts), but all Layouts will be available only during the current session. When the io.Connect platform is restarted, the in-memory Layout store will be empty.
The in-memory Layout store may be useful in cases where you have your own custom Layout service which imports Layouts on system startup and exports them on system shutdown allowing you to persist Layouts across user sessions.
To configure io.Connect Desktop to use an in-memory Layout store, set the
"type"property of the"store"object to"in-memory":{ "layouts" : { "store": { "type": "in-memory" } } }
System Folder Settings for the Extensible Installer
To set the locations for the Windows "Desktop" and "Start Menu" folders when repackaging the io.Connect Desktop installer, use the
"context"extensibility point in the extensibility configuration file:{ "context": [ { "type": "setValue", "args": { "name": "DesktopFolder", "value": "%Public%/Desktop" } }, { "type": "setValue", "args": { "name": "StartMenuFolder", "value": "%ProgramData%/Microsoft/Windows/Start Menu/Programs/io.Connect Desktop" } } ] }
App Title
The
"syncTitleWithDocumentTitle"property, used for defining the behavior for synchronizing the titles of web app and Workspaces App instances with the document title, now accepts a"preserveCustomTitle"string as a value. Using this value will instruct io.Connect Desktop to initially synchronize the window title with the document title whenever the document title changes until the user or the io.Connect API updates the window title. From that point forward, the window title will be set only when the user or the io.Connect API updates it:To provide global settings for synchronizing app titles, use the
"syncTitleWithDocumentTitle"property of the"windows"top-level key in thesystem.jsonsystem configuration file of io.Connect Desktop:{ "windows": { "syncTitleWithDocumentTitle": "preserveCustomTitle" } }To override the global system configuration per app, use the
"syncTitleWithDocumentTitle"property of the"details"top-level key in the app definition:{ "details": { "syncTitleWithDocumentTitle": true } }
Ungrouping Windows via Long Mouse Button Press
To enable or disable ungrouping windows when the user holds down the left mouse button on the window header, use the
"unlockOnLongMousePress"property of the"group"object under the"windowManagement"top-level key in thesystem.jsonsystem configuration file:{ "windowManagement": { "group": { "unlockOnLongMousePress": { "enabled": true, "timeout": 1200, "tolerance": 10 } } } }The
"unlockOnLongMousePress"object has the following properties:
Property Type Description "enabled"booleanIf true(default), will enable unlocking windows from window groups on a long mouse press."timeout"numberInterval in milliseconds to wait before unlocking a window from a window group on a long mouse press. Defaults to 1000."tolerance"numberDistance in pixels allowed for the mouse to move from its initial position before the unlocking operation becomes unavailable. Defaults to 5.
Notification Badge
To specify whether a notification badge should be displayed on the io.Connect Desktop tray menu icon, in the io.Connect launcher, and on the Windows taskbar icons of io.Connect apps, use the
"showNotificationBadge"property of the"notifications"top-level key in thesystem.jsonsystem configuration file:{ "notifications": { "showNotificationBadge": true } }
Controlling Window Visibility Before Library Initialization
If you need to show or hide a window dynamically (e.g., an authentication app) but don't want to initialize the entire
@interopio/desktoplibrary, use theshowWindow()andhideWindow()methods of theiodesktopservice object injected in the globalwindowobject:// Hide a window. await iodesktop.hideWindow(); // Show a hidden window. await iodesktop.showWindow();
SSO App Visibility
You can now control the visibility of your SSO app. If your business use case requires it, you can now hide your SSO app from the user by using the
"hidden"property of the"details"top-level key in the app definition:{ "type": "window", "name": "sso-application", "details": { // Will hide the logins window from the user. "hidden": true, "url": "https://my-sso-app.org", "mode": "html", "width": 400, "height": 400, "startLocation": "center" } }If you need to show or hide the SSO app dynamically but don't want to initialize the entire
@interopio/desktoplibrary, use theshowWindow()andhideWindow()methods of theiodesktopservice object injected in the globalwindowobject:// Hide a window. await iodesktop.hideWindow(); // Show a hidden window. await iodesktop.showWindow();
Transparency for Frameless Windows
To make a frameless window transparent, use the
"transparent"property of the"details"top-level key in the app definition:{ "name": "my-frameless-window", "type": "window", "details": { "url": "https://example.com/my-frameless-app", "mode": "frameless", "transparent": true } }⚠️ Note that the
"transparent"property is valid only for frameless windows.
Persisting the Current Loading Strategy for Workspaces
The current loading strategy of a Workspace created or restored programmatically can now be preserved in its Workspace Layout when the Workspace is saved. This will enable you to restore the Workspace later with its current loading strategy, and not the default one specified in the Workspaces App definition. Use the
"persistCurrentStrategy"property of the"details"top-level key in the Workspaces App definition to specify whether the current or the default strategy will be applied when you save and restore, or hibernate and resume Workspaces:{ "name": "workspaces-app", "details": { "loading": { // Default loading strategy to be used for restoring and resuming Workspaces. "loadingStrategy": "delayed", // The loading strategy specified when programmatically creating or restoring Workspaces // will be preserved in the Workspace Layout when the Workspace is saved. "persistCurrentStrategy": true } } }⚠️ Note that if the
"restoreWorkspacesByReference"and the"persistCurrentStrategy"properties are both set totrue, and your Workspace is saved in a Global Layout, it's current loading strategy (if any is specified) won't be preserved when the Global Layout is restored, as the Workspace will be restored in its original state.
Clearing Electron Cache from Previous Versions
To instruct io.Connect Desktop to delete the Electron cache from previous platform versions within the same location on startup, use the
"clearOld"property of the"cache"object under the"folders"top-level key in thesystem.jsonsystem configuration file:{ "folders": { "cache": { "clearOld": true } } }
Improvements & Bug Fixes
Upgraded to Electron 31.2.0 (Chromium 126).
The
authDone()method can now be invoked by any window. This can be useful if your SSO app opens other windows when handling the authentication process.Now when a fallback script defined in a preload scripts can't be fetched, io.Connect Desktop returns the HTTP status code and the respective error instead of throwing an error for an invalid URL.
Improved behavior for opening URLs in the default browser.
Improved handling of dump files for crash reports.
Fixed not being able to drag a tab in a maximized group when using web groups.
Fixed the Windows taskbar icon of the shell app sometimes disappearing when the platform is installed in a custom location.
Fixed Workspace bounds not saved in Layouts when the Workspace is snapped to a position on the screen using the Windows snapping functionality.