
Changelog
io.Connect Desktop 9.9
Release date: 13.06.2025
| Components | Version |
|---|---|
| Electron | 36.2.0 |
| Chromium | 136.0.7103.49 |
| Node.js | 22.15.0 |
The following libraries are bundled with io.Connect Desktop 9.9 and will be used for auto injection:
| Injected Library | Version |
|---|---|
@interopio/desktop |
6.13 |
@interopio/fdc3 |
2.5 |
Breaking Changes
Workspaces
The io.Connect Workspaces have been redesigned with the goal of improving the UI and providing smoother user experience, which necessitated introducing breaking changes in the
@interopio/workspaces-ui-reactlibrary.⚠️ Note that the following changes will be breaking for you only if you upgrade to version 4.0 or later of the
@interopio/workspaces-ui-reactlibrary and:
- You have a custom Workspaces App in which you are using any of the affected default components provided by the
@interopio/workspaces-ui-reactlibrary. In this case, your app won't build when you upgrade to the latest version of the library.- You are using the default Workspaces UI app and you have only customized it with CSS. In this case, your styles won't be applied when you upgrade to the latest version of the
@interopio/workspaces-ui-reactlibrary.This is due to the fact that some legacy components have been deprecated, the HTML structure of others has been modified, and a new system with CSS variables has been introduced for styling the Workspaces App. If you have completely customized your Workspaces App (entirely replaced the affected default components with your own custom components), you shouldn't experience any issues when migrating to the latest version of the
@interopio/workspaces-ui-reactlibrary.If you don't upgrade the
@interopio/workspaces-ui-reactlibrary, your Workspaces App will still work in newer versions of io.Connect Desktop.The following breaking changes have been made to the
@interopio/workspaces-ui-reactlibrary:
- The
<WorkspaceTabV2 />component has been renamed to<WorkspaceTab />and the legacy<WorkspaceTab />(version 1) has been removed.- The "Add Apps" button ("+" button) in the Workspace window group header has been moved to the left of the header, after the window tabs.
- The legacy Glue42 CSS files have been removed.
- The legacy
<GlueLogo />component has been removed.- The legacy "Save Workspace" system popup has been removed. The "Save Workspace" popup has been replaced by a dialog that's part of the
<WorkspaceTab />component and can be customized by customizing that component.- Changed the CSS classes for the
<Logo />component, for the background of an empty Workspace, and for the<WorkspaceTab />component.- Changed the tab sizing strategy.
- Completely restructured the HTML and CSS of the "Add Apps" popup.
- Completely restructured the HTML and CSS of the "Add Workspace" popup.
Deprecated Platform Apps
Launchpad
The legacy Windows style io.Connect launcher known as the io.Connect Launchpad is now deprecated.
⚠️ Note that a new io.Connect launcher which is also called the io.Connect Launchpad is introduced in io.Connect Desktop 9.9. The new Launchpad is a conceptually different app from the legacy Launchpad and isn't meant to be its descendent despite the name coincidence.
Global Search App
The legacy Global Search App is now deprecated.
New Features
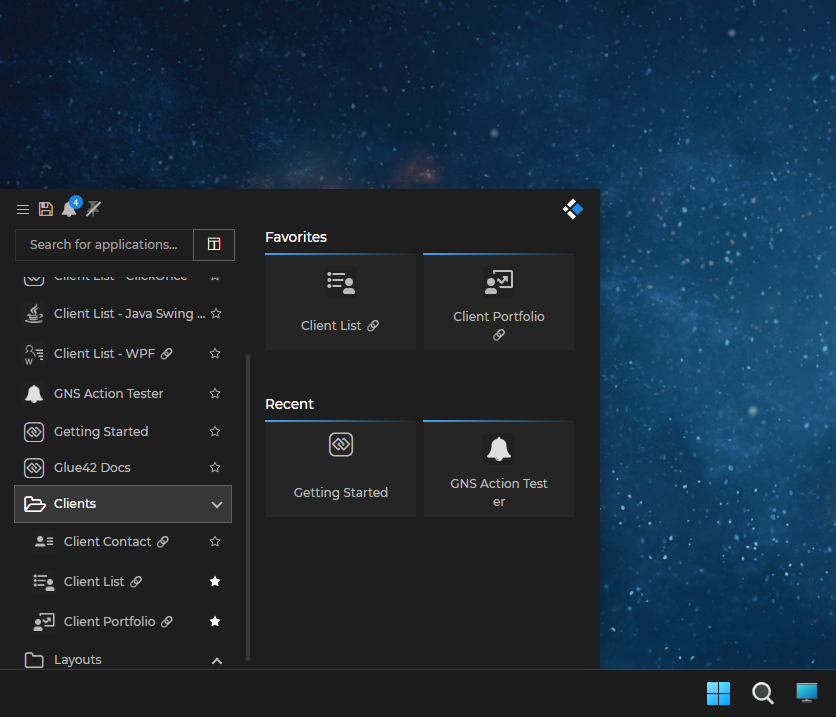
New io.Connect Launcher
The new io.Connect Launchpad is now the default io.Connect launcher. It's an easily customizable web app that acts as a central hub for all io.Connect features - apps, Workspaces, Layouts, notifications, platform preferences, and more.
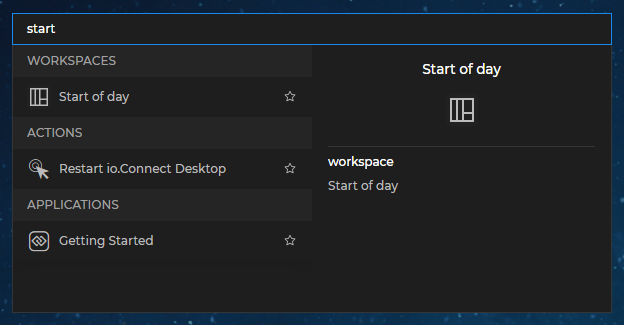
The Launchpad starts in expanded mode and contains conveniently placed sections with easy access to all available Workspaces, apps, and Layouts. At the top, you can find search bar that's not just a simple item filter, but a fully functional global search implemented using the search capabilities of the io.Connect framework.
The Launchpad provides quick access to the Notification Panel, the Download Manager, the Feedback Form, and contains a menu with various platform settings. It can be moved, minimized, and collapsed to a compact horizontal toolbar in order to save screen real estate. Users who prefer the Launchpad to be always available on the screen can pin the Launchpad to the left or the right side of their monitors.
CSS Variables for Customizing the io.Connect Platform
io.Connect Desktop and all its default system web apps (Workspaces, web groups, Launchpad, and more) use the io.Connect styles provided by the
@interopio/themepackage. You can use the CSS variables provided by the io.Connect themes to customize the system apps of your platform.The following image demonstrates the available CSS variables for customizing the Workspace tab of the Workspaces App:

Modal Windows
⚠️ Note that this feature is still experimental in io.Connect Desktop.
⚠️ Note that until now, the only option to show dialogs from your apps was by using the
showDialog()method of anIOConnectWindowinstance. This method is still supported and you can use it to show the already existing set of predefined dialogs, as well as custom ones, but it doesn't support the new set of predefined dialogs available via the new@interopio/modals-apilibrary. Respectively, the@interopio/modals-apilibrary doesn't support the predefined dialogs available via theshowDialog()method.io.Connect Desktop now supports a new set of predefined modal windows (alerts and dialogs), which you can use in your interop-enabled apps via the new
@interopio/modals-apilibrary.The new
"alerts"top-level key in thesystem.jsonsystem configuration file of io.Connect Desktop allows you to provide configuration settings for your alert windows. The already existing dialogs configuration, found under the"dialogs"top-level key in thesystem.jsonfile, applies to the newly introduced dialogs as well.Alerts Configuration
To provide settings for alert windows, use the
"alerts"top-level key in thesystem.jsonsystem configuration file of io.Connect Desktop:{ "alerts": { "enabled": true, "width": 450, "height": 100, "ttl": 7000, "roundedCorners": true } }The
"alerts"object has the following properties:
Property Type Description "enabled"booleanIf true(default), will enable the io.Connect alerts."height"numberHeight in pixels for the io.Connect alerts. Defaults to 82."roundedCorners"booleanIf true, the io.Connect Window containing the alerts will have rounded corners. Defaults tofalse."transparent"booleanIf true(default), the io.Connect Window containing the alerts will be transparent."ttl"numberInterval in milliseconds that defines how long the alert is displayed to the user before it automatically disappears. Defaults to 5000."url"stringURL pointing to the location of the io.Connect alerts app. You can use this to provide a URL pointing to your custom alerts app. "width"numberWidth in pixels for the io.Connect alerts. Defaults to 400.Modals API
To enable the Modals API in your apps, you must include and initialize the
@interopio/modals-apilibrary in your project. Initialize the@interopio/desktoplibrary and pass the globally availableIOModals()factory function to thelibrariesarray of the configuration object. TheIOModals()factory function, like theIODesktop()factory function, is injected in the globalwindowobject:import IODesktop from "@interopio/desktop"; import IOModals from "@interopio/modals-api"; // Initializing the Modals API. const config = { libraries: [IOModals] }; const io = await IODesktop(config); // Options for displaying an alert. const alertOptions = { variant: "success", text: "Successfully initialized the Modals API!" }; // Displaying an alert. await io.modals.alerts.request(alertOptions);The following example demonstrates displaying one of the predefined dialogs via the Modals API and providing custom content for it:
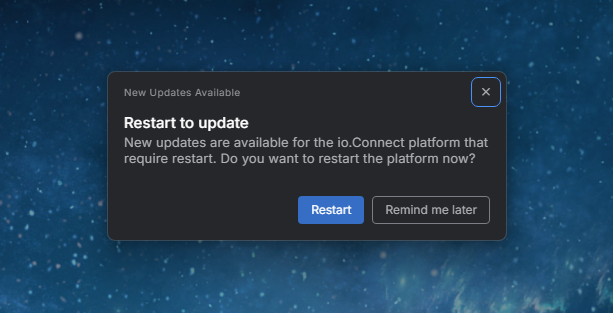
// Options for displaying a dialog.
const dialogOptions = {
    templateName: "noInputsConfirmationDialog",
    variables: {
        title: "New Updates Available",
        heading: "Restart to update",
        text: "New updates are available for the io.Connect platform that require restart. Do you want to restart the platform now?",
        actionButtons: [
            { variant: "primary", text: "Restart", id: "restart" },
            { variant: "outline", text: "Remind me later", id: "remind-later" }
        ]
    }
};

// Displaying a dialog.
await io.modals.dialogs.request(dialogOptions);
ℹ️ For details on using the Modals API, see the Capabilities > Modals section.
Prevent Closing of Workspaces App Instances
By default, Workspaces App instances will close automatically when a Frame close operation is requested (e.g., when the user clicks the "Close" button or when you try to close a Frame programmatically).
To get notified when a Workspaces App instance is about to close and prevent it from closing automatically, use the
onClosing()method of aFrameinstance. TheonClosing()method receives as an argument a callback that will be executed when theFrameinstance is about to close. The callback receives as an argument an object with apreventproperty holding as a value a function that you can use to prevent closing theFrame:const myFrame = await io.workspaces.getMyFrame(); // Use the `prevent()` function to prevent closing the Frame. const handler = ({ prevent }) => prevent(); // Get notified when the Frame is about to be closed. myFrame.onClosing(handler);The
close()method of aFrameinstance now accepts aFrameCloseOptionsobject as an argument. Use this argument to specify whether to allow theFrameto prevent closing and whether to show a confirmation dialog to the user:const options = { // This will allow the Frame to prevent closing. allowPrevent: true, // A confirmation dialog for closing the Frame will be displayed to the user. // This property will override the dialog setting in the Workspaces App definition. showDialog: true }; await myFrame.close(options);By default, a confirmation dialog for closing the Workspaces App instance will be displayed to the user if the
Frameclose operation has been prevented. To configure the default behavior for displaying this dialog, use the"dialogs"object under the"details"top-level key in the Workspaces App definition. To disable showing this dialog, set the"preventClose"property of the"enableDefaultDialogs"object tofalse:{ "dialogs": { "enableDefaultDialogs": { "preventClose": false } } }⚠️ Note that this configuration can be overridden programmatically by passing a
FrameCloseOptionsobject as an argument to theclose()method of aFrameinstance.
Windows Taskbar Icons for Workspaces App Instances
To retrieve and set the Windows taskbar icons for individual Workspaces App instances, use the
getIcon()andsetIcon()methods of aFrameinstance respectively. This allows you to use different Windows taskbar icons for the different Workspaces App instances. The icon must be provided as a Base64 string inside anIconobject:const myFrame = await io.workspaces.getMyFrame(); // Retrieve the current Frame icon. const currentIcon = await myFrame.getIcon(); console.log(currentIcon.base64Image); // Set a new icon for the Frame. const newIcon = { base64Image: "my-new-icon-as-base64-string" }; await myFrame.setIcon(newIcon);
Dragging Windows
To start dragging a window programmatically when the left mouse button is pressed, use the
dragMove()method of anIOConnectWindowinstance. Optionally, provide as an argument aDragMoveOptionsobject holding the location of the mouse cursor within the window at the time the dragging operation was initiated. The io.Connect platform will use that location to place the window under the mouse cursor when the mouse is moving (e.g., in case the mouse has already moved several pixels in any direction before the dragging operation has been initiated by the platform).The following example demonstrates how to initiate a window dragging operation when the user holds down the left mouse button inside a predefined element of an app designated as a move area:
const myMoveArea = document.getElementById("my-move-area");
const myWindow = io.windows.my();
const handler = (event) => {
    event.stopPropagation();

    // Check whether the left mouse button was pressed.
    if (event.button === 0) {
        // Retrieve the coordinates of the mouse cursor when the left mouse button was pressed.
        const options = {
            location: {
                x: event.pageX,
                y: event.pageY
            }
        };

        // Start dragging the window.
        myWindow.dragMove(options);
    }
};

myMoveArea.addEventListener("mousedown", handler);
⚠️ Note that the
dragMove()method works only when the left mouse button is pressed. Attempting to use this method with any other mouse button will cause the platform to throw an error.
Layouts
The following Layout options and events are now available in the Layouts API.
Ignoring Contexts when Saving Layouts
The
NewLayoutOptionsobject passed as an argument to thesave()method was expanded with anignoreContextsproperty. Use this property to instruct the io.Connect platform to skip saving any window or Workspace contexts when saving a Layout:const options = { name: "My Layout", ignoreContexts: true }; const savedLayout = await io.layouts.save(options);Default Global Layout Changed
To get notified when the default Global Layout has been changed, use the
onDefaultGlobalChanged()method and provide a callback for handling the event. The callback will receive as an argument an object with anameproperty holding the name of the newly selected default Global Layout. If the event was fired because the default Global Layout was cleared, the argument will beundefined:const handler = (layout) => { if (layout) { console.log(`The default Global Layout was changed to "${layout.name}".`); } else { console.log ("The default Global Layout was cleared."); } }; const unsubscribe = io.layouts.onDefaultGlobalChanged(handler);Layout Renamed
The callback passed to the
onRenamed()method now accepts as a second argument an object with anameproperty holding the previous name of the renamed Layout:const handler = (currentLayout, previousLayout) => { console.log (`Layout "${previousLayout.name}" was renamed to "${currentLayout.name}".`) }; const unsubscribe = io.layouts.onRenamed(handler);
Window Placement
The
PlacementSettingsobject passed as an argument to theplace()method of the Window Management API has been extended with an optionalsaveBoundsproperty enabling you to save the last known bounds of the io.Connect Window when performing a placement operation with snapping enabled. A newclearPlacement()method has been added that allows you to clear the placement settings for the window after a placement operation with snapping enabled, and optionally restore its previously saved bounds or provide new bounds for it:const placementSettings = { // Setting `snapped` to `true` enables you to clear the placement settings for the window later. snapped: true, verticalAlignment: "top", // Save the bounds of the window before executing the placement operation. saveBounds: true }; await myWindow.place(placementSettings); // Clearing the window placement and restoring the last known window bounds. const clearPlacementSettings = { restoreBounds: true }; await myWindow.clearPlacement(clearPlacementSettings);⚠️ Note that the
clearPlacement()method will work only after placement operations with snapping enabled (i.e.,snappedhas been set totrue).
Windows Dynamic Configuration
The
WindowConfigurationobject that is passed as a required argument to theconfigure()method of anIOConnectWindowinstance has new properties and some of its existing ones have been modified.Web Page Search
To enable or disable the web page search feature for a window dynamically, use the
searchproperty of theWindowConfigurationobject:const config = { search: { enabled: true } }; await myWindow.configure(config);Size & Move Areas for Windows
The
hasSizeAreasproperty of theWindowConfigurationobject is now valid for all window modes (flat, tab, HTML, and frameless):const config = { hasSizeAreas: false }; await myWindow.configure(config);⚠️ Note that the
hasSizeAreasproperty is valid only for single windows. Also, settinghasSizeAreastofalsewill remove the drop shadows of flat, tab, and HTML windows.The
hasMoveAreasproperty of theWindowConfigurationobject is now valid for frameless and HTML windows:const config = { hasMoveAreas: false }; await myWindow.configure(config);Windows Taskbar Icon
To control the visibility of the Windows taskbar icon for the window, use the
showInTaskbarproperty of theWindowConfigurationobject:const config = { showInTaskbar: false }; await myWindow.configure(config);
Transparency for Frameless Windows
To specify transparency settings for frameless window opened via the browser native
window.open()method, use thetransparentoption:const url = "https://example.com"; // Opening a transparent frameless window. const options = "mode=frameless, transparent=true"; window.open(url, undefined, options);
Rounded Corners for Frameless Windows
To specify that a frameless window should have rounded corners, use the
"roundedCorners"property of the"details"top-level key in the app definition:{ "name": "my-frameless-window", "type": "window", "details": { "url": "https://example.com/my-frameless-app", "mode": "frameless", "roundedCorners": true } }⚠️ Note that the
"roundedCorners"property is valid only for frameless windows. In Windows versions older than Windows 11 build 22000, this property won't have any effect and frameless windows won't have rounded corners.
Operation Timeout for the Workspaces API
To configure the interval for awaiting Workspaces API operations to complete (e.g., if you want to increase or decrease the default interval for restoring a Workspace), use the
"operationTimeout"property of the"workspaces"object under the"windowManagement"top-level key in thesystem.jsonsystem configuration file of io.Connect Desktop:{ "windowManagement": { "workspaces": { "operationTimeout": 45000 } } }
Preventing Overrides of App Definition Properties
You can now use the
"allowOverrides"property of the"details"top-level key in the app definition to prevent apps from overriding programmatically app definition properties. For web apps, this includes the"url"property, and for native apps - the"command"property. This enables you to additionally improve your platform security by ensuring that it won't be possible for apps within the platform to load programmatically other unknown apps that may execute malicious code.The following example demonstrates using the
"allowOverrides"property of the"details"top-level key in the app definition to prevent apps from overriding the"url"property in a web app definition when attempting to start this app programmatically via the io.Connect APIs:{ "details": { "url": "https://my-org.com/my-app", "allowOverrides": { // This is set to `true` by default and it's highly recommended to explicitly set it to `false`. "url": false } } }The following example demonstrates using the
"allowOverrides"property of the"details"top-level key in the app definition to prevent apps from overriding the"command"property in a native app definition when attempting to start this app programmatically via the io.Connect APIs:{ "details": { "command": "MyApp.exe", "allowOverrides": { // This is set to `true` by default and it's highly recommended to explicitly set it to `false`. "command": false } } }
Alternate Window Management Behavior
By default, when you move an io.Connect Window close enough to another io.Connect Window and drop it, it will automatically stick to it. If you move a window over a tabbed window group and drop it, it will be added to that group. The same is valid for dropping windows and window groups in Workspaces. To prevent these automatic operations, you can hold the
ALTkey while moving an io.Connect Window or a window group.Now, it's possible to reverse these default window management behaviors by using the
"alternateBehavior"property of the"windowManagement"object in thesystem.jsonsystem configuration file of io.Connect Desktop.The following example demonstrates how to instruct the io.Connect platform to stick windows together and add dropped windows to tab groups and Workspaces only when the
ALTkey is pressed:{ "alternateBehavior": { "snapping": { "reverse": true }, "dropInTabGroup": { "reverse": true }, "dropInWorkspace": { "reverse": true } } }
Capturing Client App Errors
To instruct io.Connect Desktop to capture console messages, network request errors, and any unhandled errors originating from your web app, use the
"logging"property of the"details"top-level key in the app definition:{ "details": { "logging": { "consoleMessages": { "enabled": true, "level": "info" }, "networkRequestErrors": { "enabled": true }, "unhandledErrors": { "enabled": false } } } }The captured errors will be logged in the respective
<app-name>.logfile where<app-name>represents the name of your app as specified in its app definition. The app log file will be located in the<installation_location>/interop.io/io.Connect Desktop/UserData/<ENV>-<REG>/logs/applicationsfolder where<ENV>-<REG>represents the environment and region of io.Connect Desktop (e.g.,DEMO-INTEROP.IO).Capturing these errors is disabled by default. The
"logging"property accepts a Boolean or an object as a value. If set totrue, all console messages, networks request errors, and unhandled errors will be logged. You can use an object as a value to provide settings for the types of errors you want to capture.The
"logging"object has the following properties:
Property Type Description "consoleMessages"objectSettings for capturing console messages. "networkRequestErrors"objectSettings for capturing network request errors. "unhandledErrors"objectSettings for capturing unhandled errors (e.g., unhandled Promiserejections, errors not logged in the console).The
"consoleMessages"object has the following properties:
Property Type Description "enabled"booleanIf true, will allow capturing all console messages. Defaults tofalse."level""trace"|"debug"|"info"|"warn"|"error"Sets the level at which to capture console messages. The platform will capture all console messages at the specified level and above. Defaults to "trace".The
"networkRequestErrors"object has the following properties:
Property Type Description "enabled"booleanIf true, will allow capturing all network request errors. Defaults tofalse.The
"unhandledErrors"object has the following properties:
Property Type Description "enabled"booleanIf true, will allow capturing all unhandled errors. Defaults tofalse.
Combining Icons in the Windows Taskbar
When the user sticks two or more io.Connect web apps together to form a window group, the individual Windows taskbar icons are combined automatically into one icon representing the window group. The Windows taskbar icon used for window groups is customizable and you can use the same icon for the window groups as for any of your other apps. Until now, however, the Windows taskbar icons of window groups and individual app instances wouldn't be combined in the Windows taskbar even if you were using the same icon for both.
It's now possible to combine these icons by using the
"iconURL"property of the"group"object in thethemes.jsonthemes configuration file of io.Connect Desktop to provide the URL of the icon as specified in the definitions of your apps. This URL won't be used by the platform to retrieve the icon itself, but only to create an icon ID that the OS needs for grouping icons in the Windows taskbar. You still must provide the file name of the desired group icon by using the"icon"property of the"group"object and must make sure that your custom icon is present in the<installation_location>/interop.io/io.Connect Desktop/Desktop/assets/imagesfolder.To define an icon for your app, use the
"icon"top-level key in the app definition file:{ "name": "my-app", "title": "My App", // Defining an icon for your app. "icon": "https://example.com/my-universal-icon.ico", "type": "window", "details": { "url": "https://example.com/my-app" } }To use the same icon as a Windows taskbar icon for window groups, place the icon file in the
<installation_location>/interop.io/io.Connect Desktop/Desktop/assets/imagesfolder and define the icon inside the"group"object in thethemes.jsonfile of io.Connect Desktop for all available themes:[ { "name": "dark", "displayName": "Night", "properties": { "group": { "icon": "my-universal-icon.ico", "iconURL": "https://example.com/my-universal-icon.ico" } } } // Do this for all other available themes. ]Now, all your apps and window groups that are using the same icon will be automatically combined in the Windows taskbar.
Logging for Child Windows of Web Apps
It's now possible for child windows of web apps opened via the browser native
window.open()method to use the Logger API to create log entries. The log entries created by child windows are located in the parent app log file. Each log entry by a child app contains specific details about the child app (indication that the log entry was made by a child app, instance ID and URL of the child app) allowing you to easily find and extract the relevant information. The following example demonstrates the shape of an actual log entry by a child app:[2025-06-16T10:12:12.476] [INFO] [15308_13] [child:15308_14|https://interop.io/] - Log entry by a child app.
Environment Variables from Remote Configuration Stores
To apply environment variables from a remote configuration store or to override any environment variables set in your local gilding configuration, you must define them in an
env.jsonfile in io.Manager or in your custom REST service:// In `env.json`. { "set": { // These will override any existing environment variables with the same names in your local `gilding.json`. // To remove an environment variable, provide an empty string as a value. "MY_APP_PROD": "https://my-app.com", "MY_APP_DEV": "https://dev.my-app.com", "REMOVED_VAR": "" } }
Defining Additional Metrics Attributes
You can now define additional resource and metrics attributes to be included by io.Connect Desktop when publishing metrics. To define additional attributes, use the
"additionalResourceAttributes"and"additionalAttributes"properties of the"metrics"object under the"otel"top-level key in thesystem.jsonsystem configuration file of io.Connect Desktop. You can use environment variables as values. Environment variables must start and end with a percent sign (e.g.,%MyEnvVar%), and can contain a fallback value (e.g.,%MyEnvVar?DefaultValue%).The following example demonstrates defining additional metrics and resource attributes:
{
    "otel": {
        "enabled": true,
        "metrics": {
            "enabled": true,
            "url": "https://otlp-http.interop.io/v1/metrics",
            // Additional attributes for each published metric.
            "additionalAttributes": {
                "platformName": "MyPlatform",
                "envVar": "%MyEnvVar%/config"
            },
            // Additional resource-level attributes.
            "additionalResourceAttributes": {
                "service.name": "MyService",
                "service.namespace": "MyServiceNamespace"
            }
        }
    }
}
Improvements & Bug Fixes
Upgraded to Electron 36.2.0 (Chromium 136).
Improved handling of environment variables defined in the
"customProperties"and"userAgent"properties in an app definition.Improved the behavior for invoking the notification
onclickandonactionhandlers.Improved the window placement behavior in cases of resolution and monitor changes.
Fixed a bug related to applying Workspace size constraints.
Fixed a race condition related to saving Layouts.
Fixed bugs related to using multiple Channels.
Fixed a race condition related to subscribing for the
onClosing()event for window groups.