
How to...
Splash Screen
io.Connect Desktop has a built-in splash screen, but also supports showing a custom splash screen. The splash screen can be loaded from a local file or from a remote location.
The default splash screen HTML file is located in the <installation_location>/interop.io/io.Connect Desktop/Desktop/assets/splash folder. To customize it, replace it with your own splash screen file. You can also use the existing files and modify them directly.
To configure the splash screen, use the "splash" top-level key in the system.json system configuration file of io.Connect Desktop.
The "splash" object has the following properties:
| Property | Type | Description |
|---|---|---|
"alwaysOnTop" |
boolean |
If true, the splash screen will always be on top of other windows. Available since io.Connect Desktop 9.5. |
"blockStartup" |
boolean |
If true (default), will block startup until the splash screen has loaded. |
"disabled" |
boolean |
If true, the splash screen will be disabled. |
"height" |
number |
Height in pixels for the splash screen. Defaults to 500. |
"showInTaskbar" |
boolean |
If true (default), the splash screen icon will be shown in the Windows taskbar. Available since io.Connect Desktop 9.7. |
"showOnShutdown" |
boolean |
If true (default), will show the splash screen when io.Connect Desktop is shutting down. |
"timeout" |
number |
Interval in milliseconds to wait for the splash screen to load. Defaults to 5000. |
"transparent" |
boolean |
If true (default), the splash screen background will become transparent. |
"url" |
string |
URL pointing to the location of the splash screen. You can use environment variables. Defaults to "file:///%IO_CD_ASSETS_DIR%/splash/splash.html". |
"width" |
number |
Width in pixels for the splash screen. Defaults to 750. |
The following example demonstrates how to provide a custom splash screen and settings for it:
{
    "splash": {
        "disabled": false,
        "url": "file:///my-assets/custom/splash.html",
        "width": 350,
        "height": 233,
        "blockStartup": true
    }
}
The "disabled" property is set to false by default. Use the "blockStartup" property to specify whether io.Connect Desktop should wait for the splash screen to load before proceeding with the startup.
For the splash screen setup to work, you must handle the following events:
// `updateStatus` event
ipcRenderer.on("updateStatus", (event, arg) => {
    console.log(`updating status to ${arg.text}`);
    var status = document.getElementById("status");
    status.innerHTML = arg.text + "...";
});

// `setVersion` event
ipcRenderer.on("setVersion", (event, arg) => {
    var status = document.getElementById("version");
    status.innerHTML = arg.text;
});

// `setEdition` event
ipcRenderer.on("setEdition", (event, arg) => {
    var edition = document.getElementById("version");
    edition.innerHTML += ` (${arg.text})`;
});

// `setEnvRegion` event
ipcRenderer.on("setEnvRegion", (event, arg) => {
    var edition = document.getElementById("version");
    edition.innerHTML += ` -${arg.text}`;
});
The splash screen is treated as an io.Connect frameless window type which enables you to customize it with transparent areas or use irregular shapes for it.
Loaders
io.Connect Desktop comes with built-in loaders that can be replaced with custom ones.
Window Groups
If you have a custom Web Group App, you can provide your own loading animation for the io.Connect Windows in the <Group /> component.
If you are using classic groups (available only in the advanced platform mode), the loader for the io.Connect Windows can be set in the configuration for the available platform themes.
To specify a loading animation when using classic groups, use the "loadingAnimation" property of the object for defining a theme inside the "availableThemes" array under the "themes" top-level key in the system.json system configuration file of io.Connect Desktop:
{
    "themes": {
        "availableThemes": [
            {
                "name": "my-custom-theme",
                "displayName": "My Custom Theme",
                "description": "Custom theme for my platform.",
                "loadingAnimation": "./assets/my-custom-loader/loader.xaml"
            }
        ]
    }
}
9.0 Version Stream
If you are still using the io.Connect Desktop 9.0 version stream, the loader for io.Connect Windows can be set in the themes.json themes configuration file of io.Connect Desktop.
Use the "loadingAnimation" property of each respective theme in the themes.json file and specify a path to your custom XAML file. The path can be either absolute or relative to the <installation_location>/interop.io/io.Connect Desktop/Desktop/config folder:
// Custom loading animation for the "Dark" theme.
[
    {
        "name": "dark",
        "properties": {
            "loadingAnimation": "../custom/spinner.xaml",
        }
    }
]
Use the "loadingText", "loadingTextFont", "loadingTextFontSize" and "loadingTextColor" properties to add custom text to the io.Connect Window loader:
[
    {
        "name": "dark",
        "properties": {
            "loadingAnimation": "../custom/spinner.xaml",
            "loadingText": "My custom loader text.",
            "loadingTextFont": "Calibri",
            "loadingTextFontSize": 20,
            "loadingTextColor": "#eeeeee"
        }
    }
]
Workspaces
If you have a custom Workspaces App, you can provide your own loading animation for a Workspace in the <Workspaces /> component.
⚠️ Note that a Workspace, a window in a Workspace, and the Workspaces App itself have different loading animations. Currently, the
@interopio/workspaces-ui-reactlibrary provides means only for customizing the loading animation for a Workspace.
9.0 Version Stream
If you are still using the io.Connect Desktop 9.0 version stream, the loader for the default Workspaces App is the same as the one for window groups and can be set in the themes.json themes configuration file of io.Connect Desktop.
Layouts
The default loader for Layouts is an HTML file located in the <installation_location>/assets/loader folder which you can replace with your own custom one or edit it directly.
You can also provide custom configuration for it in the system.json system configuration file of io.Connect Desktop by using the "splash" property of the "layouts" top-level key.
The "splash" object has the following properties:
| Property | Type | Description |
|---|---|---|
"disabled" |
boolean |
If true, the Layout loader will be disabled. |
"height" |
number |
Height in pixels for the Layout loader. |
"title" |
string |
Title for the Layout loader. |
"url" |
string |
URL pointing to the location of the Layout loader. You can use environment variables. Defaults to "file:///%IO_CD_ASSETS_DIR%/loader/index.html". |
"width" |
number |
Width in pixels for the Layout loader. |
The following example demonstrates how to provide a custom loader and settings for it:
{
    "layouts": {
        "splash": {
            "url": "https://example.com/my-custom-loader/index.html",
            "title": "My Custom Loader",
            "width": 500,
            "height": 300
        }
    }
}
Product Texts
The io.Connect seed project configuration enables you to customize the product name and other product-related texts.
ℹ️ For more details, see the Developers > Seed Project > Configuration > Basic Settings section.
Alternatively, to change the product name, you can also use the "build" top-level key in the system.json system configuration file of io.Connect Desktop:
{
    "build": "My Custom Build"
}
ℹ️ For more details, see the Installer section.
To change the product name in the splash screen, you must modify the splash screen itself.
ℹ️ For more details on how to customize the splash screen, see the Splash Screen section.
9.0 Version Stream
If you are still using io.Connect Desktop 9.0, you can change the product name displayed in the following locations:
- Platform tray icon:
To change the product name displayed on hover over the io.Connect tray icon and in the tray icon menu, use the "build" top-level key in the system.json system configuration file of io.Connect Desktop:
{
    "build": "My Custom Build"
}- io.Connect Executable Description:
Since this information is compiled into the executable file at build time, the recommended approach is to send the name and description strings to the io.Connect team and they will be modified according to your requirements. Otherwise, use a tool for updating Windows executable resources.
⚠️ Note that this description is displayed in the Windows Task Manager by default.
- Installer UI:
The product name displayed in the installer can be changed only through the extensibility features of the installer app.
ℹ️ For more details, see the Installer section.
Icons
The built-in io.Connect Desktop icons are replaceable. The following icons can be replaced when building your platform via the seed project:
- the icon displayed when the default io.Connect Desktop launcher is pinned to the Windows taskbar;
- the io.Connect Desktop tray icon;
- the default Windows taskbar icon for apps;
- the Windows taskbar icon for io.Connect Window groups;
- the Windows taskbar icon for tab groups;
- the Windows taskbar icon for the Workspaces App;
- the icon for the io.Connect Desktop executable file;
⚠️ Note that most of the following sections are relevant only when using io.Connect Desktop on Windows. The macOS Dock displays only a single icon for an app irrespective of how many processes or windows are associated with it. The default platform icon displayed in the macOS Dock is named
logo.pngand is located in the<installation_location>/assets/imagesfolder.
9.0 Version Stream
If you are still using io.Connect Desktop 9.0, the default platform icons are located in the <installation_location>/interop.io/io.Connect Desktop/Desktop/assets/images folder and can be replaced directly in your bundle deployment. To customize the platform icons, replace them with your own files, but keep the file names.
ℹ️ For details on how to change the icons of the automatically created shortcuts when using the io.Connect Desktop installer app for deployment, see the Installer > Shortcuts section. For details on how to change the installer screen icons, see the Installer > Installer UI section.
Launcher
The default icon displayed when the io.Connect Desktop launcher is pinned to the Windows taskbar is located in the <installation_location>/assets/images folder and is named logo.ico. To customize this icon, replace it with your own file, but keep the logo.ico file name.
Tray
All tray icon variants for Windows and macOS are located in the <installation_location>/assets/images folder. To customize the platform tray icons, replace them with your own files, but keep the respective file names of the different tray icon variants.
For Windows, all tray icons are in ICO format. Icon variants are available for the different themes and for displaying alert badges. If there aren't any tray icons available for Windows, the logo.ico file will be used as a tray icon.
For macOS, the tray icons are in PNG format. Icon templates are available for tray icons with and without an alert badge. If there aren't any tray icons available for macOS and the tray menu isn't disabled, the platform will throw an error and won't initialize.
App Default
The logo.ico file located in the <installation_location>/assets/images folder is also used as a default Windows taskbar icon for interop-enabled apps. To change it, replace the logo.ico file with your own custom icon, keeping the name logo.ico.
⚠️ Note that the io.Connect launcher also uses this icon as its default Windows taskbar icon.
Window Groups
The default icon for io.Connect Window groups displayed in the Windows taskbar is located in the <installation_location>/assets/images folder and is named groups.ico. To customize this icon, replace it with your own file, but keep the groups.ico file name.
Alternatively, you can specify a custom icon by using the "groupIcon" property of the object for defining a theme inside the "availableThemes" array under the "themes" top-level key in the system.json system configuration file of io.Connect Desktop:
{
    "themes": {
        "availableThemes": [
            {
                "name": "my-custom-theme",
                "displayName": "My Custom Theme",
                "description": "Custom theme for my platform.",
                "groupIcon": "my-group-icon.ico"
            }
        ]
    }
}
⚠️ Note that the specified group icon file must be an ICO file and must be placed in the
<installation_location>/assets/imagesfolder.
9.0 Version Stream
If you are still using io.Connect Desktop 9.0, you can change the group icon from the themes.json themes configuration file of io.Connect Desktop. The io.Connect Window groups theme properties are located under the "group" key for each respective theme. Use the "icon" property and specify the name of your custom icon:
// Custom group icon for the "Dark" theme.
{
    "name": "dark",
    "properties": {
        "group": {
            "icon": "custom-group-icon.ico"
        }
    }
}
⚠️ Note that the specified group icon file must be an ICO file and must be placed in the
<installation_location>/interop.io/io.Connect Desktop/Desktop/assets/imagesfolder.
Tab Groups
To change the default icon for tab groups, go to the themes.json themes configuration file of io.Connect Desktop. The io.Connect Window groups theme properties are located under the "group" key for each respective theme. Use the "tabGroupIcon" property and specify the name of your custom icon:
// Custom tab group icon for the "Dark" theme.
{
    "name": "dark",
    "properties": {
        "group": {
            "tabGroupIcon": "tab-groups.ico"
        }
    }
}
⚠️ Note that the specified tab group icon file must be an ICO file and must be placed in the
<installation_location>/interop.io/io.Connect Desktop/Desktop/assets/imagesfolder.
Workspaces
The Windows taskbar icon for the Workspaces App can be set from the workspaces.json file located in the <installation_location>/interop.io/io.Connect Desktop/Desktop/config/apps folder. Specify an absolute or a relative path to your custom icon:
{
    "title": "Workspaces UI",
    "type": "workspaces",
    "name": "workspaces-demo",
    "icon": "../../resources/icons/workspaces.ico",
    "details": {}
}
The io.Connect logo icon displayed in the Workspaces App can be changed from the app itself.
ℹ️ For more details on how to customize the default Workspaces UI app or build an entirely new custom Workspaces App, see the Capabilities > Windows > Workspaces > Overview > Extending Workspaces section.
Executable File
The icon for the io.Connect Desktop executable file (io-connect-desktop.exe) is compiled into the app at build time. You can replace it when building your distribution package via the io.Connect seed project.
ℹ️ For more details, see the Developers > Seed Project > Customization > Modifications section.
9.0 Version Stream
The icon for the io.Connect Desktop executable file (io-connect-desktop.exe) is compiled into the app at build time and can't be changed without invalidating its Authenticode signature. For this reason, the recommended approach is to send your custom icon to the io.Connect team to include it in your customized build step. If that isn't possible, you can replace the icon using a tool for updating Windows executable resources. Keep in mind that if you update the executable file, you'll need to Authenticode sign it yourself, otherwise it won't have a valid signature, which might trigger warnings from Windows or antivirus software. For a general example on signing the executable file when using a bundle as a deployment option, see the Signing section.
Signing
⚠️ Note that this section is relevant only for the io.Connect Desktop 9.0 version stream.
ℹ️ For details on how to sign io.Connect Desktop 10.0 artifacts, see the Developers > Seed Project section.
If you make any changes to the io.Connect Desktop executable file (e.g., change the icon or metadata), you must sign it with an Authenticode signing certificate. This is necessary to prevent Windows or antivirus software warnings. The signing procedure is highly specific and depends on your certificate vendor and existing infrastructure. The following example outlines only the basic steps you must follow to sign the io.Connect Desktop executable file after applying your customizations. The example assumes that you would like to change the icon of the io.Connect Desktop executable file and that you are using a bundle as a deployment option:
Extract the bundled io.Connect Desktop installation at a preferred location and get the io.Connect Desktop executable file.
Change the icon of the executable file using your preferred tool.
Sign the executable file using your signing tool.
Follow your standard deployment procedures.
ℹ️ For an example of the general steps you must follow to sign the executable file and the installer app when using an installer as a deployment option, see the Installer > Signing section.
Launcher
To customize the styles of the Launchpad, use the CSS variables provided by the io.Connect themes.
Workspaces
To customize the styles of the Workspaces App, use the CSS variables provided by the io.Connect themes.
Window Groups
To customize the look and feel of the io.Connect web groups, add your own CSS styles that will override the default ones.
To customize the look and feel of the io.Connect classic groups, use the themes.json themes configuration file of io.Connect Desktop.
Modal Windows
To customize the styles of the modal windows, use the CSS variables provided by the io.Connect themes.
Notifications
The default app for handling io.Connect notifications can be customized visually or altogether replaced with your own custom Notifications App.
ℹ️ For more details on how to customize or replace the default notification apps, see the Capabilities > Notifications section.
Feedback Form
io.Connect Desktop has a built-in Feedback Form that allows users to send feedback with improvement suggestions or bug reports.
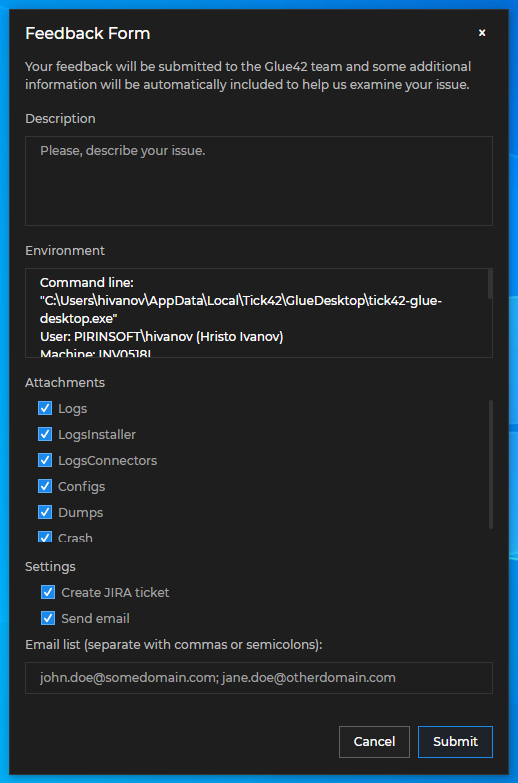
The Feedback Form can be entirely customized by using the @interopio/components-react library.
ℹ️ For more details, see the Capabilities > More > Features > Feedback Form > Extending the Feedback Form section.