Changelog
io.Connect Desktop 9.6
Release date: 11.11.2024
| Components | Version |
|---|---|
| Electron | 32.2.1 |
| Chromium | 128.0.6613.186 |
| Node.js | 20.18.0 |
Breaking Changes
Channel Restrictions
The
"preventModifyingRestrictionsFor"property of the"channelSelector"object under the"details"top-level key in the app definition now accepts an array of objects instead of an array of strings as a value. Each object in the array now allows you to specify the name of the Channel whose restrictions the user or the app won't be able to modify, as well as the type of the restriction - read or write.The following example demonstrates how to prevent the user and the app from modifying the read and write restrictions for the specified Channel:
{
    "details": {
        "channelSelector": {
            "preventModifyingRestrictionsFor": [
                {
                    "name": "Red",
                    "read": false,
                    "write": false
                }
            ]
        }
    }
}
Each object in the
"preventModifyingRestrictionsFor"array has the following properties:
Property Type Description "name"stringName of the Channel. "read"booleanIf true, the users and the app will be able to modify the Channel restriction for subscribing for data (manually from the Channel Selector and programmatically via the Channels API)."write"booleanIf true, the users and the app will be able to modify the Channel restriction for publishing data (manually from the Channel Selector and programmatically via the Channels API).
New Features
Interception API
Added an Interception API that enables your to register interception handlers from your apps in order to intercept low-level platform control messages for executing operations in the io.Connect API domains. The interception handlers can modify these messages in order to decorate the default operation implementations, prevent them, or replace them with your custom ones. The interception handlers can be invoked both before and after the execution of the default platform implementations of the intercepted operations.
To enable your apps to register interception handlers, use the
"interception"top-level key in thesystem.jsonsystem configuration file of io.Connect Desktop.The following example demonstrates how to enable interception for all apps:
{
    "interception": {
        "enabled": true
    }
}
The following example demonstrates how to register an interception handler for the
"raise"operation of the Intents API domain (invoked by theraise()method of the Intents API). The handler will be invoked during both interception phases - before and after the default platform implementation of the intercepted operation has been executed. In the"before"phase, the context data in theIntentRequestobject with which the Intent was originally raised will be modified. In the"after"phase, the result in theIntentResultobject returned from executing the default platform operation will be modified:// Specify which API domains and which operations within them to intercept. const interceptions = [ { domain: "intents", operation: "raise" // If an interception phase isn't explicitly specified here, the handler // will be invoked during both interception phases - before and after the default // platform implementation of the intercepted operation has been executed. } ]; // Handler that will be invoked when the targeted platform operation has been intercepted. // The handler will receive as an argument an `InterceptionMessage` object describing the intercepted operation. const handler = (message) => { const phase = message.phase; // Defining the behavior of the handler based on the current interception phase. if (phase === "before") { // Extracting the `IntentRequest` object with which the Intent was originally raised. let raiseIntentArgs = message.operationArgs[0]; // Modifying the context data with which to raise the Intent. raiseIntentArgs.context.data = { io: 42 }; // The modified operation arguments must be returned as an `InterceptionResponse` object with an `operationArgs` property. const modifiedArgs = { operationArgs: [raiseIntentArgs] }; // The execution of the default platform implementation will proceed with the modified arguments. return modifiedArgs; } if (phase === "after") { // Extracting the `IntentResult` object returned from executing // the default platform implementation for raising an Intent. let raiseIntentResult = message.operationArgs[0]; // Modifying the `IntentResult` object. raiseIntentResult.context.data = { io: 42 }; // The modified operation result must be returned as an `InterceptionResponse` object with an `operationResult` property. const modifiedResult = { operationResult: raiseIntentResult }; return modifiedResult; } }; // Configuration for registering an interception handler. const config = { interceptions, handler }; // Registering an interception handler. await io.interception.register(config);
Grouping Notification Actions
You can now create groups of notification actions. This enables you to assign multiple actions to a single notification button. Nested actions are displayed as a dropdown menu:
To group notification actions, use a combination of the
displayIdanddisplayPathproperties of theNotificationActionobject when defining an action. ThedisplayIdproperty must be set to a unique ID for the action. This ID can be used as a value in thedisplayPathproperty of another notification action to determine the position of the latter within the notification action menu.The following example demonstrates how to create a notification with a single action button that will have two nested actions as sub-items:
const options = {
    title: "New Trade",
    body: "VOD.L: 23 shares sold @ $212.03",
    actions: [
        {
            action: "edit",
            title: "Edit",
            onClick: () => { },
            // Unique ID for the action.
            displayId: "1",
        },
        {
            action: "copy",
            title: "Copy",
            onClick: () => { },
            // Using the ID of another action to specify the position
            // of this action within the notification action menu.
            displayPath: ["1"],
        },
        {
            action: "paste",
            title: "Paste",
            onClick: () => { },
            // Using the ID of another action to specify the position
            // of this action within the notification action menu.
            displayPath: ["1"],
        }
    ]
};

const notification = await io.notifications.raise(options);
Notifications Bulk Edit
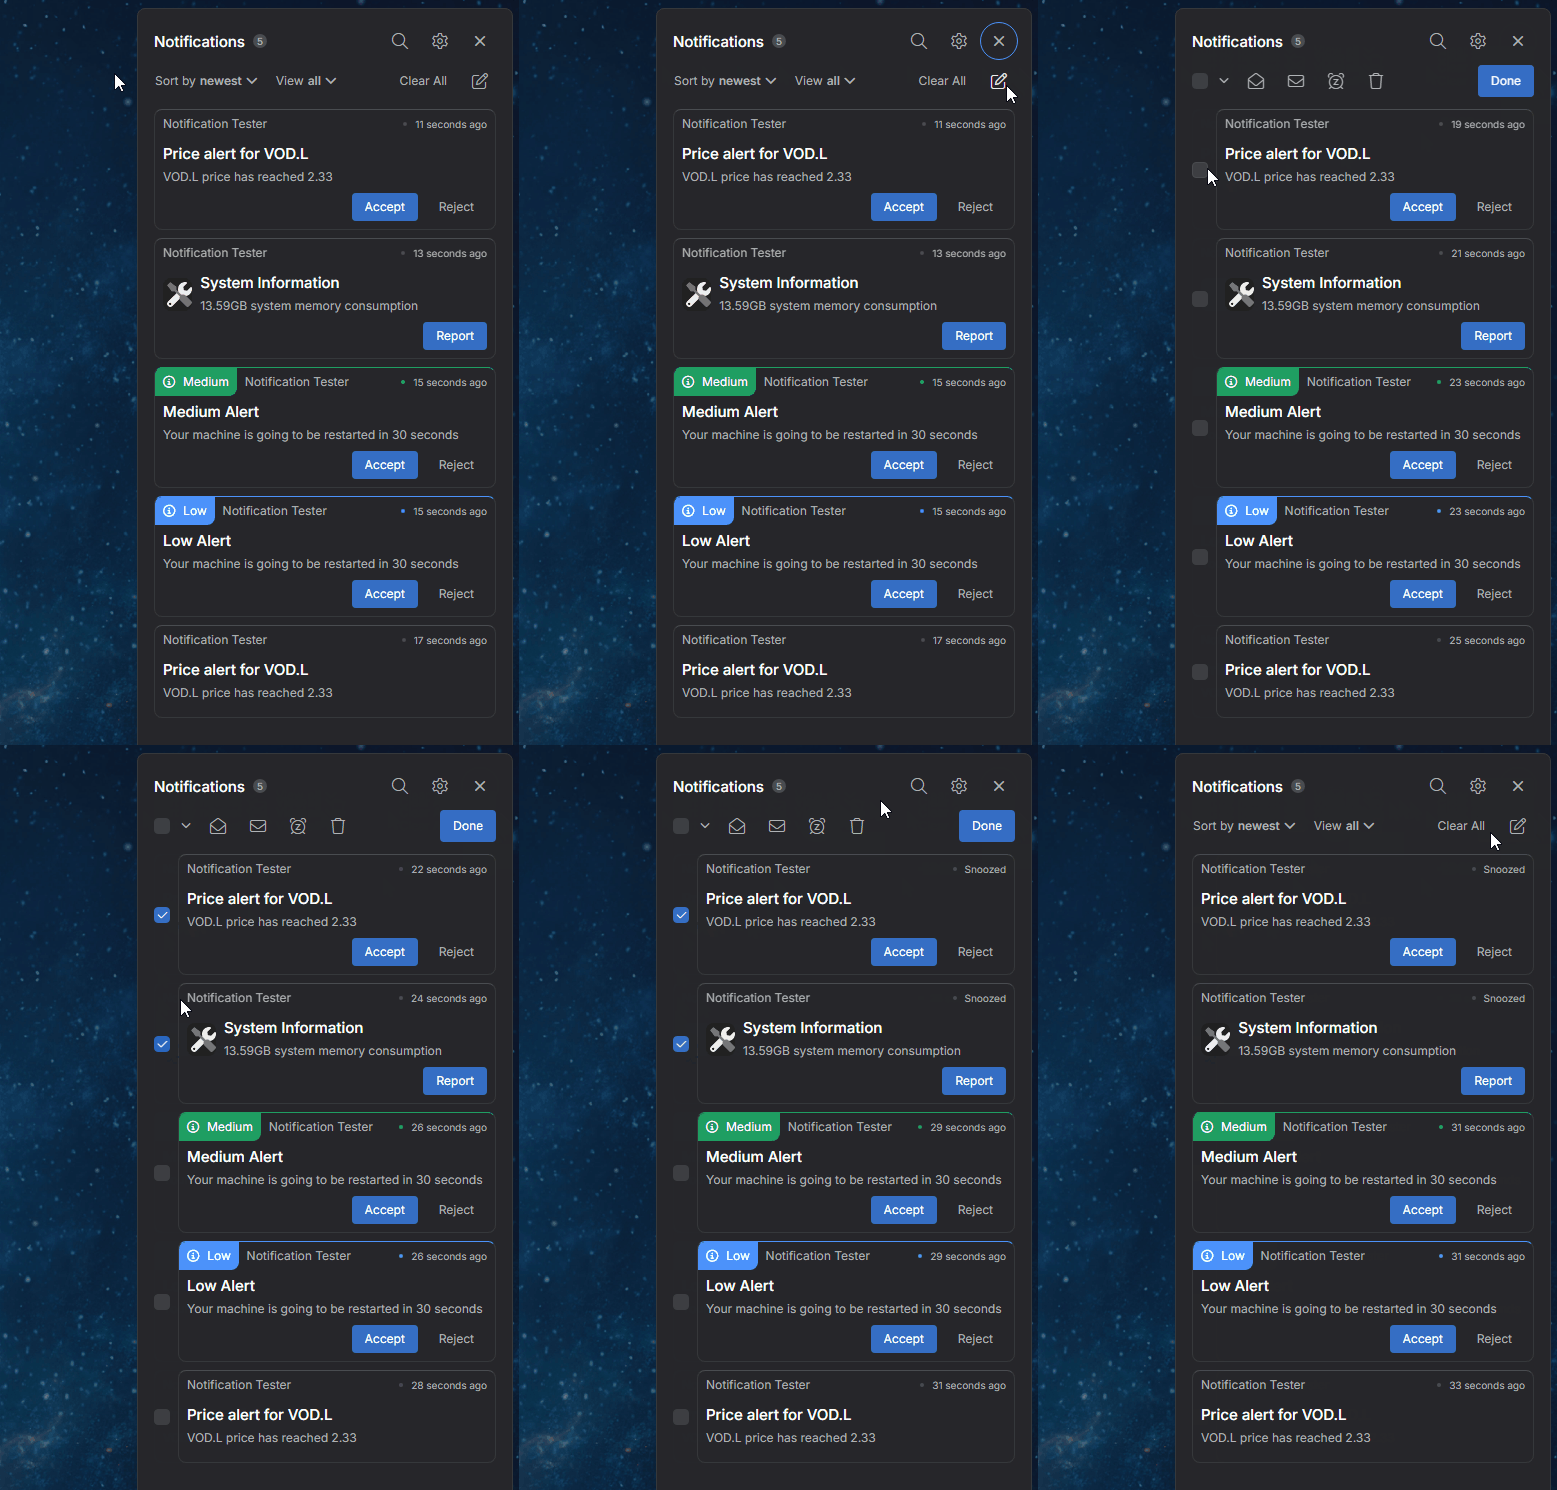
It's now possible to edit notifications in bulk in the Notification Panel. Click the "Bulk Edit" button, select the notifications you want to edit, choose the action (snooze, mark as read or unread, delete), and click the "Done" button:
Notifications API
Import
Importing notifications can be useful if you want to persist the notification history between user sessions. Even if the user shuts down the platform, you can dynamically import the previously saved batch of existing notifications when the user logs in again. All imported notifications will be visible in the Notification Panel and will be available in the notification list that can be accessed programmatically, but only notifications with state set to
"Active"will be displayed as notification toasts to the user. An event for a raised notification will be triggered for all imported notifications.To import a notification, use the
import()method and provide a list ofIOConnectNotificationOptionsobjects as a required argument:const notifications = [ { title: "New Trade", body: "VOD.L: 23 shares sold @ $212.03", state: "Active" actions: [ { action: "openClientPortfolio", title: "Open Portfolio" } ] }, { title: "New Trade", body: "VOD.L: 42 shares bought @ $211.73", state: "Seen" } ]; await io.notifications.import(notifications);Dismiss
By default, when the user clicks on a notification in the Notification Panel, the notification will close. To disable this behavior and allow clicked notifications to remain in the Notification Panel, set the
"closeNotificationOnClick"property of the"notifications"top-level key in thesystem.jsonsystem configuration file of io.Connect Desktop tofalse:{ "notifications": { "closeNotificationOnClick": false } }You can also configure this behavior programmatically by using the
configure()method:const settings = { closeNotificationOnClick: false }; await io.notifications.configure(settings);
Intents API
To get notified when Intent handlers are added or removed, use the
onHandlerAdded()andonHandlerRemoved()methods respectively on top level of the Intents API. Provide a callback function for handling the event:const handler = (intentHandler) => { console.log(`App "${intentHandler.applicationName}" was registered as an Intent handler.`); }; const unsubscribe = io.intents.onHandlerAdded(handler);To clear all previously saved Intent handlers, use the
clearSavedHandlers()method of the Intents API. To remove a saved handler for a specific Intent, use theclearSavedHandlerproperty of theIntentRequestobject when raising the Intent:const intentRequest = { name: "ViewChart", // Clearing a previously saved handler for this Intent. clearSavedHandler: true }; await io.intents.raise(intentRequest); // Clearing all saved handlers for all previously raised Intents. await io.intents.clearSavedHandlers();
Intent Resolver API
Exposed information about the initial calling app of the Intent Resolver UI via the
callerproperty of the Intent Resolver API. Thecallerproperty returns aResolverCallerobject holding the ID, name and title of the calling app:const caller = io.intents.resolver.caller;The callbacks passed to the
onHandlerAdded()andonHandlerRemoved()methods now receive anIntentInfoobject as a second optional argument which you can use to obtain details about the Intent that the app can handle.The
sendResponse()method now accepts aSendResolverResponseOptionsobject as a second optional argument. You can use this object to save the chosen Intent handler as a handler for the raised Intent. If the Intent Resolver UI was opened via thefilterHandlers()method instead of theraise()method, you also have to specify the name of the Intent for which the handler will be saved:const options = { saveHandler: true, // Providing the Intent name is necessary only when the Intent Resolver UI // was opened via the `filterHandlers()` method instead of the `raise()` method. name: "ViewChart" }; await io.intents.resolver.sendResponse(selectedIntentHandler, options);
Intent Resolver React Component
Added the
@interopio/intents-resolver-ui-reactlibrary which exports the<IOConnectIntentsResolverUI />React component that can be used to create an Intent Resolver App.To use the library in your project, execute the following command:
npm install @interopio/intents-resolver-ui-reactUsing the
<IOConnectIntentsResolverUI />component:import { createRoot } from "react-dom/client"; import IODesktop from "@interopio/desktop"; import IOConnectIntentsResolver from "@interopio/intents-resolver-api"; import IOConnectIntentsResolverUI from "@interopio/intents-resolver-ui-react"; // The default styles for the Intent Resolver App must be imported. import "@interopio/intents-resolver-ui-react/styles"; // Provide the factory function for the `@interopio/intents-resolver-api` library. const config = { libraries: [IOConnectIntentsResolver], // This is necessary for listening for app and instance events. appManager: "full" }; // Initialize the io.Connect API. const io = await IODesktop(config); const domElement = document.getElementById("root"); const root = createRoot(domElement); root.render( // Provide the initialized io.Connect API object to the component. <IOConnectIntentsResolverUI config={{ io }} /> );
Spellchecker
io.Connect Desktop now utilizes the built-in Electron spellchecker which is enabled by default. To provide settings for the spellchecker, use the
"spellchecker"top-level key in thesystem.jsonsystem configuration file of io.Connect Desktop:{ "spellchecker": { "enabled": true, "languages": ["en-US", "fr"], "dictionaryDownloadURL": "https://example.com/dictionaries" } }
Defining Critical Apps
You can now define apps as critical for the platform by using the
"critical"top-level key in the app definition. If a critical app fails to load, the platform will shutdown and display an error message:{ "name": "my-app", "type": "window", "critical": true, "details": { "url": "https://my-app.com" } }To mark dynamically started apps or dynamically created io.Connect Windows as critical, use the
criticalproperty of theApplicationStartOptionsor theWindowCreateOptionsobjects respectively:// Starting a critical app. const appName = "my-app"; const appStartOptions = { critical: true }; await io.appManager.application(appName).start(null, appStartOptions); // Creating a critical window. const windowName = "my-window"; const windowURL = "https://example.com"; const windowCreateOptions = { critical: true }; await io.windows.open(windowName, windowURL, windowCreateOptions);
Platform Cache
To set the location for storing files cached by io.Connect Desktop (preload files, injected CSS files, and app icons), use the
"location"property of the"platformCache"object under the"folders"top-level key in thesystem.jsonsystem configuration file of io.Connect Desktop:{ "folders": { "platformCache": { "location": "%LocalAppData%/my-custom-cache-location/" } } }The
"platformCache"object has the following properties:
Property Type Description "location"stringAbsolute path determining the location for storing the cached files. The platform will use this location to cache all preload scripts and injected CSS files defined in the system configuration and in the app definition files, as well as all app icons. You can use environment variables. Defaults to "%LocalAppData%/interop.io/io.Connect Desktop/UserData/%GLUE-ENV%-%GLUE-REGION%/cache".
Channel Selector UI
The Channel Selector UI now displays indicators when the window publishes data to a Channel, or only receives data from it. This functionality is available only for web groups and when a directional Channel Selector is enabled:
Channels API
The
dataobject in aChannelContextobject may now contain anfdc3property if FDC3 context data has been published to the Channel. This allows non-FDC3 interop-enabled apps to use FDC3 User Channel contexts more easily. The optionalfdc3property is an object with a requiredtypeproperty holding the type of the FDC3 context. This is valid for all methods of the Channels API that utilize theChannelContextobject in any way:// Example of accessing FDC3 context data by using the `get()` method. // The `ChannelContext` returned by `get()` will contain a `data.fdc3` property if FDC3 context data has been published to the Channel. const context = await io.channels.get("Red"); if (context.data.fdc3) { // The `type` property of the `fdc3` object is required. const contextType = context.data.fdc3.type; console.log(contextType); } // Example of subscribing for FDC3 context data by using the `subscribe()` method. // The `data` argument received by the callback will have an `fdc3` property if FDC3 context data has been published to the Channel. const handler = (data) => { if (data.fdc3) { // The `type` property of the `fdc3` object is required. const contextType = data.fdc3.type; console.log(contextType); } }; const unsubscribe = io.channels.subscribe(handler);The
publish()method of the Channels API now accepts also aPublishOptionsobject as a second optional argument. You can use it to specify the name of the Channel to update and whether the published data is FDC3 context data. This allows non-FDC3 interop-enabled apps to work with FDC3 contexts more easily:// FDC3 context data to publish. const data = { type: "fdc3.contact", name: "John Doe", id: { email: "john.doe@example.com" } }; const options = { name: "Red", // Specify that the published data is FDC3 context data. fdc3: true }; await io.channels.publish(data, options);The
get(),getMy(),subscribe(), andsubscribeFor()methods for retrieving and subscribing to Channel contexts now accept anFDC3Optionsobject as an optional argument. You can use this argument to specify the type of the FDC3 context in which you are interested. Theget()andgetMy()methods will resolve with an empty object if FDC3 context data of the specified type isn't available in the Channel. The callback passed to thesubscribe()andsubscribeFor()methods won't be invoked unless FDC3 context data of the specified type is published in the Channel:// Specifying the type of an FDC3 context. const fdc3Options = { contextType: "fdc3.contact" }; // Retrieving an FDC3 context of a specific type. const fdc3Context = await io.channels.getMy(fdc3Options); // Subscribing to an FDC3 context of a specific type. const handler = (data) => { // The `type` property of the `fdc3` object is required. const contextType = data.fdc3.type; console.log(contextType); }; const unsubscribe = io.channels.subscribe(handler, fdc3Options);
FDC3 Context Types
Updated the methods of the io.Connect Channels API to be able to send and receive FDC3 context data in order to facilitate using FDC3 User Channel contexts in non-FDC3 interop-enabled apps.
Improvements & Bug Fixes
Upgraded to Electron 32.2.1 (Chromium 128).
Increased the default timeout for the io.Connect Desktop splash screen from 2000 to 5000 milliseconds.
Improved the behavior of the native file drag and drop functionality.
Improved handling of creating web group windows when the display resolution is different from 100%.
Fixed custom tray appearing at wrong location when its window is resized.
Fixed not restoring the Workspaces Frame in the correct state.
Fixed the behavior of the
"combineIcons"property in the app definition for combining same app icons into a single icon in the Windows taskbar.


